Minicurso de xara x
XARA X
is a great program for creating simple or complex vector and bitmap
graphics. With simple menus, easy-to-use controls and editing tools,
Xara X makes it easy for professional and beginner designers to
produce professional quality images within a matter of minutes. We
recommend Xara X for your creation of your web and vector graphics.
|

Hace click
|
Gel Text
by
Gary W. Priester
with
Xara X |
|

Hace click
|
Layered graphic
by
Visicom Media
with
Xara X |
|

Hce click
|
Animation
by
Visicom Media
with
Xara X |
Gel texto
Step 1
For this tutorial, we will be using a font called
Valken which is available in the Xara X CD Fonts folder.
Select the "Text Tool" on the main tool bar on the left
side of the screen. Click on the screen to place the text
cursor on the page. Key in XARA. Select 72pt from the Size
drop down list on the Infobar at the top of the screen.
Step 2
Figure 1: Drag the text cursor over the text to
highlight it.
On the Infobar, click the right arrow next to the Tracking
text entry box (shown in red) until it reaches 100. This
increases the space between the characters.
Figure 2: Select the "Fill Tool" on the main
tool bar. (To select a tool, click it with the Selector
Tool--the arrow pointer).
Click the text with the Fill Tool to select it. From the
drop down list of Fill Types on the Infobar, select
'Linear'.
You will see an arrow that extends from the center of the
text to the right side of the text. This arrow is called
the Fill Path arrow. You can drag both ends of the arrow
to change the length of the linear fill as well as the
direction. Arrange the fill path so the black is on the
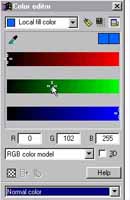
top and the white is on the bottom. Click on the small box
at the top of the arrow. Open the 'Color Editor' by
clicking the small color wheel icon to the left of the
screen color palette. Change the black to the RGB colors
shown above. The first value is for red, the second is for
green and the last is for blue.
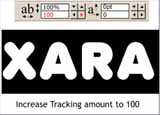
Figure 1 |
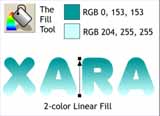
Figure 2 |
Step 3
Click the bottom square on the fill path and change the
values as shown. If you are not familiar with the 'Color
Editor', see the section below. Otherwise you may go on to
the next page.
When you open the Color Editor, if you only see half the
menu, click the small button just under the X to Display
Advanced Options.
From the drop down list of Color Models, select RGB Color
Model. If your values are expressed in percentages instead
of 0-255 you need to go to the Page Options dialog (Utilities
> Options) and select the Units tabbed section. Change the
Color Units: to 0-255. Press OK to close the dialog.
To modify colors, key in the values for each RGB component.
If you prefer to mix your colors you can use the HSV (Hue,
Saturation and Value) color model.
Step 4
Figure 1: Xara X supports multicolor gradient
fills. To add a color, simply drag a color from the screen
palette and drop it onto the fill path. Once the color is
on the fill path, you can slide it to a new position, and/or
modify the color in the 'Color Editor'. Add the color
shown in the center of the fill path. Make a duplicate
copy of the text (Ctrl D) We will need it in a few
minutes.
Figure 2: Xara's new "Bevel Tool" is a as much
fun as one can have and not get arrested.
Select the Bevel Tool, then click the text to select it.
From the drop down list of Bevel Types (on the Infobar),
select Rounded. Slide the Contrast slider to the right
until it reads 80. Click the icon with the four arrows
facing inward to create an Inner Bevel, and click the
inverted U icon to select Round Join. From the drop down
list of Slider Types , select Size. Change the size
setting to 10.
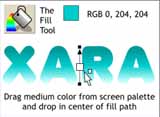
Figure 1 |
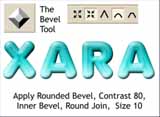
Figure 2 |
Step 5
Figure 1: From the Slider Types drop down list,
select 'Light Elevation'. Set the Light Elevation setting
to 80% by moving the slider to the right.
Figure 2: Select the "Contour Tool". Click the
duplicate text that you made a few moments ago to select
it.
Drag any of the red arrows towards the center of the text
to apply a basic contour. Click the small icon on the
Infobar with the inverted U to apply a Round Join. Change
the Size of the contour to 8.0. Change the Number of Steps
to 1. Press Enter on your keyboard to apply the Steps
change. Finally press the Insert Path icon (shown top
right) on the Infobar. This eliminates everything but the
inner contour.
Figure 3: Using the "Selector Tool", position
the contoured text over the beveled text as shown. Change
the fill color to white by pressing the white color square
on the screen palette with the left button (the right
applies the outline color).
You can use the arrow keys on your keyboard to move the
contoured shape as well. Hold down the Alt key to move a
tiny amount.
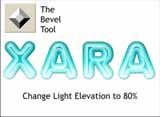
Figura 1 |

Figura 2 |

Figura 3 |
|
|
|
Step 6
Figure 1: Select the "Transparency Tool" on the
main tool bar.
Click the contoured shape to select it. From the drop down
list of Transparency Shapes on the left side of the
Infobar, select, Linear. Reposition the fill path
arrow so the non transparent end is on the top and the
transparent end is on the bottom. Extend the top and
bottom of the fill path arrow slightly above and below the
contoured shape.
Figure 2: Select the beveled text and the
transparent highlight by holding down the Shift key on
your keyboard while clicking each object.
From the 'Arrange' pull down menu, select 'Create Bitmap
Copy...' in the 'Create Bitmap Options' dialog, select 'True
Color' from the Color Depth drop down list. Press 'Create'
to create the copy. The bitmap copy is now placed in the
exact center of your screen.
Note to CorelDRAW users: Unlike CorelDRAW which
permanently changes your image into a bitmap, the original
vector image remains in Xara and can still be edited.
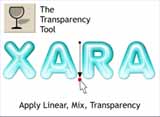
Figura 1 |
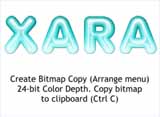
Figura 2 |
Step 7
For this next step, we'll be using a cool little Xara
helper called SL Blur to blur the bitmap copy we
just created.
Click here to download a free copy in the XaraXone
Shareware page.
Copy the bitmap to the clipboard (Ctrl C or Edit > Copy).
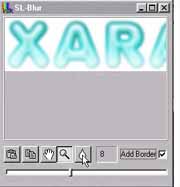
Minimize Xara, and open SL Blur. The entire application is
what you see here on the left. Press the clipboard icon on
the left to paste the bitmap into the editing window.
Move the slider to about 8. Check the 'Add Border' check
box. Press the water drop icon to apply the blur. Press
the Copy icon (to the left of the hand icon) to copy the
bitmap to the clipboard. We are done with SL Blur.
Step 8
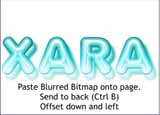
Return to the Xara window. Select 'Paste' from the 'Edit'
pull down menu to retrieve the bitmap. A dialog will
appear asking how you want to paste the bitmap copy. Chose
the first option, 'Bitmap' and press 'Paste'.
Send the bitmap to the back (Ctrl B ) and offset it down
and to the right as shown.
Step 9
Figure 1: Duplicate the bitmap using 'Ctrl K'
(Clone) which places the duplicate exactly on top of the
original. Select the "Transparency Tool" and apply a 'Flat,
Stained Glass transparency' (select Stained Glass from the
drop down list of Transparency Types). When we duplicate
the bitmap, Xara automatically places it on top. When we
add the Stained Glass transparency, it creates the
illusion that the text is transparent.
Figure 2:Select the white highlights (the
Contoured shape) and bring it to the front. (Ctrl F)
NOTE: The highlight is beneath the bitmap. To
dig down through the layers, hold down the Alt key on your
keyboard and click over the highlight. The status bar, at
the bottom left of the screen, will first show Bitmap and
then 1 Shape.
Duplicate the highlight (Ctrl K) and change the
Transparency Type to 'Luminosity'. This makes the
highlight a little bit brighter.
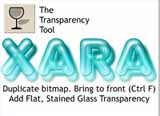
Figure 1 |

Figure 2 |
Step 10
Here is the final effect. I placed a white marble fill
(from Xara's Fill images on the CD) behind the objects.
This enhances the transparency effect.
|
|
|
Layered Graphic
|
Many documents often use one layer but it is possible to
create new layers if you need them. In this tutorial, we will
create different shapes and background that are controlled
with layers.
Step 1
Create a new "Drawing" document: (File > New > Drawing).
By using the 'Freehand and Brush Tool', draw a form in the
shape of a heart. As the first attempt is usually not
perfect, click on the 'Shape Editor Tool', adjust the
shape by dragging the point handles (Figure 1). Fill with
color. add a shadow to the shape by clicking the 'Shadow
Tool'. The first image (the one with the shadowed-heart
shape) is per default in Layer 1 (figure 2).
Figure 1 |

Figure 2 |
Step 2
Figure 1: Add a second layer: (Utilities >
Gallery > Layer Gallery).
Click on "New" tab. Leave the name to "Layer 2".
Figure 2: Add a few coloured stars. The star shape
is available in the 'Quick Shape Tool'. Create one star
with the size you like and fill with color. To produce
more stars, duplicate the one you have just created: (Edit
> Duplicate) or press Ctrl-D. Place the stars over the
heart. Then group them: press Shift and select each stars,
from the menu, click 'Arrange' and choose 'Group'.
Figura 1 |

Figura 2 |
Step 3
Add a background: click on 'Fill gallery' icon
 In the Fill gallery window,
select 'Get fills...' tab, select 'Stone' and click on the
graphic 'Stone9.jpg'. Drag the graphic outside of the
windows and place it over the heart. To place the
background behind the heart: (Arrange > Move Backwards). In the Fill gallery window,
select 'Get fills...' tab, select 'Stone' and click on the
graphic 'Stone9.jpg'. Drag the graphic outside of the
windows and place it over the heart. To place the
background behind the heart: (Arrange > Move Backwards).
Step 4
In summary, Layer 1 contains the heart-shaped
image,
Layer 2 contain the stars,
and Layer 3 contains the Stone9.jpg background.
Open the Layer gallery dialog box (Utilities > Galleries >
Layer gallery). Test the layers function by clicking the
check boxes under the eye icon. As you can see, you can
show or make disappear layers as you wish. Layers are very
useful if you work with a complex graphic.

Figura 1 |
Figura 2 |
|
|
|
|
This tutorial is to show how simple it is to create an
animated text with Xara X.
Step 1
To create an animation, open the document as Animated:
(File > New > Animation). Animated files are made of
frames. The first text will be in Frame 1.
Open the Frame Gallery: (Utilities > Gallery > Frame
Gallery). Click on "Properties". In the 'Frame' tab, set
'Local delay' at 25.
Step 2
Click on the 'Text Tool' (F8). Type your text (here I
type "GO"). To change the text font: select 'Selector Tool',
click 'Fonts Gallery' icon
 located at
the top right of the application. Choose the font you like
and click 'Apply' to validate the choice. To change the
color, click the 'Color Editor' icon located at
the top right of the application. Choose the font you like
and click 'Apply' to validate the choice. To change the
color, click the 'Color Editor' icon
 located at
the left bottom of the application. To add a shadow effect,
click the 'Shadow Tool' and drag it where you want the
shadow appeared. located at
the left bottom of the application. To add a shadow effect,
click the 'Shadow Tool' and drag it where you want the
shadow appeared.
Step 3
The next step is to create the second part of the
animation. In the Frame gallery dialog box, click on 'New'.
Adjust 'Local delay' in 'Properties' to 40.
Select 'Text Tool' and drag the cursor where you want
to type the second text. To change font and color, follow
instructions in step 2.
Step 4
Preview the animation: (Utilities > Animation > Preview
all Frames). If you wish to slow or fasten the animation,
change the time set in 'Local Delay' in the propreties of
each frames. Once satisfied, save the graphic as a .GIF:
(File > Export Animated GIF). The graphic is ready for a
web use.
|
|
|
THE END
|