Minicurso de xara3d parte II

Boton

 
Xara3D lets you create 3D buttons in seconds. And you can even animate them. This page describes creating a rectangular button but you can create a range of other button shapes in the same way. We show you how to create an example button and give you the values we used to create the example shown. For your own buttons, you can try different values to give different results.

Step 1

First stage is to type in the text you want your button to show. We've used Button.
 

Step 2

Next step is to tell Xara3D we want a button. Click to display the Button Options dialog box:


On this dialog box select "Button". This creates a button displaying the word Button:


The button takes the color and angles of the text but other settings (such as bevel) are default values.

Step 3

Next we want to change the button options. The default button shape is "Rounded" (when stretched by 200% it becomes an ellipse). Let's change the shape. We used "Rounded rectangle" and 100% Stretch (to make a rounded square):
 

Step 4

Last thing we want to show is changing the corner curvature. 100% is the curvature selected by the designer of the button shape. Make it smaller for sharper corners or larger for more rounded corners:
 

(This example uses 50% corners.) Increasing the radius too much create an ellipse. You can deselect "Corners" if you want to check the effect of different values against the original value.

Step 5

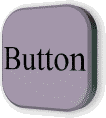
You can change the angles, colors, bevels etc. for buttons in the regular way. For this example we changed the button angle to 0º 52º 0º, used an extrude depth of 15, used a Round Incut bevel with a depth of 60, moved light 1, and changed the text color to dark blue:
 

And that's it - you've created a 3D button. As well as 
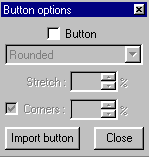
the set of predefined button shapes, you can also click "Import button" on the Button options dialog box for further shapes from the Buttons folder.


Hosted by www.Geocities.ws

1