|
Curso de Paint Shop Pro
(PSP)
11 Texto Limoso
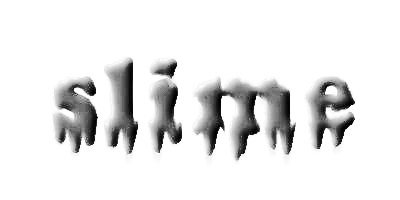
Step 1 Start out by opening a new file, 400 pixels
wide by 200 high, with a white background and 16 million colors. Set
your foreground color to gray (RGB 192/192/192). Choose a font with some
width to it and add some text. Here I've used Arial Black, 48 pt.
Deselect the text by hitting Ctrl-D.
Step 2 Now select the Retouch Tool (the little
pointing finger). Choose Smudge and set the size to 20, the brush shape
to round, the Opacity to 80, Density to 100, Step to 1, Hardness to 50,
and the paper texture to None. Pull oozing drops down from the bottoms
of each letter. Then use the tool to deform any straight edges that
remain.
Step 3 Next we add some three dimensionality to the
project. Then use the Select tool with a tolerance set to 35 to reselect
the lettering. To select all the letters at once, hold down the shift
key while you click on each one. Once you have all the text selected, go
to Selections: Float. Next, in the Image Menu, select Effects: Cutout.
Set the opacity to 70, the blur to 14, the shadow color to medium gray (RGB
128, 128, 128), and the vertical and horizontal offsets to -3. Be sure
that the 'Fill with Color' box is Unchecked.
Step 4 Okay, we have some shadows, now we need some
highlights. Repeat the cutout procedure, but this time set the shadow
color to white and the vertical and horizontal offsets to 3.
Step 5 Now the image needs a bit more depth. Go to
the color menu, Histogram: Equalize.
Step 6 This is a bit too light for the effect we
want, so we're going to darken it a bit. Go to Color, Adjust: Hue,
Saturation, Lightness. Set Hue and Saturation to 0 and Lightness to -50.
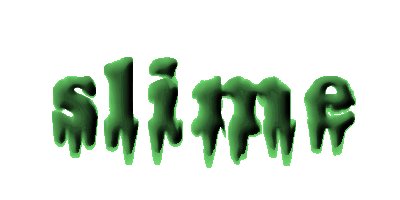
Step 7 Now we're ready for some color. Go to the
Color Menu, Adjust: RGB. Set Red and Blue to 0, and Green to 100.
Step 8 We're almost there; all we need now is the
glowing slime. Go to the Window menu and choose Duplicate. This should
open up a new file identical to the one we've been working with. The
text should even still be selected in the new window. Using this new
file, Go to Colors, Adjust: Brightness and Contrast. Set the Brightness
to -5, and the Contrast to 75.
Step 9 Now go to Image,Blur: Blur. This evens out
the colors a bit. Next, we're going to cut and paste a bit. Go to the
Edit Menu: Copy. Set your background color to black, and then return the
original image. Go to the Edit Menu and select Paste as a Transparent
Selection. The bright green Slime should now appear in your graphic.
Position it atop the original lettering and there you have it. To use
the image on your webpage, set the background color to white, and save
as a transparent GIF file.
Espero que les sirva de algo
la ayudita
|
|
|