|
Curso de Paint Shop Pro
(PSP)
07 Texto Fuego
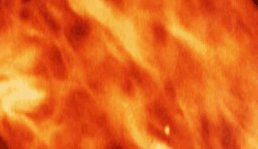
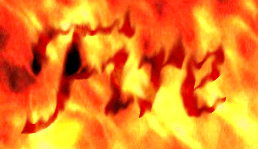
Step 1 This effect gives text that appears to be
made out of flame. To do this technique, you will first need to download
the texture called realfire.jpg. The texture is actually 480 x 480
pixels. A reduced version is shown below. To get the real file, click on
the fire texture and download it.
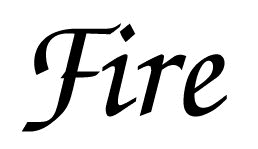
Step 2 Open a new file, 250 pixels wide by 150 high,
16 million colors, with a white background. Select Black as your
foreground color and add some text. Use a font with some flow to it.
Some fonts look better if you use italics. Here I've used a font called
Invitation, 72 point Bold. After you've added your text, go to the
Selections menu and choose Promote to Layer.
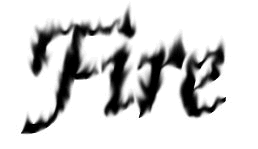
Step 3 Next choose the retouching tool (the little
pointing finger.) In the Controls palette set it to Smudge, and under
Brush Tip set the shape to Round, the Size to 13, the opacity to 50, the
Hardness to 0, the Density to 100, and the Step to 1. Use the Smudge
tool to make little flames by pulling up. Be sure to roughen all the
edges. When you're done, it should look something like this:
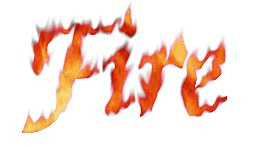
Step 4 Now we add the flames. Open up realfire.jpg
in PSP and in the Edit menu, select Copy. Now return to your project and
in the Edit menu, select Paste: As a New Selection. This should fill
your entire window, but don't worry. Using the Move tool, adjust the
flames so that the part you like best is directly over your text. Now go
to the Selections menu, and again choose Promote to Layer.
Step 5 Next, to get the effect we want, go into the
Layers menu and choose Layer Properties. Set the Blend Mode of your new
layer to 'Lighten'. Your text should appear filled with your flame. At
this point you might want to save your graphic as a PSP file, which
preserves the layers. This is also a very convenient place to change the
background color to best match your page. This can be done by simply
changing the color of the Background Layer.
Step 6 Now we want to sharpen it up a bit and
prepare to save as a transparent GIF. First go to the Layers menu and
choose Merge:Merge All. Then go to Image,Sharpen: Sharpen more.
Step 7 To finish, set your background color to
white, and then go to the Color menu and select Set Palette Transparency.
Set the Palette Transparency to the Current Background Color, and then
save your file as a transparent GIF.
Espero que les sirva de algo
la ayudita
|
|
|