|
Curso de Photoshop 6.0
46 Lineas
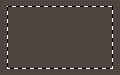
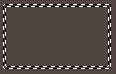
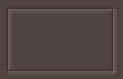
Step 1 Open a new document (Ctrl+N) with a dark background. Create a new
layer (Shft+Ctrl+N). Use the Marquee tool to create a box of your choice.
Step 2 Go to Select> Modify> Border and set the Width to between 2 - 3
pixels. Step 3 Fill the inside of the border with the background color. Then go to
Image> Adjust> Brightness/Contrast. And using the slider set the
Brightness to +100 . Step 4 Now use the arrow keys to move the selection up 1 pixel and left 1
pixel. Once again go to Image> Adjust> Brightness/Contrast. And using
the slider set the Brightness this time to -100 . Press (Ctrl+D) to
Deselect.
Espero que les sirva
de algo la ayudita
|
|
|