Curso de Photoshop 6.0
34 Menú 3D
Photoshop 5.0 or greater and the eyecandy plug-in [download
demo] are needed to create this type of menu.
Without Alien Skin's plug-in, eyecandy, it is possible to
follow this tutorial, but the result will not be the same...
not quite as "beautiful".
Step 1
Open a new document at 640 x 480 pixels (File> New)
with a transparent background color. Draw a shape with 4
angles (or more if you like) by using the Path tool ( ). ).
Step 2
Once the shape is created, select this tool
 in the Path section, and draw
rounded shapes, from the points out to the image border.
Once you're done and have the desired shape, with the Path
tool ()
right-click the mouse button to display the menu. Select:
Fill Subpatch. You will get a menu with these options:
Foreground Color, Background Color ... Select: Fill with
Foreground Color (the color in the menu tools will fill
your shape), as seen in the image below. Once the image is
full, create a new layer (Layer> New> Layer). Draw an
elliptical shape in your new layer. Fill the elliptical
shape (Edit> Fill: with the same Foreground color as the
first shape, or another, it's up to you). in the Path section, and draw
rounded shapes, from the points out to the image border.
Once you're done and have the desired shape, with the Path
tool ()
right-click the mouse button to display the menu. Select:
Fill Subpatch. You will get a menu with these options:
Foreground Color, Background Color ... Select: Fill with
Foreground Color (the color in the menu tools will fill
your shape), as seen in the image below. Once the image is
full, create a new layer (Layer> New> Layer). Draw an
elliptical shape in your new layer. Fill the elliptical
shape (Edit> Fill: with the same Foreground color as the
first shape, or another, it's up to you).
Step 3
Now add a bevel emboss effect (Layer> Effects> Bevel
Emboss) to the elliptical shape.
Set options to the following (see below):
Step 4
Do not forget to check the "down" option to get a
perfect effect. Once done, still on the elliptical shape's
layer, add an inner shadow effect (Layer> Effects> Inner
Shadow). The simple steps are done!! You should get a menu
similar to the one shown below, on the right. If it is not
the same, repeat from the start ... (when I say the same,
I am referring to the effect, not the shape).

Step 5
From this step on, we need the Alien Skin's eyecandy
plug-in. Download the demo [Here],
though I really suggest you buy the complete version, ...this
plug-in is simply one of the best! It provides various
handy effects. For example, eyecandy has a plug-in for an
exceptional flame effect. Anyway, enough about eyecandy!
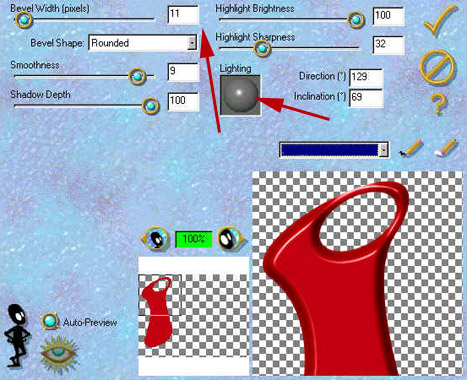
Let's get on with our tutorial!! You need to apply
eyecandy's "inner bevel" filter (Filter> Eye Candy 3.01>
Inner Bevel). Choose the same options as shown below, pay
attention to the arrows, they are very important elements:
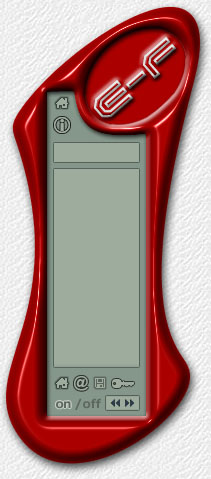
Step 6
Once the effect is applied, you're "done"! You will
have the same menu as the one on the left. Of course, you
can change colors, effects ... everything comes with
practice and tons of ideas! In time, you will be capable
of creating menus such as the one on the right, below.
|
|
|
Espero que les sirva
de algo la ayudita
|

