|
Curso de Photoshop 6.0
28 Efecto
Resaltado
Step 1 Firstly, open up a new image, with a dark background, this tutorial
does not work with a white background, not sure with light colored
backgrounds, but use a black background just to stick with the tutorial
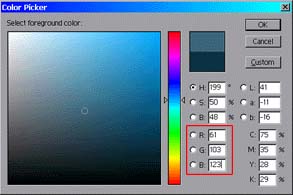
so you can understand how to create this effect. Make your foreground
color the following: R:61 G:103 B:123 - If you don't know where
to do this, look on the screenshot below, fill in the correct numbers in
the area where I highlighted, the red box. Step 2 After that's your color, make your text that color. To do that,
render your text, and check 'Preserve Transparency'. Then fill with
foreground color. Now on your text, duplicate it 3 times: Layer>
Duplicate Layer. On the topmost layer, the duplicated copy, go to:
Filter> Blur> Gaussian Blur: Radius of 3. Duplicate the blurred layer 3
times, until you have a total of 4 blurred layers. Now with the original
text layer, you still have 3 of those remember? When we duplicated it 3
times, and used one for blurring, you should still have 3 original
layer's that haven't been blurred leftover. Step 3 Using the copy of the original text layer, move it in the middle of
the blurred layers, so it should have 2 blurred layers on top of it, and
2 blurred layers on the bottom of it. In Layer Options : Change the
blurred layer's all to Color Dodge, and change that middle layer that's
not blurred into Multiply. The 2 original text layers you still have
below will need to be blurred now. Blur both of them with 'Gaussian blur',
with a radius of 3. If that doesn't show the text effect right, then
undo those blurs and blur them 1 pixel more. Step 4 You should see the effect now! You got the text effect nailed down.
Your layer formation should be like mine:
Espero que les sirva de algo
la ayudita
|
|
|