Curso de Photoshop 6.0
25 Efecto
3D
Step 1
Create a new file: File> New. I made mine Width=400,
Height=400 pixels. Create a new layer and use the
Selection tool to create the outline of your object. I
made mine an Oval like in my Oval Interface.
Step 2
Click the 'Channels' tab and create a new channel. Make
sure you still have your object shape selection visible.
Fill this selection with white: Alt-E> L, White. Then
deselect: Ctrl-D.
Now use the Selection tool to choose any areas in your
object that will be hollowed out or indented. Fill with
Black. Control-Click the channel then save the selection:
Select> Save Selection.

Step 3
We need to makes sure the edges are smooth. Ctrl-D
deselects everything. Then do a Gaussian Blur: Filter>
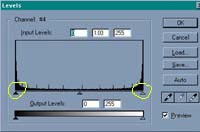
Blur> Gaussian Blur> Radius = 3. Ctrl-L brings up the
level adjustor. Notice the 3 triangles under the levels
window? Drag the left and right triangles towards the
middle one until the object edges are smooth.
Step 4
Control-click Channel 4 selects all the white areas of
the channel. Do a series of Gaussian blurs Radius 10 , 6 ,
4 , 2 , 1. Then Ctrl-D to delselect and do one more
Gaussian Blur Radius 1.
Step 5
Select> Load Selection - the one you saved a while ago,
Click the Layers Tab. Click Layer 2. Fill the selection
with a color, texture, or gradient. Ctrl-D Deselects. Use
lighting effects: Filter> Render> Lighting Effects>
Texture Channel = 4, and there ya have it! .

|
|
|
Espero que les sirva de algo
la ayudita
|

