Containers Layouts Widgets
- button
- checkbox
- combo
- label
- list
- menubar
- radiobutton
- splitpane
- table
- textfield
- textarea
- toolbar
- tree
Layouts -> GridLayout
A GridLayout places components in a grid of cells. Each component takes all the available space within its cell, and each cell is exactly the same size. If you resize a frame (or a container) with a GridLayout, you'll see that the cell size changes so that the cells are as large as possible, given the space available to the container (Source: Java Tutorial).
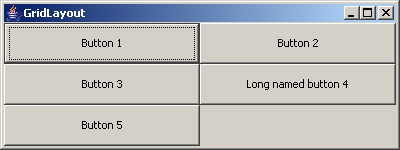
The code that generated the above frame is:
alias gridlayout {
  $gf = frame("GridLayout", 'size=400 150');
  $gp = panel($gf, 'layout=Grid 3 2');
  add($gp, button('Button 1'));
  add($gp, button('Button 2'));
  add($gp, button('Button 3'));
  add($gp, button('Long named button 4'));
  add($gp, button('Button 5'));
  show($gf);
}
In the above image, 'Button 1', 'Button 3', and 'Button 5' are all in the first column. 'Button 1' and 'Button 2' are both in the first row, 'Button 3' and 'Long named button 4' are in the second row, and so on. See below for explanation of columns and rows. You might also notice that there is no need to fill up all the cells of the grid.
Syntax
The syntax to setup the grid layout to a container is:
$p = panel('layout=grid rows cols [hgap vgap]');
rows and cols of course refer to the number of rows and columns of your grid, and the hgap and vgap are horizontal gap and vertical gap (in pixels), respectively. Gaps mean the number of pixels between the cells. The default value of the gap is 0. These values are optional but the rows and columns MUST be specified.
- End of page -