Containers Layouts Widgets
- button
- checkbox
- combo
- label
- list
- menubar
- radiobutton
- splitpane
- table
- textfield
- textarea
- toolbar
- tree
Layouts -> FlowLayout
FlowLayout arranges components from left-to-right and top-to-bottom, centering components horizontally with a five pixel gap between them. When a container size is changed (eg, when a window is resized), FlowLayout recomputes new positions for all components subject to these constraints. (Source: Java Notes)
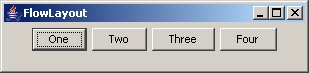
The image below shows how the components would initially appear in a frame with a FlowLayout.
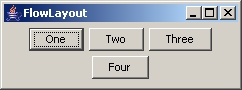
When the frame is resized, the buttons are also readjusted as shown below.
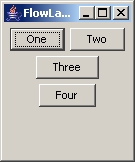
It doesn't matter how you resize the frame, the components will still follow a "natural flow" as can be seen in third image below.
Syntax
To set the layout of a panel, either of the following can be used:
$p = panel('layout=Flow alignment');
$p = panel('layout=FlowLayout alignment');
$p = panel('layout=flow');
The alignment argument can be LEADING, CENTER, or TRAILING. LEADING specifies that the components be left-aligned and TRAILING specifies right alignment (Source: Java Tutorial). The alignment is optional and the default is CENTER. Take note that this is not case-sensitive so you can actually use 'layout=flow leading' (as an example).
The image below shows a frame with three boxpanels stacked on top of each other with the different flowlayout alignments.
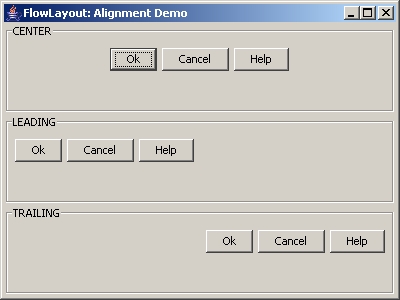
The alias below shows how the above frame was created. The bolded text shows how the flowlayout was set up for each boxpanel. Take note that the buttons do not really do anything.
alias flow {
  $f = frame('FlowLayout: Alignment Demo', 'size=400 300');
  $p = panel($f, 'layout=Grid 3 1');

  $p1 = boxpanel('title=CENTER', 'layout=Flow CENTER');
  $p2 = boxpanel('title=LEADING', 'layout=Flow LEADING');
  $p3 = boxpanel('title=TRAILING', 'layout=Flow TRAILING');

  $ok     = button('Ok');
  $cancel = button('Cancel');
  $help   = button('Help');

  foreach $var (array($p1, $p2, $p3)) {
    add($p, $var);
    add($var, $ok);
    add($var, $cancel);
    add($var, $help);
  }
  show($f);
}
- End of page -