Cameras |
|
17 |
Cameras |
Cameras are objects that you use to view a scene. A modeling window represents the view from a camera. This view is used to create an image of your scene during rendering. In This Section:
Camera Overview |
|
| |
A camera represents a particular view of your scene. By changing the position and orientation of a camera, and the properties of the camera's lens and film, you can control the camera's view. A modeling window represents the view of a particular camera. Each modeling window has an associated camera, but each camera does not necessarily need to have an associated modeling window.
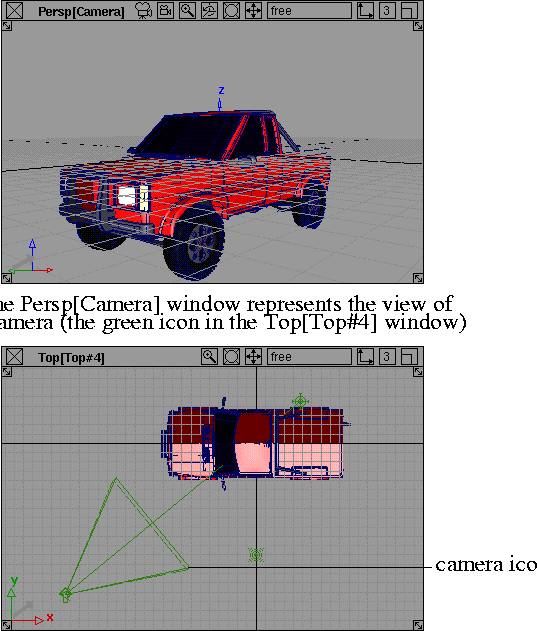
There are two types of cameras: orthographic and perspective. The view from an orthographic camera does not include the effect of perspective. That is, an object will appear the same size no matter how far it is from the camera. The view from a perspective camera includes this effect; an object will appear larger when it is close to the camera, and smaller when it is far from the camera. A single scene may contain several cameras. For example, by default a scene contains four cameras corresponding to the four modeling windows: top, front, right, and perspective (camera). You can render the view from one or several of the cameras in a scene. In some cases a modeling window may not represent the exact view of a camera. For example, if the aspect ratio of the film back does not match the aspect ratio of the camera's modeling window, then the window will only show a portion of the camera's view (see Film Back Properties on page 335). Another example is the magnify window which represents a magnified view of a modeling window (see Magnify in the Basic Tools in Alias book). A perspective camera appears in the SBD and ASBD windows as a group of nodes representing the camera's position (eye point), view (look at point), and up point. You can also display perspective cameras in the orthographic modeling windows as a green icon. Orthographic cameras do not appear in the SBD and ASBD windows unless the camera has an image plane.
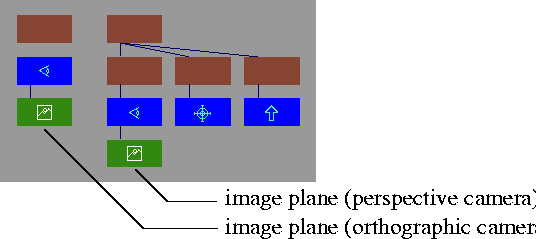
Image PlanesAn image plane is an image that you can attach to a camera's view. This image appears in the camera's modeling window and in images rendered from that camera (either in front of or behind the scene). Any camera can have one or several image planes. For example, you could use an image plane as a visual reference when building a model, or as a background for your scene when rendering.
An image plane appears in the SBD and ASBD windows beneath the camera's eye node. This it is not a hierarchical grouping, however. Any transformations you make above the eye node do not affect the image plane. If you add an image plane to an orthographic camera, the orthographic camera appears in the SBD and ASBD windows with the image plane beneath its eye node.
Using Cameras | |
|
| |
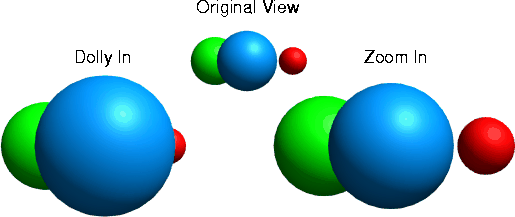
You use cameras to generate views for modeling windows and to generate views to render. Creating or Copying a CameraYou can create a new camera by selecting Layouts > New camera (see Creating New Windows in the Basic Tools in Alias book). You can copy an existing camera using the Clone tool (see Cloning the Current Window in the Basic Tools in Alias book). Displaying Camera IconsYou can control whether camera icons are displayed in the orthographic modeling windows by selecting DisplayTgls > Object Toggles > Camera (see Changing the Display of Cameras in the Basic Tools in Alias book). Changing a Camera's ViewYou can change a camera's view by changing its Camera Properties, Film Back Properties, and Lens Properties. (see Camera Properties on page 334, Film Back Properties on page 335, and Lens Properties on page 338). You can also change a camera's view using the camera tools (see Using Cameras in the Basic Tools in Alias book), or the modeling window control icons (see Modeling Window Control Icons in the Basic Tools in Alias book). Zoom and DollyBoth zooming and dollying change the size of all objects in your scene as they appear in the camera's window. Dollying, however, also changes the size of objects that are near the camera relative to objects that are far from the camera. Zooming maintains the relative size of objects in your scene.
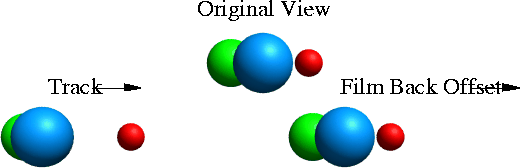
Track and Film Back OffsetBoth tracking and changing the film back offset value change the position of all objects in your scene as they appear in the camera's window. Tracking, however, also changes the position of objects that are near the camera relative to objects that are far from the camera. Changing the film back offset value maintains the relative position of objects in your scene.
Animating a CameraYou can animate a camera parameter setting in the Camera Editor by Shift-clicking the name of the parameter, and then clicking the Key button in the title bar of the Camera Editor. This is similar to the procedure for animating parameter settings in the Control Window (see Animating Parameter Settings on page 40). You can also animate a camera using Animation > Turntable, Animation > Autofly, or Animation > Set keyframe (see in the Animating in Alias book). Selecting Camera Views to RenderYou can select which camera views will render an image file, mask file, or depth file in the Render Globals window. To select which camera views will render: | |
| |
Using Image Planes | |
|
| |
You use image planes as visual references while building a model, or as a means of compositing background and/or foreground images during rendering. Adding or Deleting an Image PlaneYou can add any number of image planes to a camera. To add an image plane to a camera using Import Image Plane:
| |
|
See Importing Image Planes in the Basic Tools in Alias book. |
To add an image plane to a camera using the Camera Editor: |
| |
| |
To delete all image planes from a camera:
| |
|
See Deleting Image Planes in the Basic Tools in Alias book. |
|
|
See Delete Image Plane Options in the Basic Tools in Alias book. |
To delete one image plane from a camera: |
| |
| |
Animating an Image PlaneYou can animate an image plane using a variety of different methods:
Sizing and Positioning an Image PlaneBy default, an image plane fills the camera view with the entire image. You can size and position an image plane so that only a portion of the image appears or so the image appears in a specific region of the camera view. Use the Image Placement parameters in the Camera Editor to size and position an image plane (see Image Placement on page 353). Masking an Image PlaneYou can mask an image plane so that only portions of the image are visible. Use the Mask parameters in the Camera Editor to mask an image plane (see Mask on page 350). | |
|
Windows > Edit > Cameras |
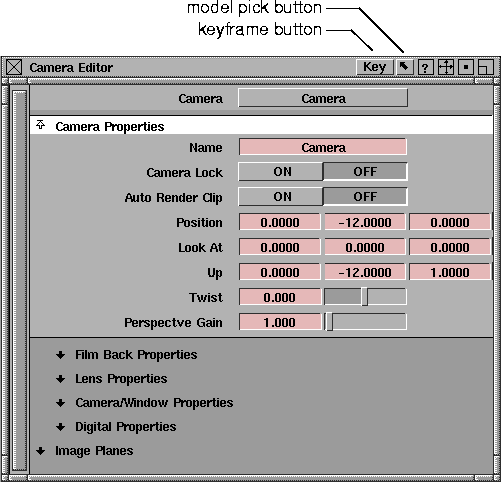
Camera Editor |
|
| |
The Camera Editor is the primary interface that you use to edit cameras and image planes. | |
|
Camera Editor parameters behave similarly to Control Window parameters (see Parameters on page 35). |
The Camera Editor contains parameters which control the properties of cameras and image planes. The title bar of the Camera Editor contains a keyframe button which lets you set a keyframe for a parameter, and a model pick button which lets you select the modeling window associated with the current camera in the Camera Editor. To open the Camera Editor:
See the next sections for details on the parameters available in this window: |
| Copyright © 1998, Alias|Wavefront, a division of Silicon Graphics Limited. All rights reserved. | Please send questions or comments regarding the documentation to: [email protected] |
 to open the Delete Image Plane Options box.