|
|
Windows > Edit >
Cameras
|
Image Plane Properties
|
|
|
|
|
Image Planes
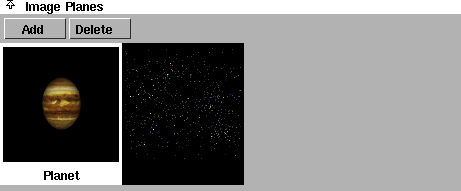
The Image Planes section of the Camera Editor contains a list of image plane swatches for the current camera, and buttons that let you add a new image plane to the camera or delete an existing image plane.
By default, a cameras has no image planes, and no image plane swatches are listed. You can add one or more image planes to a camera using the Add button. The image planes are then listed in the Image Planes section of the Camera Editor, and the Image Plane Parameters for the active image plane become available. The active image plane is highlighted in white in the image plane swatch list. You can select an image plane by clicking on its swatch.
|
|
See Adding or Deleting an
Image Plane on page 330.
|
Add
-
- Lets you add a new image plane to the current camera by selecting an image file with the File Requestor.
-
- You can also add an image plane to the active window's camera by selecting File > Import > Image plane (see Importing Image Planes in the Basic Tools in Alias book).
Delete
-
- Deletes the selected image plane.
Image Plane Parameters
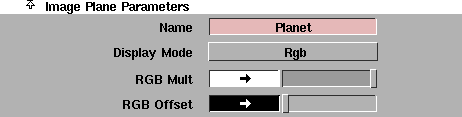
The Image Plane Parameters represent the parameters for the active image plane (the image plane that is selected in the Image Planes list).
Name
-
- The name of the selected image plane in the Image Planes list.
|
|
|
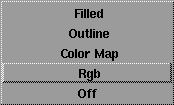
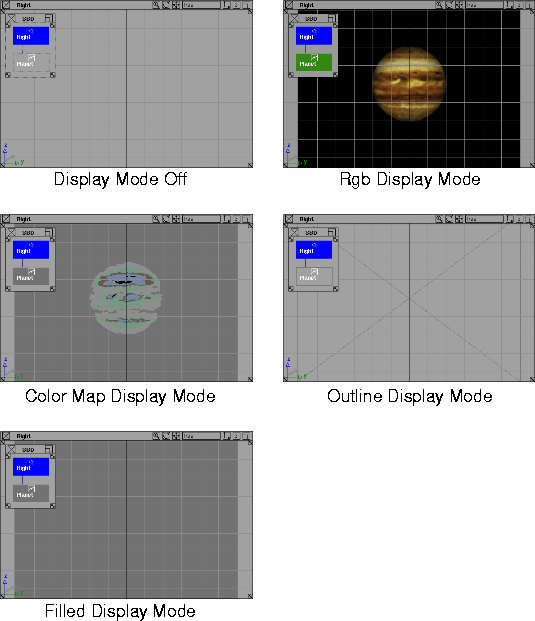
Display Mode
-
- Controls how the image plane is displayed in the modeling windows and in the SBD and ASBD windows. The image plane will only render when Display Mode is either Rgb or Off. The default setting is Rgb.
| Filled
| A solid rectangle.
|
| Outline
| A rectangle with diagonals.
|
| Color Map
| Seven separate colors defined in the User Colors window as VIDEO_1 through VIDEO_7 (see Setting Colors for Your Alias Interface in the Basic Tools in Alias book).
|
| Rgb
| Full 24 bit color image.
|
| Off
| No display.
|
|
|
See Rgbmult on page 101.
|
RGB Mult
-
- A scaling factor applied to all colors in the image plane. That is, all colors in the image plane are multiplied by the RGB Mult color. For example, you can color correct an image plane that appears too green by setting the RGB Mult color to a shade of blue. The default color is white (no effect).
|
|
See Rgboffset on page 101.
|
RGB Offset
-
- An offset factor applied to all colors in the image plane. That is, all colors in the image plane have the RGB Offset color added to them. For example, you can brighten an image plane that appears too dark by setting the RGB Offset color to a shade of grey. The default color is black (no effect).
Image

Image File
-
- The image plane's source image file name. If this file is part of a sequence (for example, image.1, image.2,...), then only the base file name is displayed (for example, image). Image File may be an absolute path (for example, /usr/3DCD/pix/image), or it may be a file name relative to the current project (for example, image).
|
|

|
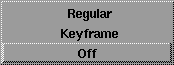
Frame Type
-
- Determines whether the image plane will use an animated sequence of image files (Regular or Keyframe), or a single image file (Off). The default setting is Off.
| Off
| the image plane uses a single image file, even if the image file is part of a sequence
|
| Keyframe
| the image plane uses an irregular sequence of image files (see Keyframe Frame Type below)
|
| Regular
| image plane uses a regular sequence of image files (see Regular Frame Type on page 350)
|
Keyframe Frame Type
If you want to use an irregular sequence of image files as an animated image plane (for example, if the sequence only includes image files for frames 1, 7, 11, 14, 18, and 33), set Frame Type to Keyframe. The Frame and Offset parameters become available.

By keyframing (Animation > Set keyframe) the Frame parameter, you can create an animation curve for the image plane which you can edit in the Action Window. If you do not have an image file for every frame of your animation, then use the STEP tangent type when animating the image files (see STEP in the Animating in Alias book).
You can also use the Read button to automatically create keyframes for all available image files.
Frame
-
- The image file frame number that you want to use for the current frame of your animation. The slider range is 0 to 100. The default value is 0.
Offset
-
- The frame of your animation at which the image plane displays the first image file of the sequence. The slider range is 0 to 100. The default value is 0.
-
- For example, if the image plane files are named image.1, image.7, ..., image.33, and the Offset value is 7, then image.1 is displayed at frame 1 + 7 = 8 of the animation, image.7 is displayed at frame 7 + 7 = 14, ..., and image.33 is displayed at frame 33 + 7 = 40. In addition, image.1 is displayed at frames 1 to 7 because it is the first image of the sequence, and image.33 is displayed at frames 41 to the end of the animation because it is the last image of the sequence.
Read
-
- Scans your image file directory for images of the form image.# (where # is the image's frame sequence number), and automatically keyframes those images at the correct frames. You can press the Read button again at any time to include any new image files in the animation. You can also edit the animation curve for the image plane's Frame parameter in the Action Window.
-
- For example, if image files exist for frames 1, 7, 11, 14, 18, and 33, and the Offset value is 7, clicking the Read button will automatically keyframe these images at frames 8, 14, 18, 21, 25, and 40.
-
- The Read button is very useful if you do not know which frames you have available (for example, if someone else is generating keyframe pose images for you at the same time that you are building the animation).
Regular Frame Type
If you want to use a regular sequence of image files as an animated image plane (for example, if the sequence includes image files for frames 1, 2, 3, 4, 5,..., 30), set Frame Type to Regular. The Start/End and By/Offset parameters become available.

By setting these parameters, you automatically create an animation curve for the image plane's Frame parameter which you can edit in the Action Window.
Start/End
-
- The first and last frame number of the image file sequence.
By/Offset
-
- The increment of each image file frame number (By), and the frame of your animation at which the image plane displays the first image file of the sequence (Offset).
-
- For example, if the image plane files are named image.1, image.2, ..., image.30, and the Offset value is 7, then image.1 is displayed at frame 1 + 7 = 8 of the animation, image.2 is displayed at frame 2 + 7 = 9, ..., and image.30 is displayed at frame 30+7 = 37. In addition, image.1 is displayed at frames 1 to 7 because it is the first image of the sequence, and image.30 is displayed at frames 38 to the end of the animation because it is the last image of the sequence.
Mask

|
|
Image plane masking is
similar to label masking (see
Label Masking on page 130).
|
The Mask parameters let you mask the Image File so that only portions of the image are visible.
|
|
|
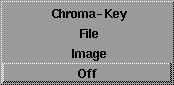
Mask Type
-
- The method used to mask the image plane's Image File. The default setting is Off (no mask).
| Off
| no mask; the entire rectangular Image File is displayed
|
| Image
| the mask is taken directly from the Image File (for example, if the image contains transparency information)
|
| File
| the mask is taken from a separate image: the Mask File (see File Mask Type below)
|
| Chroma-Key
| the mask is based on a certain color, or a certain range of colors, in the Image File (see Chroma-Key Mask Type on page 352)
|
Invert Mask
-
- Reverses the effect of the mask so that masked areas become unmasked, and vice-versa. The default setting is OFF.
File Mask Type
|
|
See File Masking on page 130.
|
If you want to use a separate image file to mask the image plane's Image File, set Mask Type to File. The Mask File and Frame Type parameters become available.
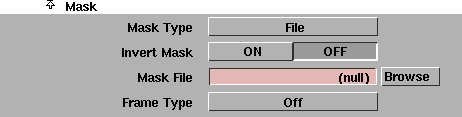
Mask File
-
- The name of the image file used as a mask by the image plane. Where the Mask File is white, the Image File will be visible. Where the Mask File is black, the Image File will not be visible. Where the Mask File is grey, the Image File will be partially visible. The Mask File is automatically positioned in the same location as the Image File.
|
|
|
Frame Type
-
- Determines whether the image plane will use an animated sequence of mask files (Regular or Keyframe), or a single mask file (Off). The default setting is Off. The Mask parameter Frame Type is identical to Image parameter Frame Type (see Frame Type on page 348).
-
- One use of animated Image File and Mask File is to view a pre-rendered walk cycle for a character and evaluate the character's interaction with other characters.
Chroma-Key Mask Type
|
|
See Chroma Key Masking on
page 131.
|
If you want to mask certain colors, or a certain range of colors, in the Image File, set Mask Type to Chroma-Key. The Key Color, Hue Range, Sat Range, Value Range, and Threshold parameters become available.
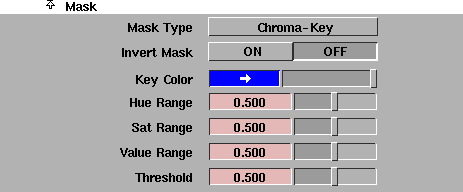
One use of chroma key masking is to mask out the blue background of live action that was filmed against a blue screen.
Key Color
-
- The color to be masked in the Image File. The default color is RGB 0,0,255. To mask a range of colors, you must also set the Hue/Sat/Val Range parameters.
Hue Range
-
- The range of hues (H) centered on the Key Color which will also be masked. The slider range is 0 to 1. The default value is 0.5.
Sat Range
-
- The range of saturations (S) centered on the Key Color which will also be masked. The slider range is 0 to 1. The default value is 0.5.
Val Range
-
- The range of values (V) centered on the Key Color which will also be masked. The slider range is 0 to 1. The default value is 0.5.
Threshold
-
- The point at which the color state changes. The slider range is 0 to 1. The default value is 0.5.
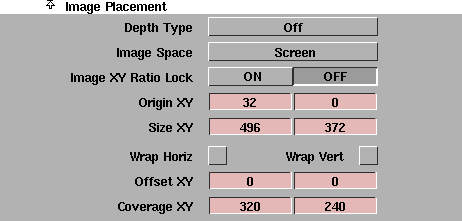
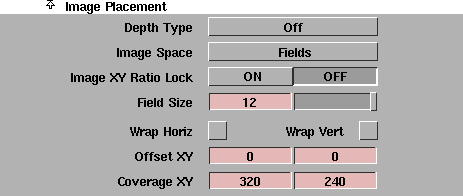
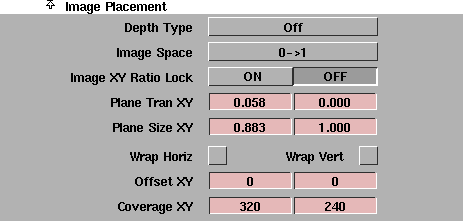
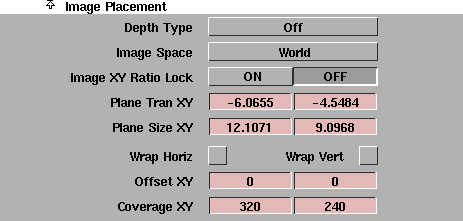
Image Placement
|
|
See Sizing and Positioning an
Image Plane on page 332.
|
The Image Placement parameters control how the Image File covers the camera view. For example, you may not want to display any bad edges that may be in your Image File, or you may want the image to occupy a very specific region of the screen.
|
|
|
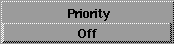
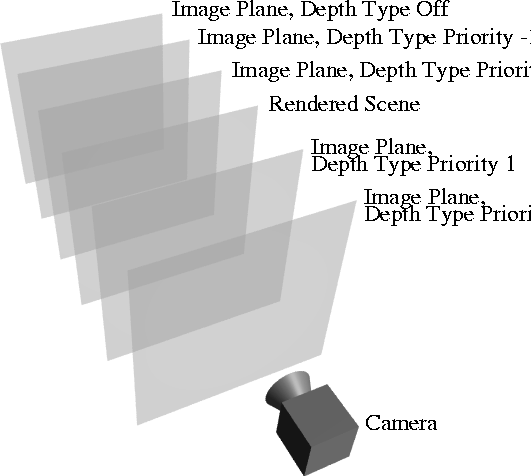
Depth Type
-
- Determines whether the image plane appears in front of or behind your scene, and in front of or behind other image planes. If Depth Type is Priority, a numeric field becomes available.

-
- The value of the Priority numeric field determines the order the image planes appear in. Image planes with Priority greater than 0 will appear in front of the rendered scene. Image planes with Priority less than or equal to 0 will appear behind the rendered scene.
|
|
|
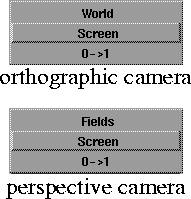
Image Space
-
- Determines how the image plane is positioned and sized in the modeling window. The Image Space options are slightly different for orthographic and perspective cameras. The default setting is Screen.
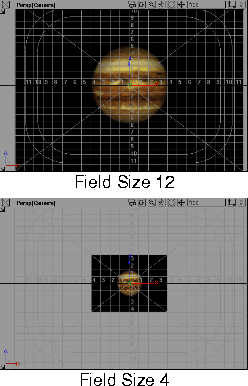
Fields Image Space Type (Perspective Windows Only)
If you want to position and size the image plane based on standard cel animation field sizes, set Image Space to Fields. The Origin XY and Size XY parameters (or the Plane Tran XY and Plane Size XY parameters) are replaced by the Field Size parameter.
|
|
|
Field Size
-
- Sets the image plane's size to a standard cel animation field (for example, 12-field or 11-field) in the view window. To display the field sizes in the view window, select DisplayTgls > Window Toggles > Cut-in. The valid range is 1 to 30. The slider range is 1 to 12. The default setting is 12.
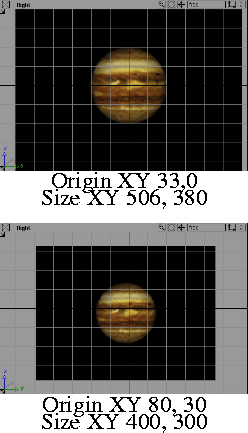
Screen Image Space Type
If you want to position and size the image plane relative to the view window based on the actual size of the window, set Image Space to Screen. The Plane Tran XY and Plane Size XY parameters (or the Field Size parameter) are replaced by the Origin XY and Size XY parameters.

|
|
|
Origin XY
-
- The location of the image plane's bottom left corner relative to the view window. For example, if Origin XY is 0, 0, then the bottom left corner of the image plane will be in the bottom left corner of the view window. If the window size is 573, 380, and Origin XY is 573, 380, then the bottom left corner of the image plane will be in the top right corner of the view window.
Size XY
-
- The horizontal and vertical dimensions of the image plane.
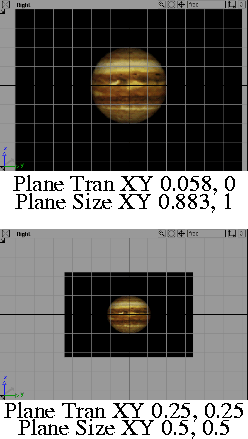
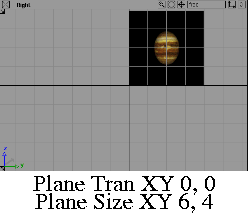
0->1 Image Space Type
If you want to position and size the image plane relative to the view window independent of the actual size of the window, set Image Space to 0->1. The Origin XY and Size XY parameters (or the Field Size parameter) are replaced by the Plane Tran XY and Plane Size XY parameters.
|
|
|
Plane Tran XY
-
- The location of the image plane's bottom left corner expressed as a fraction of the view window's dimensions. For example, if Plane Tran XY is 0, 0, then the bottom left corner of the image plane will be in the bottom left corner of the view window. If Plane Tran XY is 1,1, then the bottom left corner of the image plane will be in the top right corner of the view window, regardless of the actual window size.
Plane Size XY
-
- The horizontal and vertical dimensions of the image plane expressed as a fraction of the view window's dimensions.
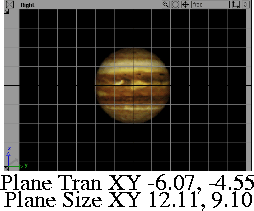
World Image Space Type (Orthographic Windows Only)
If you want to position and size the image plane relative to the view window using actual model space units, set Image Space to World. The Origin XY and Size XY parameters (or the Field Size parameter) are replaced by the Plane Tran XY and Plane Size XY parameters.
|
|
|
Plane Tran XY
-
- The location of the image plane's bottom left corner relative to the view window in model space units. For example, if Plane Tran XY is 0, 0, then the bottom left corner of the image plane will be at the world space origin.
|
|
|
Plane Size XY
-
- The horizontal and vertical dimensions of the image plane in model space units.
Image XY Ratio Lock
-
- Maintains the image plane's proportions by keeping the following parameters at a constant ratio: Plane Size XY (when Image Space is 0->1 or World), Size XY (when Image Space is Screen), and Coverage XY. The default setting is OFF.
Wrap Horiz, Wrap Vert (Wrap Horizontally, Wrap Vertically)
-
- Tiles (repeats) the image horizontally (Wrap Horiz) or vertically (Wrap Vert) when the coverage area is larger than the size of the image. The default setting is OFF.
|
|
|
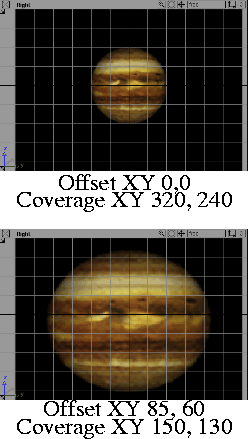
Offset XY
-
- The origin of the image plane relative to the origin of the Image File.
Coverage XY
-
- The horizontal and vertical dimensions of the image plane relative to the Image File.
|


