|
|
9
|
Surface Textures
|
|
Surface textures are two-dimensional textures that simulate various types of surface materials by using either an image file (File and Stencil textures) or a computer graphic procedure (Bulge, Checker, Cloth, Curvature, Fractal, Grid, Highlight, Mountain, Noise, Ramp, and Water textures).
In This Section:
Using Surface Textures
|
|
|
|
|
You can use surface textures to simulate two-dimensional materials (for example, cloth). The File and Stencil textures are used to specify an image file. The Curvature texture is used by the Surf curvature and Surf curv params tools. The Highlight texture is used by the Highlight and Highlight params tools.
Reducing Surface Texture Distortion
By default, surface textures are mapped to a surface's parametric space. That is, the XY values of the texture are mapped to the UV parameters of the surface. If the surface's UV parameterization is non-uniform (that is, the U and V isoparms are not uniformly spaced), then the texture will appear distorted. This often occurs when mapping a surface texture to a curved surface. The greater the surface curvature, the less uniform the parameterization, and the greater the texture distortion.
If a surface texture appears distorted on a surface, do one of the following:
|
|
See Rebuilding Complex
Surfaces in the Modeling in
Alias book.
|
- Make sure your surface is evenly parameterized. You can use Rebuild Surface to re-create the surface with uniform parameterization.
|
|
See Chord Length on
page 147.
|
- Use chord length mapping by setting Chord Length ON.
|
|
See Projection Texture on
page 191.
|
- Use the surface texture as a source texture for a Projection solid texture.
|
|
See Worldspace on page 147.
|
- Use world space mapping by setting Worldspace ON.
Label Mapping
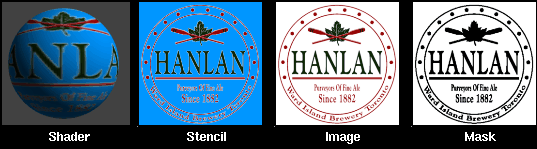
Label mapping is a technique of applying an image file onto a surface (for example, a label on a shampoo bottle) and masking parts of the image file so that it covers only a portion of the surface. The Stencil surface texture is used for both mapping and masking.
To map a label to a shader:
-
1
-
In the shader's Control Window, click the Map button to the right of the Color parameter. The Texture Procedures window appears.
-
If you are planning to mask the label, continue with step 2.
-
If you do not need to mask the label, you can skip to step
4.
|
|

|
-
2
-
In the Texture Procedures window, click the Stencil button.
-
The Texture Procedures window automatically closes, a
Stencil texture swatch appears in the Multi-lister, and the
Control Window displays the texture's parameters.
-
3
-
In the Stencil texture's Control Window, click the Map button beside the Image field. The Texture Procedures window appears.
|
|

|
-
4
-
In the Texture Procedures window, click the File button. The Texture Procedures window automatically closes, a File texture swatch appears in the Multi-lister, and the Control Window displays the texture's parameters.
-
5
-
In the Control Window, type the name of the image file you want to use as the label in the Image field, or click the Browse button and select the image file using the File Requestor.
-
The image file is now mapped onto the shader, and
appears on the shader swatch in the Multi-lister. By default,
the image file covers the entire shader. However, you can
limit the area it covers by masking the label and/or
positioning it on the shader.
Label Masking
A mask controls the transparency of a Stencil texture and limits the area on a surface where the texture will be visible. There are two types of masks: file masks and chroma key masks.
File Masking
File masking uses a texture or image file to specify which areas of the Stencil texture are transparent. Where the Mask file is white, the Image file will be visible on the surface. Where the Mask file is black, the shader color will be visible on the surface. Where the Mask file is grey, both the Image file and the shader color will be partially visible.
If the Image file has four channels (RGBA), then you can use the same file for both the Image file and the Mask file. The RGB information will be used for the image portion of the stencil and the A (alpha) will be used for the mask portion of the stencil. If, however, the Image file has only three channels (RGB), then you must create a separate Mask file.
You can create a Mask file by converting the Image file to black and white using a paint program (for example, VizPaint2D or StudioPaint). Although you can use a color image file as a Mask (for example, you could use the same file for both the Image and Mask), the level of transparency of the mask will vary through the range of colors.
To mask a label using an image file mask:
-
1
-
In the Stencil texture Control Window, click the Map button beside the Mask parameter. The Texture Procedures window appears.
|
|

|
-
2
-
In the Texture Procedures window, click the File button. The Texture Procedures window automatically closes, a File texture swatch appears in the Multi-lister, and the Control Window displays the texture's parameters.
-
3
-
In the Control Window, type the name of the image file you want to use as the mask in the Mask field, or click the Browse button and select the mask file using the File Requestor.
-
The Mask is now mapped onto the shader, and the Image
file no longer covers the entire shader swatch in the Multi-
lister. The Mask file is automatically positioned in the same
location as the Image file.
-
To control the overall transparency of the Stencil texture,
adjust the Rgbmult value in the Mask file's Control Window.
-
To control the softness of the mask, adjust the Bluroffset
value in the Mask file's Control Window. Small values
(around 0.01) are most useful.
Chroma Key Masking
Chroma key masking does not require a mask file. Instead, you set the Stencil texture's HSV Color Key parameters so that a certain color, or a certain range of colors, are either visible or invisible.
Chroma key masking has no effect if an image file is mapped to Mask. Make sure there is no Mask file assigned to the Stencil texture (type a space in the Mask field) if you want to use chroma key masking.
To mask a label using chroma key masking:
-
1
-
In the Stencil texture Control Window, click on HSV Color Key to display the HSV Color Key parameters.
-
2
-
Set Key Masking ON.
-
3
-
Click the color field beside Color Key to open the Color Editor.
-
4
-
Click the Grab button in the Color Editor. The mouse pointer becomes an eye dropper.
-
5
-
Move the eye dropper over the Multi-lister, and click the left mouse button on the background color of the Image texture. All areas of the Image texture that have this color are now transparent (masked) and the shader color is visible in these areas.
-
To mask a range of colors, adjust the Hue Range, Sat Range,
Val Range, and Threshold settings.
-
To invert the mask, set Positive Key ON. Only the color (or
range of colors) specified in the HSV Color Key parameters
are visible, instead of masked.
When you are finished masking the label, click the arrow in the bottom right corner of the shader swatch to hide the Stencil texture and the Image file (and the Mask file if there is one).
To preview the label map and mask, use Quick render. You may want to open the Global Quick Rendering Parameters window and increase the Shading Frequency value to better visualize the label map and mask. However, if you have to increase the Shading Frequency value to 10, it may be faster to do a full render.
To position the texture on a surface, see Positioning Surface Textures below.
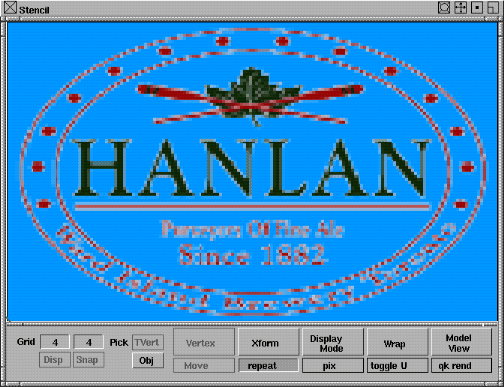
Positioning Surface Textures
By default, a texture mapped to a surface covers the entire surface. You can mask the texture so that it is only visible in certain areas of the surface. You can also scale and/or position the texture so that it covers only a certain area of the surface.
|
|
See Surface Placement on
page 146 and Label Mapping
on page 148.
|
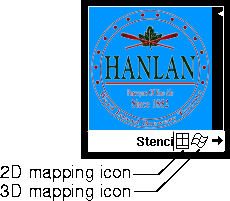
Two sets of parameters control the positioning of the texture: the Surface Placement parameters and the Label Mapping parameters. If you adjust these parameters in the texture's Control Window, the shader swatch in the Multi-lister will update to reflect any changes you make. Therefore, by editing these parameters directly and using the Multi-lister as a preview, you can roughly position a texture on a surface. There are, however, two easier methods of positioning a texture on a surface: 2D mapping and 3D mapping.
|
|
|
Each surface texture swatch in the Multi-lister has two small icons in its bottom right corner. Clicking on either of these icons activates the corresponding method of texture placement. It is also possible to use 2D mapping and 3D mapping simultaneously. For example, you could use 3D mapping to visualize the texture on the surface and use 2D mapping (the Texture Placement window) to position the texture.
3D Mapping
The 3D mapping technique displays the texture directly on the wire frame of the surface to which the texture mapped shader is assigned. This display is updated each time you adjust any of the Surface Placement or Label Mapping parameters.
To use 3D mapping to position a texture on a surface:
|
|
|
-
1
-
Make sure that the texture mapped shader is assigned to the appropriate surface, and that this surface is the only active object in the modeling window.
-
2
-
Open the texture's Control Window, and open the Surface Placement and Label Mapping sections.
-
3
-
Click the 3D mapping icon in the bottom right corner of the texture swatch in the Multi-lister.
|
|
|
-
The modeling window displays the texture directly on the
wire frame of the surface.
-
4
-
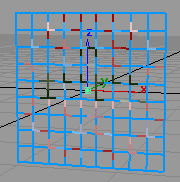
If necessary, increase the patch precision of the surface to better visualize the texture. Patch precision represents the number of curves (visual isoparms) that are displayed to represent each patch on a surface. On most surfaces, the default patch precision of 2 is too low for 3D mapping. Increasing the patch precision, however, will also increase the screen refresh time.
|
|
|
-
Select Object > Patch precision and enter a number between
2 and 30. The number of visual isoparms per patch
increases, making the texture pattern more visible.
|
|
|
-
5
-
You may want to use Shade display mode to better visualize the texture. Select DisplayTgls > Shade. The surface is displayed in shaded mode.
-
6
-
Adjust the Surface Placement and Label Mapping parameters until the texture is correctly positioned on the surface.
-
The Label Mapping parameters control the position and
orientation of the texture relative to the surface (see Label
Mapping on page 148).
-
The Surface Placement parameters control the position and
orientation of the texture pattern relative to the texture
(Surface Placement on page 146).
-
7
-
Click the 3D mapping icon in the bottom right corner of the texture swatch in the Multi-lister. The modeling window no longer displays the texture directly on the wire frame of the surface.
-
8
-
If you turned on the Shade display mode in step 5, select DisplayTgls > Shade to turn it off.
-
9
-
If you increased the patch precision of the surface in step 4, reset the patch precision of the surface to its default value (2). Select Object Edit > Patch precision and enter 2.
2D Mapping
The 2D mapping technique uses the Texture Placement window to display and position a texture. The horizontal and vertical dimensions of this window (S and T) represent the two parametric dimensions of the active surface (U and V). A texture mapped to the active surface will therefore be displayed in the Texture Placement window relative to the surface. The buttons at the bottom of the Texture Placement window allow you to interactively edit the position and orientation of the texture relative to the surface.
The 2D mapping technique is slightly different when you are positioning a texture on a spline surface and when you are positioning a texture on a face. This is because the range of the U and V parameters is different for spline surfaces and faces. The range of the U and V parameters of a spline surface is always 0 to 1. The range of the U and V parameters of a face is based on the size and location of the face when it is created.
To use 2D mapping to position a texture on a surface:
-
1
-
Make sure that the texture mapped shader is assigned to the appropriate surface, and that this surface is the only active object in the modeling window.
-
2
-
Click the 2D mapping icon in the bottom right corner of the texture swatch in the Multi-lister.
|
|
See Texture Placement
Window on page 137.
|
-
The Texture Placement window opens and displays the
texture relative to the active surface.
|
|
See Xform Menu on page 143.
|
-
3
-
Use the Xform tools in the Texture Placement window to position and orient the texture relative to the surface. The texture's Surface Placement and Label Mapping parameters are automatically updated when you use the Xform tools.
-
4
-
Close the Texture Placement window, either by clicking the 2D mapping icon in the texture swatch in the Multi-lister, or by clicking the close box in the top left corner of the Texture Placement window.
To use 2D mapping to position a texture on a face:
-
1
-
Make sure that the texture mapped shader is assigned to the appropriate surface, and that this surface is the only active object in the modeling window.
-
2
-
Click the 2D mapping icon in the bottom right corner of the texture swatch in the Multi-lister.
-
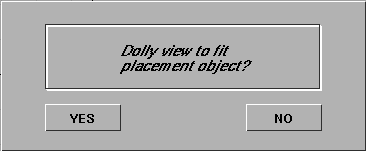
The following confirm box is displayed:
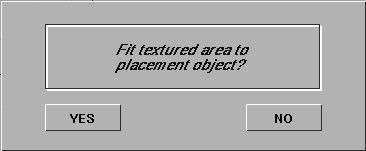
-
If you select YES, the texture map is automatically scaled
to fit the face. If you select NO, the texture is not scaled
and the following confirm box is displayed:
-
If you select YES, the view automatically dollies out to fit
the selected faces into the Texture Placement window. If you
select NO, the view remains in the worldspace origin.
-
If you select YES to both of the above prompts, the texture
will be scaled to best fit the selected face.
-
The Texture Placement window opens and displays the
texture relative to the active surface.
|
|
See Xform Menu on page 143.
|
-
3
-
Use the Xform tools in the Texture Placement window to position and orient the texture relative to the surface. The texture's Surface Placement and Label Mapping parameters are automatically updated when you use the Xform tools.
-
4
-
Close the Texture Placement window, either by clicking the 2D mapping icon in the texture swatch in the Multi-lister, or by clicking the close box in the top left corner of the Texture Placement window.
|


