|
|
Surface Edit >
Rebuild surface

|
Rebuilding Complex Surfaces
|
|
|
|
|
Purpose
Prepare surfaces for use with other tools:
- Simplify surfaces by removing extraneous knots in either or both parametric directions.
- Convert a rational surface to a non-rational cubic surface (useful for export to certain CAD systems).
- Match the degree and parameterization of a surface to that of a given surface.
- Convert a surface to uniform parameterization.
- Convert a surface to a different degree.
How To
To simplify surfaces:
-
1
-
Double-click the Rebuild surface icon, or choose Rebuild surface-
 from the Surface Edit palette menu. The Rebuild Surface options window appears. from the Surface Edit palette menu. The Rebuild Surface options window appears.
-
2
-
In the Rebuild Surface window
- Choose Reduce Spans from the Rebuild Type pop-up menu.
- Choose whether to reduce the number of spans in the U, V, or both directions from the Rebuild Direction pop-up menu.
- Set the initial Tolerance. A low value creates a more exact copy but simplifies the surface less. A high value is less exact but simplifies more.
-
3
-
Click the surfaces to rebuild.
-
4
-
Click Go to simplify the surfaces.
- When Auto Recalc is on, you can move the Tolerance slider or change the Rebuild Direction and the rebuilt surface will automatically update.
- If the rebuild is unsatisfactory, click Undo in the Rebuild Surface window and change the settings.
To remove multi-knots from surfaces:
|
|

|
-
1
-
Double-click the Rebuild surface icon, or choose Rebuild Surface- from the Surface Edit palette menu. The Rebuild Surface options window appears.
-
2
-
In the Rebuild Surface window,
- Choose Del Multi Knots from the Rebuild Type pop-up menu.
- Choose whether to remove multi-knots from the U, V, or both directions from the Rebuild Direction pop-up menu.
-
3
-
Click the surfaces to rebuild.
-
4
-
Click Go to remove multi-knots from the surfaces.
To match the degree and parameterization of surfaces to an example surface:
-
1
-
Double-click the Rebuild surface icon, or choose Rebuild Surface- from the Surface Edit palette menu. The Rebuild Surface options window appears.
-
2
-
In the Rebuild Surface window, choose Match Knots from the Rebuild Type popup.
-
3
-
Click the surfaces to rebuild.
-
4
-
Click Go.
-
5
-
Click the surface to take the degree and parameters from in the U direction.
-
6
-
Click the surface to take the degree and parameters from in the V direction. This can be the same surface as in Step 5.
-
7
-
If the rebuild is unsatisfactory, click Undo in the Rebuild Surface window and change the settings.
To convert surfaces to uniform parameterization and change the number of spans or degree:
|
|

|
-
1
-
Double-click the Rebuild surface icon, or choose Rebuild Surface- from the Surface Edit palette menu. The Rebuild Surface options window appears.
-
2
-
In the Rebuild Surface window,
- Choose Uniform Knots from the Rebuild Type popup.
- Choose whether to change the parameterization, degree and/or number of spans in the U, V, or both directions from the Rebuild Direction pop-up menu.
- Turn Change Number of CVs ON and change the value(s) in the Number of Spans text boxes to specify the exact number of spans in U (and possibly V) if needed.
- Turn Change Surf. Degree ON and change the value(s) in the Surface Degree text boxes to specify the degree in U (and possibly V) if needed.
-
3
-
Click the surfaces to rebuild.
-
4
-
Click Go to simplify the surfaces.
To convert rational surfaces to non-rational surfaces:
-
1
-
Double-click the Rebuild surface icon, or choose Rebuild Surface- from the Surface Edit palette menu. The Rebuild Surface options window appears.
-
2
-
In the Rebuild Surface window,
- Choose Non-rational from the Rebuild Type popup.
- Adjust the Tolerance and Continuity Angle sliders to guarantee that the resulting surface will be within the specified positional and tangential tolerances from the original.
-
3
-
Click the surfaces to rebuild.
-
4
-
Click Go to convert the surfaces.
Tips and Notes
- To rebuild a surface using the same settings as the last time, you do not have to open the Rebuild Surface window. Just click the Rebuild surface tool.
- If Keep Originals is off, the new surface replaces the old surface in the SBD hierarchy.
-
If Keep Originals is on, the new surface is given the name of
the old surface with "rebuild" appended to the beginning.
Rebuild Surface Option Window
Rebuild Type
Non-Rational
|
|
See Rational vs. Non-rational
Geometry on page 13.
|
-
- Convert the surface to non-rational cubic geometry.
Reduce Spans
-
- Simplify the surface by removing extraneous edit points.
Del Multi Knots
-
- Remove multi-knots from the surface.
Uniform Knots
-
- Convert the surface to uniform parameterization (i.e. move the edit points to integral parameters: 1.0, 2.0, 3.0...).
Match Knots
-
- Convert the surface to match the parameterization and degree of another surface.
Non-rational settings
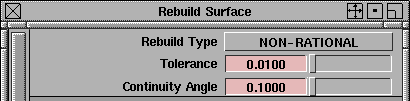
Tolerance
-
- The amount of deviation from the original surface permitted during the rebuild.
-
- A low number matches the original more exactly, but takes longer to calculate and increases the complexity of the resulting surface. A high number does not match the original as well, but is faster and results in a simpler surface.
Continuity Angle
-
- The amount of deviation from the tangents of the original surface during the rebuild.
-
- Use this option to make sure the surface stays tangent to other surfaces after it is rebuilt.
-
-
|
|
These settings appear when
Rebuild Type is Reduce
Spans.
|
Reduce Spans settings
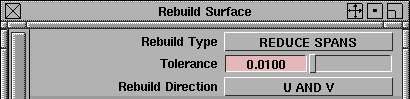
Tolerance
-
- The amount of deviation from the original surface permitted during the rebuild.
-
- A low number matches the original more exactly, but does not simplify the surface as much. A high number does not match the original as well, but simplifies more.
Rebuild Direction
-
- Choose whether to rebuild the U isoparms only, the V isoparms only, or both directions.
|
|
This setting appears when
Rebuild Type is Del Multi-
knots.
|
Del Multi-knots settings

Rebuild Direction
-
- Choose whether to rebuild the U isoparms only, the V isoparms only, or both directions.
|
|
These settings appear when
Rebuild Type is Uniform
Knots.
|
Uniform Knots settings
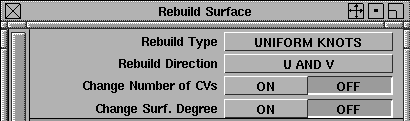
Rebuild Direction
-
- Choose whether to rebuild the U isoparms only, the V isoparms only, or both directions.
Change Number of CVs
-
- On-Change the number of spans in the rebuilt surface. Sliders appears allowing you to set the number of spans in the U and V directions.
-
- Off-The number of CVs (and spans) in the rebuilt surface is equal to the number of CVs (spans) in the original.
|
|
See Degree on page 12.
|
Change Degree
-
- On-Change the degree of the surface as it is rebuilt. Slider appears allowing you to set the degree of the rebuilt surface in the U and V directions.
-
- Off-Do not change the surface degree.
Control Options

MixMax Display
-
- Automatically creates Min-Max deviation combs for the original and rebuilt surfaces.
Max Deviation
-
- Calculate the maximum deviation between the original and rebuilt surfaces. The result appears on the prompt line. Use this to check whether you need to use tighter tolerances.
-
- This calculation can take longer than actually rebuilding the surface. Turn the option off to speed up rebuilds.
Auto Recalc.
-
- Automatically update the new surface when the values in the Rebuild Surface window change.
Keep Originals
-
- Keep the original surface after creating the rebuilt surface.
Buttons
Recalc
-
- When Auto Recalc. is turned off, use this button to update the rebuilt surface with the current values.
Undo
-
- Undo all the changes made by the Rebuild surface tool and return to the original surface.
Next
-
- Finish rebuilding the current surface and prompt for a new surface to rebuild.
See Also
|
Surface Edit >
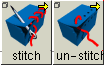
Stitch >
Stitch, Unstitch
|
Stitching/Unstitching Surfaces into Shells
|
|
|
|
|
Purpose
Create a special object called a shell from a group of surfaces, in preparation for boolean operations or export to a CAD package.
For basic information about shells, see Shells and Faces on page 25.
How To
To stitch a group of surfaces together into a shell:
|
|

|
-
1
-
Select the surfaces you want to stitch into a shell.
-
2
-
Click the Shell stitch icon, or choose Stitch > Shell stitch from the Surface Edit menu.
|
|
Stitch uses the tolerance
Maximum Gap Distance in
Preferences > Construction
options to determine surface
adjacency.
|
-
If the edges of the surfaces are within a certain tolerance of
each other, a shell is built and highlighted in yellow.
-
3
-
Click additional surfaces to stitch into the new shell.
- Pick a boundary between two surfaces to select both surfaces at once.
- Pick a group node in the SBD window to select a whole group of adjacent surface (e.g. all six sides of a primitive cube).
-
4
-
You can now:
- Click the Shell stitch tool again to start a new shell.
|
|

|
To unstich a shell into a group of surfaces:
-
1
-
Pick the shell you want to unstitch.
-
2
-
Click the Shell unstitch icon, or choose Stitch > Shell unstitch from the Surface Edit menu.
Tips and Notes
- You can undo a stitch or unstitch operation using Edit > Undo.
- Depending on the options in the Shell stitch option window, a stitched shell may not match the original surfaces exactly.
-
In this case, unstitching will not produce surfaces that
match the originals exactly either.
- Remember that normals should always point outward for shells. You may want to check the normals with the Reverse direction tool after stitching a shell.
Options
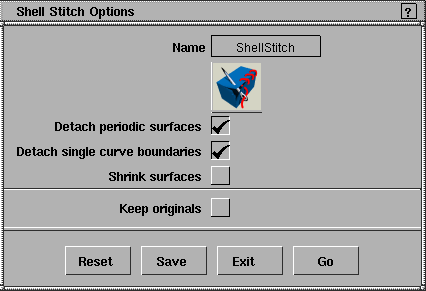
Stitch options
Detach periodic surfaces
-
- Detach the seam of periodic surfaces (that is, closed surfaces such as cylinders and surfaces created with the Revolve tool) before stitching them into a shell.
-
- This option is sometimes necessary when the stitch function does not notice that a surface edge is attached to another edge on the same surface. This is a common problem in CAD systems.
Detach single curve boundaries
-
- Detach trim edges made from single curves on surface (such as a round hole in the middle of a plane).
-
- Some CAD systems have problems with these kinds of trims. Turn this option on to allow export to those systems.
Shrink surfaces
-
- Reduce the trimmed (invisible) parts of the surfaces being stitched to the minimum size necessary to maintain the proper appearance.
-
- This reduces the complexity of the resulting shell.
Keep originals
-
- Keep the original surfaces after the shell is created.
Unstitch options
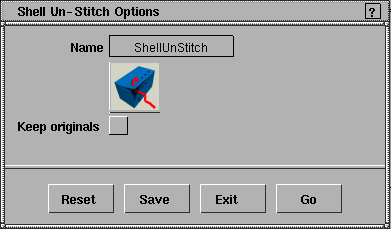
Keep Originals
-
- Keep the original shell after it is unstitched into surfaces.
See Also
|
Surface Edit >
Shells >
Shell subtract, Shell
intersect, Shell union

|
Performing Boolean Operations on Shells
|
|
|
|
|
Purpose
- Subtract the volume of one shell from another.
- Keep the intersecting volume of two shells and discard the rest.
- Combine the volumes of two shells into one new shell.
How To
To subtract the intersecting volume of one shell from another:
|
|

|
-
1
-
Click the Shell subtract icon, or choose Shells > Shell subtract from the Surface Edit palette menu.
-
2
-
Click the shell you want to subtract from.
|
|
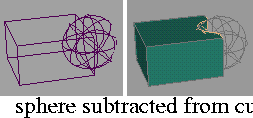
|
-
3
-
Click the shell you want to subtract from the first shell.
-
The Shell subtract tool subtracts the volume of the second
shell from the first.
To keep the intersecting volume of two shells:
|
|

|
-
1
-
Click the Shell intersect icon, or choose Shells > Shell intersect from the Surface Edit palette menu.
-
2
-
Click the first shell you want to intersect.
|
|
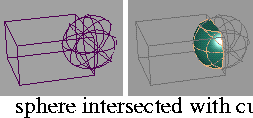
|
-
3
-
Click the second shell you want to intersect.
-
The Shell intersect tool keeps the intersecting volume of the
two shells and discards the rest.
To combine the volumes of two shells into one new shell:
|
|

|
-
1
-
Click the Shell union icon, or choose Shells > Shell union from the Surface Edit palette menu.
-
2
-
Click the first shell you want to combine.
|
|
|
-
3
-
Click the second shell you want to combine.
-
The Shell union tool combines the volumes of the two shells
into a new shell.
Tips and Notes
- The shell normals must point outward for the Boolean tools to work. You may want to check the normals with the Reverse direction tool before using boolean tools on a shell.
- You can speed up Boolean operations on multiple shells by grouping the shells and using the Boolean operations on the groups.
- The Boolean tools are named for George Boole (1815-1864) who invented a system of logical algebra which involved two values (true and false) and operations for combining them (AND, OR, NOT, XOR). His work became fundamental to the design of modern computers.
-
In the analogy between the tools and Boolean logic,
intersect is a logical AND, union is a logical OR, and subtract
is a modified form of a logical XOR (exclusive OR).
Options
Keep Originals
-
- On-template the original shells after the Boolean operation.
-
- Off-delete the original shells.
See Also
|
Surface Edit >
Claymate

|
Integrating Clay Model Changes
|
|
|
|
|
Purpose
- Integrate digitized clay model data with modeled surfaces.
- Offset a group of surface while maintaining continuity between them.
Overview
Typical Scenario
In a typical clay prototyping workflow, you might do the following steps:
-
1
-
Create a model in Alias.
-
2
-
Mill a clay model from the Alias data.
-
3
-
Reshape the clay model by hand.
-
4
-
Digitize the reshaped parts of the clay model.
-
5
-
Integrate the changes back into the Alias surfaces with the Claymate tool.
How It Works
The Claymate tool works by asking you to select:
- surfaces to modify (corresponding to the changed data),
- modifier curves or surfaces (the digitized, reshaped data), and
- reference surfaces (surfaces that have not changed).
It then uses the modifier curves/surfaces to reshape the original surfaces, while maintaining positional and tangent continuity with the reference surfaces.
More Uses
You can also use Claymate in other situations that require you to fit surfaces back to modified curves or surfaces. For example:
-
1
-
Create cross-section profile curves from a surface model.
-
2
-
Modify the curves.
-
3
-
Use the Claymate tool to fit the original surfaces to the new profile curves.
Claymate Offset
The Claymate tool has an additional function. When you turn on the Claymate Offset option in the options window, the Claymate tool will create offset copies of the surfaces you pick, and maintain the continuity between them.
How To
To use digitized changed data to reshape surfaces on a model:
-
1
-
Pick the surfaces that were changed on the clay version.
|
|

|
-
2
-
Click the Claymate icon, or choose Claymate from the Surface Edit palette menu.
-
The Claymate Control window appears.
>
|
Note:
|
If any of the picked objects are invalid for use with
Claymate, the Claymate tool unpicks everything.
|
-
3
-
Pick any other surfaces that need to be updated, then click Go.
-
4
-
Pick the curves or surfaces that were digitized from the changed sections of the clay model (the modifier curves).
-
Modifier curves/surfaces that are outside the Min/Max Mod.
Distance range are ignored.
-
5
-
Click Go.
-
6
-
Pick all the surfaces on the model that were not changed on the clay version (the reference surfaces) and with which you want the modified surfaces to maintain positional and tangent continuity.
-
The Claymate tool will maintain continuity with these
reference surfaces as it modifies the changed surfaces.
-
7
-
Click Go.
-
Claymate uses the settings in the Claymate Control window
to reshape the surfaces of the model to match the
modification curves.
-
8
-
The Claymate Control window contains many settings to control how the modification curves affect the surfaces. When Create History is on, you can continue to change the settings and the surfaces will update.
To create offset copies of surfaces that maintain continuity:
-
1
-
Pick the surfaces you want to offset.
|
|

|
-
2
-
Double-click the Claymate icon, or choose Claymate from the Surface Edit palette menu.
-
The Claymate Options window appears.
-
3
-
Turn the Claymate Offset option on, then click Go.
-
The Claymate Control window appears.
-
4
-
Set the Offset Distance in the Claymate Control window.
-
5
-
Pick any other surfaces you want to offset, then click Go.
Tips and Notes
|
|
See Creating Sets in the
Animating book, and
Introduction to Layers in the
Basic Tools book.
|
- To streamline the use of the Claymate tool, collect the surfaces to modify, the modifier curves/surfaces, and the reference surfaces in separate sets with the Edit > New set command, or better yet, by putting them in different layers.
- Claymate can produce unpredictable results if it changes the topology of the surfaces.
- Usually you will want the Auto Recalculate option on to see the effects of changing options interactively.
-
If the surfaces involved are very complex, however,
updates will take a long time. Turn Auto Recalculate off and
use the Update button at the bottom of the window.
- Increasing the number of samples allows finer control over the surfaces, but greatly increases the time required to perform the operation.
-
Calculation time increases linearly with the number of
samples on the modifier curves, and with the square of the
number of samples on the target surface.
Claymate Control window
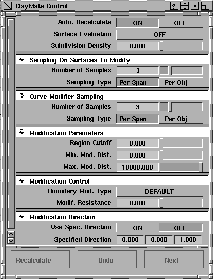
Auto Recalculate
-
- Turn this option on to automatically update the surfaces whenever you change an option in the Claymate Control window.
|
|
This pop-up menu appears
when Claymate Offset is off
in the options.
|
Surface Evaluation
-
- Off-Do not perform any surface evaluation on the surface.
-
- Curvature, Highlight, Quick Render-Display a curvature render, highlight render, or Quick Render of the new surface. For more information, see: Showing Surface Curvature on page 523, Showing Surface Features with Highlights on page 530, and Quick Render in the Rendering book.
-
- Cross Section-Calculate and display cross-section lines on the new surface. Choosing this option displays the Show Previous Xsect option. For more information, see Creating Cross-Section Lines on page 535.
Subdivision Density
-
- The maximum number of edit points the Claymate tool is allowed to add to each span of the modified surface.
-
- For example, if you set Subdivision Density to 3, the new surface can have up to 3 times as many edit points as the original surface.
-
- Enter a value from 0 to 1000. The default is 0 (do not insert any new edit points).
|
|
This section appears when
Claymate Offset is on in the
option window.
|
Claymate Offset Parameters
Offset Distance
-
- Modify the surfaces using a set of points at this distance from the surface along the surface normals.
Number of Samples
Sampling Type
-
- These options are the same as those listed under the Sampling On Surfaces To Modify section below.
|
|
This section appears when
Claymate Offset is off in the
option window.
|
Sampling On Surfaces To Modify
Number of Samples
-
- The number of samples per span or per surface (depending on the setting of the Sampling Type option) to take on the surfaces that need to be modified.
-
- The time required increases with the square of the number of samples on the surfaces to be modified.
Sampling Type
-
- Per Span-the number of samples is taken for every span.
-
- Per Obj-the number of samples is taken for every surface.
|
|
This section appears when
Claymate Offset is off in the
option window.
|
Curve Modifier Sampling
Number of Samples
-
- The number of samples per span or per object (depending on the setting of the Sampling Type option) to take on the modifier curves or surfaces.
-
- The time required increases linearly with the number of samples on the modifier objects.
Sampling Type
-
- Per Span-the number of samples is taken for every span.
-
- Per Obj-the number of samples is taken for every object.
|
|
This section appears when
Claymate Offset is off in the
options.
|
Modification Parameters
Region Cutoff
-
- Every point on a surface is affected by a number of CVs. For example, on a bicubic surface (a surface which is degree 3 in both U and V directions), each point is controlled by up to 16 CVs.
-
- Each of those CVs exerts a certain amount of influence over the point on the surface, measured between 0 and 1. The CVs closest to the selected point on the surface have the greatest effect on that point. For example, if a CV's influence on a point is 0.5, then moving that CV 5 units will move the surface point 2.5 units. If the influence is 1.0, then moving the CV 5 units will move the surface point 5 units.
-
- This value controls which CVs are moved by the Claymate tool. For each sampled point on the surface, the Claymate tool will only move CVs whose influence is greater than this value.
-
- Enter a value from 0.000 to 1.000. The default is 0.000. You can set the value to less than 0.001, but it is not recommended.
-
- If the value you enter cuts off all CVs affecting a point, a value of 0.001 is used instead.
Min. Mod. Dist.
Max Mod. Dist.
-
- The minimum and maximum distance between a point on the surfaces to be modified and the corresponding point on the modifier curves.
-
- If the distance is less than the minimum or greater than the maximum at a point, the modifier is ignored at that point.
-
- Enter values greater or equal to 0 for the Min, greater than 0 for the Max.
|
|
This section appears when
Claymate Offset is off in the
options.
|
Modification Control
Boundary Mod Type
-
- Default-modify surface boundaries and internals. Do not modify tangents. This is the recommended option for closed (periodic) surfaces.
-
- Exclusive-modify surface boundaries only. Do not modify internals or tangents.
-
- Fix Position-keep position of surface boundaries locked.
-
- Fix Tangent-keep position and tangents of surface boundaries locked.
-
- The Fix Position and Fix Tangent options only work on actual surface boundaries, and do not affect trim edges. We do not recommend using Fix Position or Fix Tangent when you have more than one surface to modify.
Modif. Resistance
-
- The amount of resistance to modification, from 0.0 to 1.0. At 0.0, the surfaces are free to change shape to fit the modifier curves. At 1.0, the shape of the original surfaces is maintained.
-
- Use this option to "dampen" the modification of the original surfaces if the changes caused by the modifier curves are too radical.
|
|
This section appears when
Claymate Offset is off in the
options.
|
Modification Direction
Use Spec. Direction
-
- Turn this option on to use the Specified Direction vector.
-
- If turned off, the direction reverts to the previous Specified Direction settings.
Specified Direction
-
- Enter a vector for the direction in which to apply the changes.
Buttons
Recalculate
-
- Update the surfaces after changing options.
-
- If the Auto Recalculate option at the top of the window is on, the surfaces are updated automatically whenever you change an option.
Undo
-
- Undo the most recent changes made by the Claymate tool.
Next
-
- Finish with the current surfaces and prompt for new surfaces.
Options
Claymate Offset
-
- Change the tool's function to create continuity-safe offset copies.
-
- When you turn this option on and click go, the parameters available in the Claymate Control window change.
Keep Originals
-
- Turn this option on to keep the original surfaces in addition to the new surfaces created by the Claymate tool.
-
- Turn this option off to delete the original surfaces after the Claymate tool creates the new surfaces.
See Also
|
Surface Edit >
Define world pattern

|
Setting Up for Worldspace Texture Mapping
|
|
|
|
|
Purpose
Join edges of surfaces together for use with world space texture mapping.
See also the Rendering in Alias book.
Overview
World space texture mapping is a method for minimizing texture distortion. It allows you to map a texture onto several surfaces as if they were one surface.
World space texturing works by doing the following:
-
1
-
Wait until a render operation causes the surfaces to be subdivided.
-
2
-
Try to unfold the subdivided surfaces onto a plane.
-
3
-
Create a mapping between the plane and the flattened surfaces.
-
4
-
Apply the texture to the plane, and through the mapping, to the surfaces.
Limitations
- World space texture mapping requires intense computation. Before you use world space texture mapping, try these faster alternatives:
- Projection maps. See Project Solid Texture in the Rendering book.
- Use separate shaders for each surface, but carefully align them to appear continuous using the texture placement window.
- If the object is flat, use a face instead of NURBS surfaces.
-
Alias tries to speed up world space texture mapping by
saving its solutions, and only recalculating when the
surfaces involved change.
- You can only use world space texture mapping on surfaces that can unfold to a flat surface (in technical terms, surfaces that are topologically equivalent to a sheet).
-
This excludes:
- Highly convoluted and self-intersecting surfaces.
- Completely closed surfaces. If you want to map a closed surface, you must create a seam to allow unfolding.
- You cannot use world space texture mapping on faces.
- World space texture mapped surfaces are usually not suitable for animations:
- The texture mapping will likely be different for every frame.
- The texture must be recalculated for each frame, greatly increasing the rendering time.
- World space texture mapping does not work with displacement maps, solid textures, or environment textures.
World space texture mapping is computationally intense, and some surfaces may not even have solutions. You can set a time-out variable top specify how long you are willing to wait while the Define world pattern tool searches for a solution. See Environment Variables on page 357.
How To
To join several surfaces together for texture mapping:
-
1
-
Pick the surfaces you want to join.
-
2
-
If the surfaces are not already grouped together, choose Group from the Edit menu.
|
|

|
-
3
-
Click the Define world pattern icon, or choose Define world pattern from the Surface Edit palette menu.
-
4
-
Click the common edge between two surfaces in the group to join the surfaces at that edge.
- You only need to join edges if you want continuity at that edge.
- Joined edges do not need to meet end-to-end. They can be offset, or different sizes.
- Joining edges works best when the two surfaces are already positionally continuous. If they are not already continuous, the texture will be stretched to cover the gap.
-
5
-
When you are finished defining the continuous edges, click Go to join the surfaces.
-
6
-
Create a basic shader in the Multi-lister.
-
7
-
Add a surface texture to the shader.
-
8
-
Double click the texture to show the texture inspector window. In the Surface Placement section, set Worldspace to ON.
>
|
Note:
|
During the calculation of world patterns you can press Esc
to stop the process and use whatever incomplete
calculations are done at that moment.
|
Tips and Notes
- The surfaces you want to map together must be grouped.
- To map a closed surface, create a seam to allow unfolding.
- Use the lowest render subdivision level possible.
- Because world space textures are calculated after the surfaces are subdivided, changing the render subdivision values will change the placement of the texture.
-
Use the subdivision level you want to render with to
check the placement of the texture.
- If the shader has several textures, you can set the Worldspace option for each individual texture.
-
For example, you could have a shader with one texture
calculated in world space and another calculated
parametrically.
- The following actions cause recalculation of the world space texture:
- Changing the joined edges, adding or deleting surfaces from the group, or changing which edges are joined. (In general, any operation which changes the relationships between the surfaces in the group).
- Reshaping, transforming, aligning, detaching, or trimming a surface in the group. (In general, any operation which changes the geometry).
- Changing the render subdivision values.
- To force a recalculation of the world space texture:
- Pick a CV on one of the grouped surfaces.
- World space textures are not mapped using UV or XYZ coordinates. If you have placed the texture using parametric texture mapping, the placement will change when you switch to world space texture mapping.
- Try to imagine unfolding the group of surfaces flat onto a table. If they do not flatten well, create seams to allow them to unfold more easily.
Environment Variables
ALIAS_WORLDSPACE_TIMEOUT
-
- The amount of time, in seconds, Alias should spend looking for a texture solution before giving up.
-
- If the search times out, Alias will render whatever calculations it had done, just as if you had pressed ESC to stop the calculations.
>
|
Note:
|
You can set ALIAS_WORLDSPACE_TEXTURE to 0 to
disable the time-out. However this is not recommended,
since Alias may encounter a group of surfaces with no
solution, and so never finish the calculations. You will have
to press ESC to stop the calculations.
|
|


