|
|
Curve Edit > Modify
> Curve editor

|
Using the Curve Editor
|
|
|
|
|
Purpose
Change the tangent or position at any point along a curve or curve on surface.
How To
To edit a curve:
-
1
-
Double-click the Curve editor icon, or choose Modify > Curve editor-
 from the Curve Edit palette menu. The Curve Editor window opens. from the Curve Edit palette menu. The Curve Editor window opens.
-
2
-
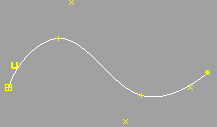
Click the curve you want to edit.
-
3
-
The Curve Editor manipulator appears.
- Use the manipulator to edit the curve interactively, or
- Use the text boxes, sliders, and menus in the Curve Editor window (see below).
Using the Curve Editor manipulator:
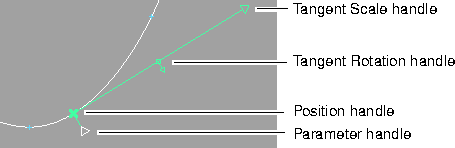
- Drag the Parameter handle to move the manipulator along the curve. Or click the Parameter handle and type an exact parameter.
- Drag the Position handle to move the current point in space.
- Drag with the left mouse button to move freely.
- Drag with the middle mouse button to move horizontally.
- Drag with the right mouse button to move vertically.
- Drag the Tangent Rotation handle to change the direction of the tangent at the current point.
- Drag the Tangent Scale handle to scale the tangent at the current point.
- Click any of the handles and type exact values.
Tips and Notes
- You cannot use snapping with the Tangent Scale handle.
Curve Editor window

Tangent Adjustment
|
|
See Parameterization on
page 10.
|
Parameter
-
- Type the parameter of the point along the curve you want to edit.
Scale
-
- Type a scale factor for the tangent.
Rotation X/Y/Z
-
- Type X, Y, and Z rotation factors for the tangent vector.
-
- For curves on surface, one rotation factor (rotation in the surface's UV space) is available.
Xform Control menu
Tangent
-
- Edit the position and tangent of the current point on the curve. This is the normal mode.
Position
-
- Edit the position of the current point on the curve. This option adds extra options to the Region Control menu.
-
- The tangent related handles are still available in the edit window, and using them will return you to Tangent mode.
Region Control menu
n CVs
-
- The number of surrounding CVs affected by the curve editor, from 2 to "curve degree plus one".
-
- When Xform Control is set to Position, two extra choices are available: 1 CV and All CVs. The All CVs option is useful for manipulating a curve with a large number of spans.
Tangent Align menu
X/Y/Z Axis
-
- Align the tangent with a world axis.
Reverse
-
- Reverse the direction of the current tangent vector.
Control Tools menu
|
|
If the Region Control value
has been changed, Undo will
not work.
|
Undo
-
- Undo the last change to the curve by the Curve editor at the current parameter value.
Next Crv
-
- Keep changes to the current curve and pick another curve to modify.
Done
-
- Keep changes to the current curve and close the Curve Editor window.
See Also
|
Curves > Project
tangent

|
Creating Continuity Between Curves and Other Objects
|
|
|
|
|
Purpose
Modify a curve or surface edge to achieve tangency or curvature continuity with a surface, or tangency with a curve intersection.
Overview
The Project tangent tool modifies a curve or surface edge to be tangent to a plane taken from an existing surface, or from the intersection of two construction curves.
Once you pick the surface, you can use the plane of that surface, or a plane perpendicular to and/or rotated from the surface, as the tangent for the curve. You can also create curvature continuity between the curve and the surface.
>
|
Note:
|
The Align tool has a similar function, but it aligns a curve
with an isoparm or curve on surface. The Project tangent
tool establishes continuity with the surface itself.
|
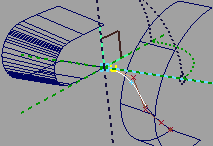
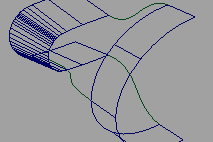
Example
Using Project tangent to prepare curves for Birail:
-
1
-
In this example, we need to create a curved surface between two existing surfaces, while maintaining continuity.
|
|
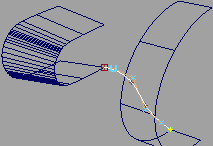
|
-
2
-
We have drawn a construction curve with the surface profile we want, using curve snap to make its endpoints lie on the edges of the two surfaces.
|
|
|
-
3
-
We use project tangent at each end to make the curve tangent to the surfaces.
|
|
|
-
4
-
We can repeat the procedure to make more profile curves.
|
|
|
-
5
-
Now that we have profile curves with tangent continuity, we can use them as generation curves for the Birail tool.
How To
To make a curve continuous with a surface:
|
|

|
-
1
-
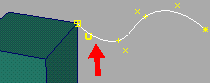
Double-click the Project tangent icon, or choose Project tangent- from the Curve Edit palette menu. The Project Tangent Adjustment control window appears.
|
Tip:
|
To project a curve using the same settings as the last time,
you do not have to open the Adjustment Control window.
Just click the Project tangent tool.
|
|
|
|
-
2
-
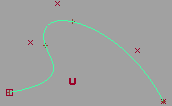
Click the curve or surface edge you want to modify, near the end which intersects the surface.
|
|
|
-
3
-
Click the surface near the edge from which the curve will project.
-
4
-
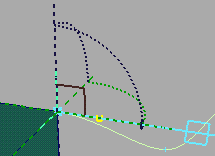
The tangent or curvature manipulator appears, depending on the Xform Control setting. (See below.)
- Use the manipulator to set the tangent, tangent magnitude, and curvature magnitude, or
- Use the text boxes, sliders, and menus in the Adjustment control window (see below).
|
|
|
-
You will almost always want construction history on. This
allows you to come back and edit the Project tangent
parameters even after you have exited the tool. When you
are satisfied with the tangent, you can delete the history
information with Delete > Del constr history.
-
5
-
When you are finished adjusting the curve, click another curve, or choose another tool.
To use the tangent/curvature manipulator:
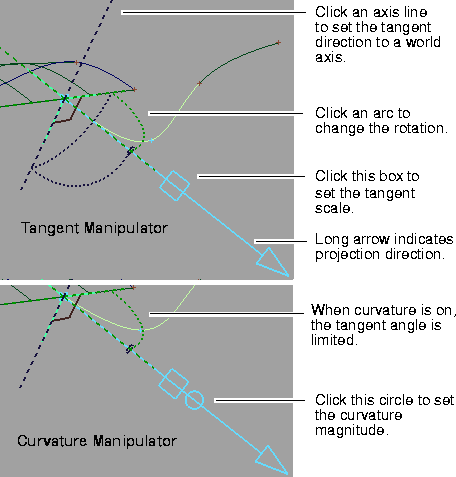
- Click an axis line to set the tangent direction.
- Click an arc, or the square, or circle (if available), then drag the mouse left and right to change the value, or type a number to set the value exactly.
To make a curve tangent to a curve intersection:
|
|

|
-
1
-
Double-click the Project tangent icon, or choose Project tangent- from the Curve Edit palette menu. The Adjustment control window appears.
>
|
Note:
|
Construction history is not available when projecting from a
curve intersection.
|
-
2
-
Click the curve or surface edge you want to modify.
-
Click near the end of the curve or edge where the curves
intersect.
-
3
-
Click the two intersecting curves.
-
4
-
An indicator appears at the intersection.
- Drag the left mouse button to change the tangent scale interactively.
- Drag the middle mouse button to change the tangent rotation interactively.
- Type two numbers to set the scale and rotation angle exactly, or
- Use the text boxes, sliders, and menus in the Adjustment control window (see below).
-
5
-
When you are finished adjusting the curve, click another curve, or choose another tool.
>
|
Note:
|
If, instead of tangent continuity, you want the curve's
tangent to make a given angle with the tangent plane of the
pair of intersecting curves, drag the right mouse button to
change the tangent angle interactively, enter the angle as the
third number on the prompt line, or adjust the slider in the
control window.
|
Tips and Notes
- Project tangent allows align construction history on the same curve provided that the two are modifying a different end of the curve.
-
It does not, however, allow other types of history to be
modifying the same curve. For instance if blend curve or
symmetry plane align history already exists when
selecting the curve to modify, you will see a confirmation
box asking whether history can be deleted.
Adjustment Control Window
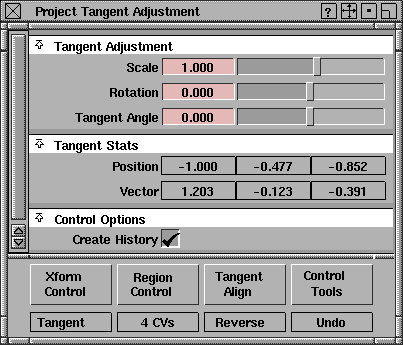
Tangent Adjustment Parameters
Scale
-
- This scale factor adjusts the length of the tangent vector, without modifying its direction.
Rotation
-
- The degree of rotation in the tangent plane. A rotation of 0 gives the default projection heading.Use positive and negative numbers to rotate in different directions.
|
|
This option is only available
when Xform Control is set to
Tangent.
|
Tangent Angle
-
- The degree of rotation out of the tangent plane. An angle of 0 gives the default projection pitch (i.e. tangent continuity). Use positive and negative numbers to rotate in different directions. Changing this value will destroy tangent continuity.
|
|
This option is only available
when Xform Control is set to
Curvature.
|
Curvature
-
- The magnitude of the curvature modification. Modify the shape of the curve without changing the curvature at the join with the surface.
Xform Control menu
Tangent
-
- Create tangent continuity between the surface/intersection and the curve.
|
|
This option is not available
when you project from a
curve intersection, or when
Tangent Align is set to
Normal.
|
Curvature
-
- Create curvature continuity between the surface and the curve.
Region Control menu
This menu has no functionality. It contains only one item, indicating the number of CVs that are modified by the tool (equal to the curve degree plus one).
If the curve is modified at its endpoint, only two CVs are affected for tangent continuity and only three for curvature (and this menu value is ignored).
Tangent Align menu
U/V
-
- Project the tangent onto the U or V direction of the surface.
|
|
This option disables
Curvature in the Xform
Control menu.
|
Normal
-
- Project the tangent onto the surface's normal at the edge. This makes the curve perpendicular to the surface, instead of tangent. It is equivalent to a Tangent Angle of 90.0 degrees.
Reverse
-
- Reverse the direction of the current tangent vector.
>
|
Note:
|
The U, V, and Normal commands set the type of alignment.
The Reverse command reverses the current tangent
direction, but does not change the type of alignment.
|
Control Tools menu
|
|
This option is exactly the
same as Edit > Undo in the
main modeling window.
|
Undo
-
- Undo all changes to the curve by the Project tangent tool.
Next Crv
-
- Keep changes to the current curve and pick another curve to modify.
Done
-
- Keep changes to the current curve and close the Adjustment control window.
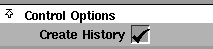
Control Options
Create History
-
- Save the Project tangent history of this curve for later editing. If you turn on Create History, you can come back later and change the options in the Adjustment control window.
See Also
|
Curves >
Rebuild curve

|
Rebuilding Complex Curves
|
|
|
|
|
Purpose
Prepare curves for use with other tools:
- Simplify curves and curves on surface by removing extraneous edit points.
- Increase curve definition by inserting edit points in segments with high curvature.
- Match the degree, parameterization, and edit point parameters of another curve.
- Convert a curve to uniform parameterization.
- Convert a curve to a different degree.
- Convert interior isoparms and trim edges into curves on surface.
How To
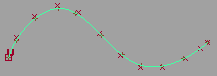
To simplify curves:
-
1
-
Double-click the Rebuild curve icon, or choose Rebuild curve- from the Curve Edit palette menu. The Rebuild Curve options window appears.
|
|
|
-
2
-
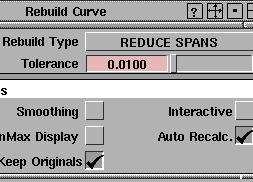
In the Rebuild Curve window,
- Choose Reduce Spans from the Rebuild Type popup.
- Set the initial Tolerance. A low value creates a more exact copy but simplifies the curve less. A high value is less exact but simplifies more.
|
|
|
-
3
-
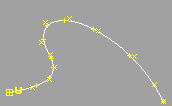
Click the curves to rebuild.
|
|
|
-
4
-
Click Go to simplify the curves.
- When Auto Recalc is on, you can move the Tolerance slider and the rebuilt curve will automatically update.
- If the rebuild is unsatisfactory, click Undo in the Rebuild Curve window and change the settings.
To add edit points to curves with high curvature:
|
|

|
-
1
-
Double-click the Rebuild curve icon, or choose Rebuild curve- from the Curve Edit palette menu. The Rebuild Curve options window appears.
|
|

|
-
2
-
In the Rebuild Curve window,
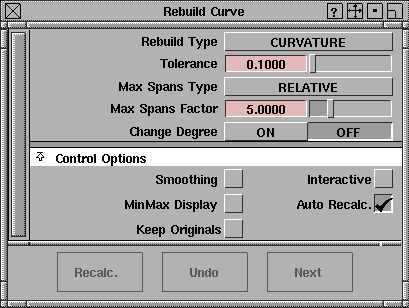
- Choose Curvature from the Rebuild Type popup.
- Set the initial Tolerance. A low value creates a more exact copy and inserts more new edit points. A high value is less exact and adds less new edit points.
- Set Max Spans Type to Absolute if you don't want the number of spans to exceed a certain number (Max Spans), otherwise use Relative.
|
|
|
-
3
-
Click the curves to rebuild.
|
|
|
-
4
-
Click Go to rebuild the curves.
- When Auto Recalc is on, you can change the settings and the rebuilt curve will automatically update.
- If the rebuild is unsatisfactory, click Undo in the Rebuild Curve window and change the settings.
To remove multi-knots from curves:
|
|

|
-
1
-
Double-click the Rebuild curve icon, or choose Rebuild curve- from the Curve Edit palette menu. The Rebuild Curve options window appears.
|
|
|
-
2
-
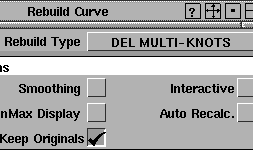
In the Rebuild Curve window, choose Del Multi-Knots from the Rebuild Type popup.
-
3
-
Click the curves to rebuild.
-
4
-
Click Go to remove multi-knots from the curves.
To match the parameterization of curves to an example curve:
|
|

|
-
1
-
Double-click the Rebuild curve icon, or choose Rebuild curve- from the Curve Edit palette menu. The Rebuild Curve options window appears.
|
|
|
-
2
-
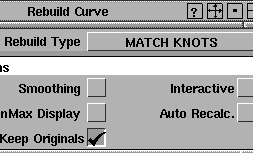
In the Rebuild Curve window, choose Match Knots from the Rebuild Type popup.
-
3
-
Click the curves to rebuild.
-
4
-
Click Go.
-
5
-
Click the curve to take the knot values (parameters) from.
-
The curves are re-parameterized with the same knot
values and degree as the example curve. This may cause
the curves to change shape.
-
6
-
If the rebuild is unsatisfactory, click Undo in the Rebuild Curve window and change the settings.
To convert curves to uniform parameterization:
|
|

|
-
1
-
Double-click the Rebuild curve icon, or choose Rebuild curve- from the Curve Edit palette menu.
-
The Rebuild Curve options window appears.
|
|
|
-
2
-
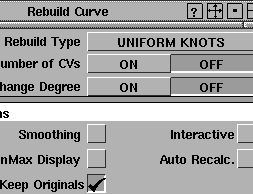
In the Rebuild Curve window, choose Uniform Knots from the Rebuild Type popup.
-
3
-
Click the curves to rebuild.
-
4
-
Click Go to convert the curves to uniform parameterization.
Tips and Notes
- If you click an isoparm or trim edge with the Rebuild curve tool, it will be rebuilt into a curve on surface.
-
Curves on surface, trim curves, and isoparms can only be
rebuilt as degree 1 or 3 curves.
- To rebuild a curve using the same settings as the last time, you do not have to open the Rebuild Curve window. Just click the Rebuild curve tool.
- If Keep Originals is off, the new curve replaces the old curve in the SBD hierarchy.
-
If Keep Originals is on, the new curve is given the name of
the old curve with "rebuild" appended to the beginning.
Rebuild Curve Option Window
Rebuild Type
Curvature
-
- Increase curve definition by inserting edit points in segments with high curvature.
Reduce Spans
-
- Simplify the curve by removing extraneous edit points.
Del Multi Knots
-
- Remove multi-knots from the curve.
Uniform Knots
-
- Convert the curve to uniform parameterization.
Match Knots
-
- Convert the curve to match the parameterization and degree of another curve.
|
|
These settings appear when
Rebuild Type is Curvature.
|
Curvature settings
Tolerance
-
- The amount of deviation from the original curve permitted during the rebuild (in current linear units).
-
- A low number matches the original more exactly, and inserts more points. A high number does not match the original as well, and inserts fewer points.
Max Spans Type
-
- Absolute-the maximum number of spans in the new curve is equal to Max Spans.
-
- Relative-the maximum number of spans in the new curve is equal to the current number of spans times the Max Spans Factor.
|
|
This option appears when
Max Spans Type is Absolute.
|
Max Spans
-
- Specify the maximum number of spans allowed in the new curve, when Max Spans Type is Absolute.
|
|
This option appears when
Max Spans Type is Relative.
|
Max Spans Factor
-
- Specify a multiplicative factor. When Max Spans Type is Relative, the maximum number of spans allowed in the new curve is the current number of spans times this factor.
-
-
|
|
See Degree on page 12.
|
Change Degree
-
- On-Change the degree of the curve as it is rebuilt. A slider appears allowing you to set the degree of the rebuilt curve. Curves on surface, trim curves, and isoparms can only be rebuilt as degree 1 or 3.
-
- Off-Do not change the curve degree.
|
|
These settings appear when
Rebuild Type is Reduce
Spans.
|
Reduce Spans settings

Tolerance
-
- The amount of deviation from the original curve permitted during the rebuild (in current linear units).
-
- A low number matches the original more exactly, but does not simplify the curve as much. A high number does not match the original as well, but simplifies more.
|
|
These settings appear when
Rebuild Type is Uniform
Knots.
|
Uniform Knots settings
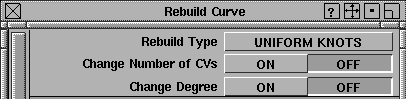
Change Number of CVs
-
- On-Change the number of CVs (and hence of spans) in the rebuilt curve. A slider appears allowing you to set the number of spans.
-
- Off-The number of CVs in the rebuilt curve is equal to the number of CVs in the original.
|
|
See Degree on page 12.
|
Change Degree
-
- On-Change the degree of the curve as it is rebuilt. A slider appears allowing you to set the degree of the rebuilt curve. Curves on surface, trim curves, and isoparms can only be rebuilt as degree 1 or 3.
-
- Off-Do not change the curve degree.
Control Options
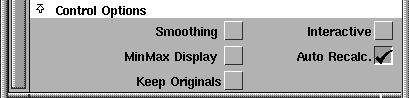
Smoothing
-
- After rebuilding, automatically switch to the Smooth tool to allow you to smooth the resulting curve.
Interactive
-
- Specify an arbitrary surface isoparm to rebuild, rather than a visible one.
MixMax Display
-
- Automatically create a Min-Max deviation comb between the original and rebuilt curves.
Auto Recalc.
-
- Automatically update the new curve when the values in the Rebuild Curve window change.
Keep Originals
-
- Keep the original curve after creating the rebuilt curve.
Buttons

Recalc
-
- When Auto Recalc. is turned off, use this button to update the rebuilt curve with the current values.
Undo
-
- Undo all the changes made by the Rebuild curve tool and return to the original curve.
Next
-
- Finish rebuilding the current curve and prompt for a new curve to rebuild.
See Also
|
Curves >
Curve planarize

|
Flattening Curves onto a Plane
|
|
|
|
|
Purpose
Modify a curve or surface edge so all its points lie on the same plane. Often used to prepare curves for use as profile curves, or for the Set planar tool.
Examples
- If you have a series of profile curves, you will usually want to flatten them before building surfaces from them.
- To put planar caps on a cylinder, you must flatten the edges.
How To
To flatten a curve:
-
1
-
Click the Curve planarize icon, or choose Curve planarize from the Curve Edit palette menu.
-
2
-
Pick the curves or surface edges you want to flatten.
- When picking curves, you can use the pick box.
- When picking surface edges, you must pick them individually.
-
3
-
Click Go to flatten the curves.
-
4
-
If you are using the Construction Plane option, click the construction plane unto which the curve(s) will be flattened.
-
If you are using the Manipulator Defined option, use the
manipulator to define the plane unto which the curve(s)
will be flattened.
Tips and Notes
- To flatten a curve to an exact, non-axis plane (that is, not XY, YZ or XZ), create a construction plane and use the Construction Plane option.
Options
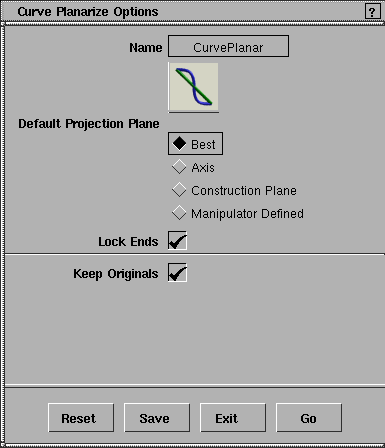
Default Projection Plane
-
- Best-calculate the plane that best fits the existing curve. That is, the plane which forces the least modification to the curve.
-
- Axis-flatten the curve onto an axis plane (XY, YZ, or XZ).
-
- Construction Plane-flatten the curve onto an existing construction plane.
-
- Manipulator Defined-specify the plane interactively using a plane manipulator.
|
|
This option appears when
the Default Projection Plane
is Best.
|
Lock Ends
-
- Do not move the endpoints while flattening. This allows you to maintain existing intersections.
|
|
This option appears when
the Default Projection Plane
is Axis.
|
Principal Plane
-
- Choose a plane (XY, YZ or XZ) to flatten the curve onto.
Keep Originals
-
- Keep the old curve(s) after flattening.
See Also
|


