|
|
Modeling Aids
|
|
|
2
|
Construction Aids
|
|
In This Section:
|
Grids palette > Grid
spacing, Grid preset

|
Changing the Grid Spacing
|
|
|
|
|
Purpose
Change the spacing between grid lines.
Overview
The Grid spacing tool changes the distance between the lines of the grid. The default spacing is 1.0 centimeters (10.0 centimeters for AutoStudio). The Grid preset tool quickly resets the grid spacing to a value you set in the option window.
The tool lets you do the following:
|
|

|
- Set the distance between grid lines.
|
|

|
- Set the number of subdivisions between grid lines.
|
|

|
- Show or hide labels on grid lines in orthographic windows.
|
|

|
- Show or hide the gnomon in the corner of the perspective window.
|
|

|
- Set the size of the grid (extent) in the perspective window.
Use Grid spacing and Grid preset in tandem when you need to change the grid temporarily, for example when working on small details of a model:
- Set the default grid spacing you normally want to use in the Grid preset option window.
- Use the Grid spacing tool to temporarily change the grid size.
- When you want to return to the normal grid size, click the Grid preset tool.
>
How To
To change the distance between grid lines:
|
|

|
-
1
-
Click the Grid spacing tool, or choose Grids > Grid spacing from the Grids palette menu.
-
2
-
Type the distance in the current measurement units between grid lines.
-
or
-
Drag the mouse left and right to resize the grid
interactively.
-
3
-
To customize the grid further, double click the Grid spacing tool or choose Grids > Grid spacing -
 from the Grids palette menu. from the Grids palette menu.
To reset the grid to the default spacing:
|
|

|
- Click the Grid preset tool, or choose Grids > Grid preset from the Grids palette menu.
-
The Grid preset tool resets the grid size to the value you set
in the Grid preset option window.
To set the default grid spacing:
|
|

|
-
1
-
Double click the Grid preset tool, or choose Grids > Grid preset - from the Grids palette menu.
-
2
-
Set the options for the default grid. This is the grid spacing you will usually use, and will want to return to after changing the grid spacing temporarily.
-
3
-
Click Save to save the new settings without actually resetting the grid.
-
Click Go to save the new settings and reset the grid.
To turn off the grid display
- Choose DisplayTgls > Window Toggles > Grid from the menu bar.
-
To turn the grid back on, select this tool again.
To save the grid settings between sessions:
- To save the current grid settings:
- Choose Layouts > User windows > Save from the menus.
- Type user_windows.view in the filename field.
- Click the Save Windows button.
- To save the preset grid settings (this actually saves the settings in all option windows):
- Choose Preferences > User Options > Save options from the menus.
- Type user_options in the filename field.
- Click the Save Options button.
Options
Grid spacing Options
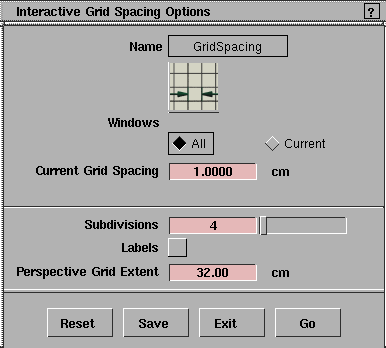
Windows
-
- Choose whether the grid spacing will change in All windows or only the Current window.
|
|

|
Grid Spacing
-
- The distance, in the current linear units, between grid lines.
|
|

|
Subdivisions
-
- The number of subdivisions between grid lines. The subdivision lines are lighter than the normal grid lines, but you can still snap to them using grid snapping.
-
- For example, if you set the grid spacing to 1.0, and the number of subdivisions to 4, Alias will show grid subdivisions at 0.25, 0.5, 0.75, 1.25, and so on.
|
|

|
Labels
-
- Label the grid and subdivision lines with their unit values.
-
- The labels only appear in the orthographic windows.
|
|
|
Perspective Grid Extent
-
- The size of the grid in the perspective window, in current linear units. Enter a value from 1 to 1000000.
Grid preset Options
The settings in the Grid preset option window are exactly the same as in the Grid spacing option window, with one addition:
|
|

|
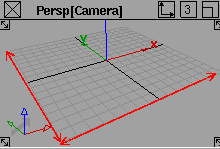
Corner Perspective Gnomon
-
- Show the gnomon in the corner of the perspective window.
-
- The gnomon is the small indicator which floats in the corner of view windows. It has colored arrows to show the orientation of the axes and a grey arrow pointing to the origin.
See Also
Snapping to Grids, Curves, and Points
|
|
|
|
|
Purpose
Constrain the movement or placement of objects in view windows.
How To
|
To Snap To
|
Hold Down
|
or Turn On This Button
|
|---|
|
|
Alt
|
Grid snap
|
|
|
Ctrl and Alt
|
Curve snap
|
|
|
Ctrl
|
Magnet snap
|
Tips and Notes
- To use a type of snapping temporarily, hold down the corresponding modifier key(s).
- To keep a type of snapping on continuously, turn on the corresponding button to the right of the prompt line. Click the button again to turn it off.
- Use curve snapping when moving or adding edit points to make sure two curves intersect.
- When snapping an object, it is the pivot of the object that snaps to the chosen position.
Working With Guidelines
|
|
|
|
|
Overview
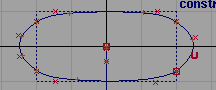
Several tools, including all the keypoint curve tools (e.g. Curves > Line-arc), add guidelines to the scene. These faint dotted lines allow you to easily snap points along lines extending from, parallel to, or perpendicular to previous curves.
Because guidelines can potentially clutter the screen, you can set the maximum number of guidelines on screen. As new guidelines are created, the oldest guidelines are removed if necessary so as not to exceed the maximum number.
How To
To create guidelines when drawing normal NURBS curves
|
|
|
-
1
-
Choose Curves > New Curves > New Curve (cvs) or Curves > New Curves > New Curve (edit pts), or double-click one of the icons to open the option box.
-
2
-
Turn on the Create Guidelines option in the option box.
-
3
-
Draw the curves. (See Drawing Curves on page 128.)
Use guidelines to place points:
|
|
|
- Click and drag along a guideline to constrain the point.
|
|
|
- Click the intersection of two guidelines to constrain the point to the intersection.
To show or hide all guidelines:
- Choose DisplayTgls > Guidelines from the menus.
To delete all guidelines:
- Choose Delete > Del guidelines from the menus.
To set the maximum number of guidelines on screen at any time:
|
|
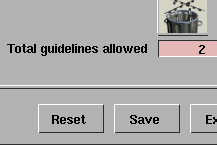
|
-
1
-
Choose Delete > Del guidelines- from the menus.
-
2
-
Set the slider to the maximum number of guidelines you want on screen at any time.
Tips and Notes
- Guidelines disappear automatically when you use tools that cannot use guidelines, such as pick tools.
See Also
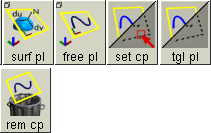
|
Grids palette >
Free plane,
Surface plane,
Set const plane,
Tgl const plane,
Remove const plane
|
Construction Planes
|
|
|
|
|
Purpose
Temporarily use a separate coordinate system that can be arbitrarily oriented with respect to the world space coordinate system.
Overview
Tools in Alias place objects in an XYZ coordinate system. Normally this is the world space coordinate system, the absolute frame of reference for the universe of your scene.
However, there will be times when you need to align objects in a specific context, where the orientation, position and rotation are different from those of the world space axes and origin.
In these cases, construction planes let you create and work in an alternative coordinate system that can be displaced and rotated from the world space coordinate system.
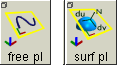
Surface plane and Free plane
- The Free plane tool creates construction planes that you position and rotate in relation to the world space coordinate system.
-
Free planes are useful when you are modeling objects that
must have an absolute orientation that is not aligned with
a major axis.
- The Surface plane tool creates construction planes that you position and rotate in relation to a curve or surface.
-
Surface planes are very powerful tools, and are useful in a
wide variety of modeling contexts.
Example
|
|
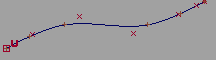
|
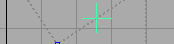
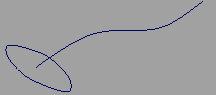
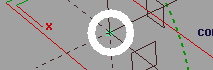
For example, consider the curve at left. We want to create a surface perpendicular to the curve at its end.
In world space this would be difficult: we would have to draw construction curves for the new surface, then try to rotate the construction curves to be perpendicular to the tangent at the end of the curve.
|
|
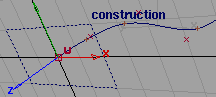
|
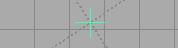
With construction planes, the task is much easier. We use the Surface plane tool. With curve snapping on, we snap the new construction plane to the curve and slide it to the end.
|
|
|
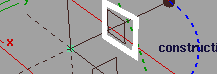
Now we can draw the curves for the new surface much more easily. The grid is perpendicular to the end of the original curve, and the origin of the new coordinate system is the original curve's endpoint.
|
|
|
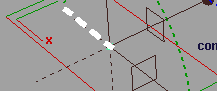
Finally we use the Tgl const plane tool to return to the world space coordinate system. The new construction curve is exactly perpendicular to the endpoint of the original curve. Now we can use Set planar or other surface building tool.
Construction Planes and the Perspective Window
When a construction plane is active, placement in the perspective window is automatically constrained to the construction plane. This includes:
- Creating primitive objects.
How To
To create a construction plane in world space:
|
|

|
-
1
-
Choose the Free plane tool from the Grids palette menu, or click its icon.
-
2
-
Click in a view window to place the new construction plane, or type 3D coordinates to place the origin of the new plane exactly.
-
The new construction plane appears, with its origin at the
point you clicked.
-
3
-
Use the manipulator handles to move, rotate, and size the construction plane (see below).
-
4
-
Click Go.
-
The coordinate system, axes, and grid are now aligned to
the new construction plane.
To create a construction plane relative to a curve or surface:
|
|

|
-
1
-
Choose the Surface plane tool from the Grids palette menu, or click its icon.
-
2
-
Click a surface or curve.
-
The construction plane appears, with its origin at the point
you clicked, and its up axis (Z-axis) aligned with the
tangent of the curve or the normal of the surface.
-
3
-
Use the manipulator handles to move, rotate, and size the construction plane (see below).
-
4
-
Click Go.
-
The coordinate system, axes, and grid are now aligned to
the new construction plane.
To use the construction plane manipulator:
|
|
|
Click a handle to select it (the handle becomes white), then either:
- Drag the handle to move/rotate/scale the plane interactively. (See details below.)
- Type exact values on the keyboard.
- Click on geometry or the grid, while using a snap mode, to snap the manipulator's axes to a specific position or orientation.
>
|
Note:
|
Because the surface plane manipulator is constrained to the
geometry to which it is attached, not all handles are drawn
or functional.
|
|
|
|
|
|

|
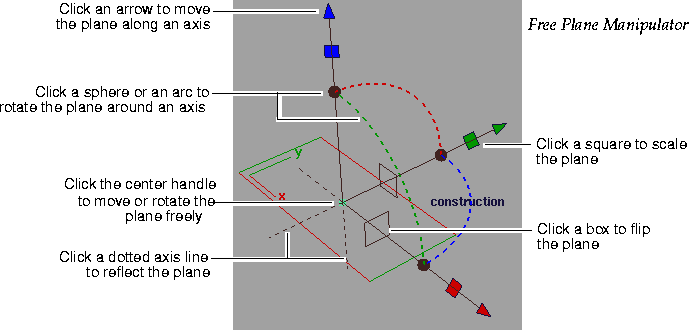
Interactive manipulation
- Drag an arrow handle to move the plane along an axis (for free planes) or along the U or V parametric direction (for surface planes).
|
|
|
- Drag a dotted arc to rotate the plane around the axis with the same color (the axis perpendicular to the arc).
|
|

|
- Drag a square handle to scale the plane along the axis that has the same color as the square. (For a surface plane, these handles don't appear by default. Turn on Scale Handle in the option window to see them.)
|
|
|
- Click an arrow handle to change the center handle to the free move handle. Then drag the center handle to move the plane freely in X, Y, Z (or U and V for a surface plane).
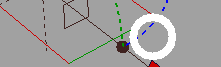
- Click a sphere or arc handle to change the center handle to the free rotate handle. Then drag the center handle to rotate the plane freely around all three axes (or around the normal for a surface plane).
|
|
|
- Click one of the rectangular boxes to flip the plane to one of the two perpendicular orientations.
|
|
|
- Click a dotted axis line to reflect the plane across the X, Y, or Z axes.
- Use Edit > Undo to undo changes to the manipulator.
To edit the current construction plane:
-
1
-
Select a construction plane.
|
|
|
-
2
-
Click the Free plane or Surface plane tool.
-
The manipulator reappears on the selected construction
plane. The coordinate system is toggled back to world
space.
>
|
Note:
|
You can also select the Free plane or Surface plane tool first,
then select the construction plane you want to edit.
|
To choose a construction plane:
|
|

|
- To toggle between the current construction plane and the world space coordinate system, choose Tgl constr plane from the Grids palette menu or click its icon.
|
|

|
- To set the current construction plane, pick a construction plane object, then choose Set constr plane from the Grids palette menu, or click its icon.
To delete a construction plane:
-
1
-
Pick only the construction plane.
|
|

|
-
2
-
Press the Delete key, or choose Delete > Del active from the menus, or click the Remove const plane tool.
To create a three-point plane:
|
|
This procedure is now much
easier than in previous
versions of Alias.
|
Occasionally you may need to create a free plane with a very specific orientation: a three-point plane. This is a plane defined by three points in space, usually a point on the model and two grid points.
|
|

|
-
1
-
Choose the Free plane tool from the Grids palette menu, or click its icon.
-
2
-
Use a snap mode and click the three points of the new construction plane.
-
The first click creates and positions the new plane. The
second and third clicks orient the plane.
>
|
Note:
|
You can select the Free plane tool at anytime; if you only
need to align to 2 points, then just hit Go after selecting
them.
|
|
Tip:
|
Open the Information window (Windows > Information >
Information window) to see detailed information as you
manipulate the plane.
|
Options
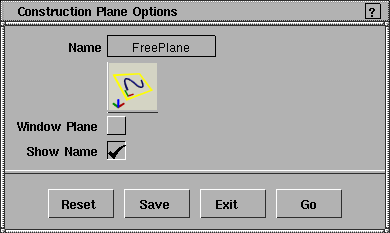
Free Plane option box:
|
|
Alternatively, the
construction plane
manipulator allows you to
create new construction
planes. Select any handle
and type "w" for window
mode.
|
Window Plane
-
- Create new construction planes parallel to the current view window.
-
- You should be careful using this option with the surface planes, since it overrides the very useful default behavior of orienting the plane perpendicular to the tangent or normal of the curve or surface.
|
|

|
Show Name
-
- Show the name of the construction plane object in the view windows.
Surface Plane option box:
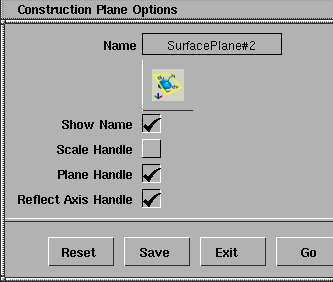
|
|
These options only appear in
the Surface plane options
window.
|
Scale Handle
Plane Handle
Reflect Axis Handle
-
- Choose which handles to show on the construction plane manipulator.
|


