|
|
11
|
Labeling and Measuring
|
|
In This Section:
|
|
|
|
|
|
Locators >
Move locator

Delete >
Del locators
DisplayTgls >
Locators
|
Introduction to Labeling and Locators
|
|
|
|
|
Purpose
Add objects to the scene showing location, distance, curvature, and other measurement information.
Overview
Locators
The following tools add locators to the scene:
- The Deviation measures tools. See
|
|
|
These objects are not geometry and hence do not render, but exist in the scene just like other objects.
Locators are not "one-time" measurements. They persist until you delete them. Locators that are attached to geometry update their measurement when the geometry is modified.
One-time Measurements
The following tools measure aspects of the scene, but do not create locators:
How To
To move a locator:
|
|

|
-
1
-
Click the Move locator icon, or choose Move locator from the Locator palette menu.
-
2
-
Click the locator you want to move.
-
To pick more than one locator, hold down the Shift key and
click.
-
3
-
Drag the mouse.
-
Use the same procedures to move the locator as with the
Xform > Move tool, or type coordinates to move the locator
exactly.
-
If a locator is attached to geometry, its movement will be
constrained to that geometry.
To edit a locator:
-
1
-
Choose Windows > Information > Information window to open the Information Window.
|
|

|
-
2
-
Click the Move locator icon, or choose Move locator from the Locator palette menu.
-
3
-
Click the locator you want to edit.
-
To pick more than one locator, hold down the Shift key and
click.
-
4
-
Drag the different parts of the locator, or use the options in the Information Window to edit the object. Details are given in the following sections for each tool, but the options are often self-explanatory.
To show or hide all locators:
- Choose DisplayTgls > Locators.
To delete a locator:
- To delete all locators in the scene:
- Choose Delete > Del locators > All.
- To delete specific locators:
|
|

|
- Click the Move locator icon, or choose Move locator from the Locator palette menu.
- Click the locator you want to delete. To pick more than one locator, hold down the Shift key and click.
- Choose Delete > Del locators > Active.
See Also
|
Locators >
Create locator

|
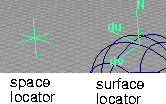
Adding a Point Locator
|
|
|
|
|
Purpose
Create a locator object at a point in space or any type of geometry.
The Create locator tool adds a locator object to the scene. You can place the locator in world space, or on a curve or surface. You can read and set the coordinates of the locator in the Information Window.
Locators have many different uses:
- Place a space locator at an exact coordinate or a surface locator at an exact parameter, then snap to it when constructing curves or surfaces.
- Drag a surface locator along a curve or surface to see the normals, and view the parameterization in the Information Window.
- Use a surface or curve locator to translate U/V parameters into 3D world space coordinates.
- Use locators as "placeholders" to keep track of points in space for later use.
How To
To create a locator:
|
|

|
-
1
-
Click the Create locator icon, or choose Create locator from the Locators palette menu.
|
|
|
-
2
-
Click in a view window to add a locator to the scene. You can continue to move the new locator while the mouse button is down. When you release the mouse button, the locator is created.
- Click in empty space to add a world space locator, or type a 3D coordinate to place the locator exactly.
- Click a curve to add a curve locator.
- Click an isoparm on a surface to add a surface locator.
Tips and Notes
- Open the Information Window to display/change the location and properties of any picked locators.
- For world space locators, you can edit the world space position of the locator.
- For surface locators, you can edit the U and V parameters of the locator, and view the world space position of the locator.
- For curve locators, you can edit the U parameter of the locator, and view the world space position of the locator.
- The Windows option controls which windows show new locators. You can change this option after a locator is created using the Windows pop-up menu in the Information Window.
Options
Windows
-
- All windows-the new locator appears in all view windows.
-
- Current window-the new locators only appears in the current window.
See Also
|
Locators >
Annotate

|
Adding an Annotation
|
|
|
|
|
Purpose
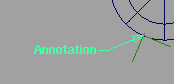
Create a label that points to a locator in the scene. When the locator moves, the annotation moves with it.
How To
To annotate an object or locator:
-
1
-
Click the Annotate icon, or choose Annotate from the Locators palette menu.
-
2
-
Click an existing locator, or
- Click in empty space to add and annotate a world space locator, or type 3D coordinates to place the locator exactly.
- Click a curve to add and annotate a curve locator.
- Click an isoparm on a surface to add and annotate a surface locator.
-
3
-
Click the point in space where you want the text to begin, or type a 3D coordinate to place the text exactly.
-
A "leader" arrow is created from the text to the locator.
|
|
|
-
4
-
Type the text string you want to attach to the locator, then press Enter.
To edit an annotation:
-
1
-
Choose Windows > Information > Information window to open the Information Window.
|
|

|
-
2
-
Click the Move locator icon, or choose Move locator from the Locator palette menu.
-
3
-
Click the annotation you want to edit.
- Drag the label to move it.
Annotation Parameters
You can change the following parameters of an annotation in the Information Window:
Text
-
- The text that appears at the end of the leader arrow.
Offset
-
- The relative distance of the text (the endpoint of the leader arrow) from the locator it points to.
Length
-
- The length of the leader arrow (small horizontal segment beside the text).
Justify
-
- Choose whether to justify the annotation text Left or Right.
Window
-
- Choose whether the annotation appears in all windows or only the current window.
See Also
|
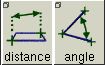
Locators >
Distance, Angle

|
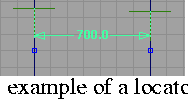
Adding Linear and Angular Measurements
|
|
|
|
|
Purpose
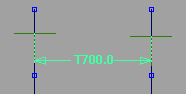
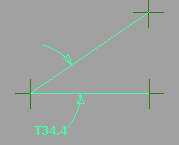
Add locators that show the distance between two points or the angle between three points.
How To
To measure the distance between two points or locators:
|
|

|
-
1
-
Click the Distance icon, or choose Distance from the Locators palette menu.
-
2
-
Click an existing locator for the start point, or
- Click in empty space to add a world space locator, or type 3D coordinates to place the locator exactly.
- Click a curve to add a curve locator.
- Click an isoparm on a surface to add a surface locator.
|
|
|
-
3
-
Click an existing locator for the end point, or click to create a new locator as in step 2.
-
If you are using an existing locator:
- Click the left mouse button to measure the diagonal distance between the locators.
- Click the middle mouse button to measure the horizontal distance between the locators.
- Click the right mouse button to measure the vertical distance between the locators.
-
If you are creating a new locator:
- Click the left mouse button to place the end locator freely.
- Click the middle mouse button to place the end locator horizontal to the start point
- Click the right mouse button to place the end locator vertical to the start point.
- If you want to measure horizontal or vertical distance on an existing distance locator, change the Display parameter in the Information window.
-
4
-
You can edit the parameters of the locator in the Information Window. See Distance parameters on page 372.
To measure the angle between three points or locators:
|
|

|
-
1
-
Click the Angle icon, or choose Angle from the Locators palette menu.
-
2
-
Click an existing locator for the endpoint of the first arm, or:
- Click in empty space to add a world space locator, or type 3D coordinates to place the locator exactly.
- Click a curve to add a curve locator.
- Click an isoparm on a surface to add a surface locator.
-
3
-
Click an existing locator for the vertex of the angle, or click to create a new locator as in step 2.
- Click the middle mouse button to place the end point horizontal to the start point
- Click the right mouse button to place the end point vertical to the start point.
|
|
|
-
4
-
Click an existing locator for the end point of the second arm, or click to create a new locator as in step 2.
- Click the middle mouse button to place the end point horizontal to the start point
- Click the right mouse button to place the end point vertical to the start point.
-
5
-
The new locator appears. Pick and drag the label to change the length of the measurement leaders (see below).
To edit a linear or angular locator:
-
1
-
Choose Windows > Information > Information window to open the Information Window.
|
|

|
-
2
-
Click the Move locator icon, or choose Move locator from the Locator palette menu.
-
3
-
Click the locator you want to edit.
- Drag the label to change the length of the measurement leaders.
Tips and Notes
- The measurements automatically update when you move or modify the objects/locators the measurements are attached to.
- You can extend an angle measurement beyond the locators. The measurement draws extension lines connecting itself to the original locators.
|
|
You can change these
parameters for each type of
measurement in the
Information Window.
|
Parameters
Common parameters
Offset
-
- The offset of the label and measurement line from the actual measurement point.
Display
|
|
This is the same as clicking
the second locator with
different mouse buttons
when you create a distance
measurement.
|
-
- For a distance locator:
-
- Choose whether to measure the Diagonal, Horizontal, or Vertical distance between the locators.
-
- For an angle locator:
-
- Choose whether to measure the True or Projected Angle. See the Options section for more information.
Window
-
- Show the locator in all windows or the current window.
Toggle Prefix
-
- Add a letter to the beginning of the label indicating whether the measurement is true (T) or projected (P).
Distance parameters
DX/DY/DZ
-
- Display the X, Y, and Z distances between the locators. You cannot edit these fields.
True Length
-
- The distance between the locators. You cannot edit this field.
Length
-
- Choose whether to measure the True or Projected length. See the Options section for more information.
Angle parameters
True Angle
-
- The angle at the focus of the three locators. You cannot edit this field.
Options
True
-
- The true measurement in 3D world space (such as seen in the Perspective window).
Projected
-
- The measurement reports the distance/angle as it appears in the window in which the measurement was created.
See Also
|
Locators >
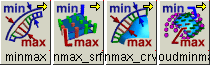
Radial Measures >
Radius, Diameter
|
Adding Radial Measurements
|
|
|
|
|
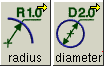
Purpose
Add locators that show the radius or diameter of objects.
How To
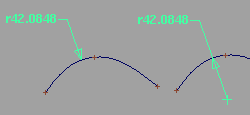
To measure the radius of a curve or arc:
|
|

|
-
1
-
Click the Radius icon, or choose Radial measures > Radius from the Locators palette menu.
-
2
-
Click the curve you want to measure. You can move the new measurement while the mouse button is down. When you release the mouse button, the measurement is attached to the curve.
|
|
|
-
3
-
The new locator appears.
- Drag the arrow head to move the measurement along the curve.
- Drag the text or leader line to change the length of the leader.
- Hold Shift and click off the measurement with the middle mouse button to toggle display of the center of the circle/center of curvature.
|
|

|
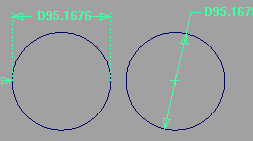
To measure the diameter of a circle:
-
1
-
Click the Diameter icon, or choose Radial measures > Diameter from the Locators palette menu.
|
|
|
-
2
-
Click the circle you want to measure. You can move the new measurement while the mouse button is down. When you release the mouse button, the measurement is attached to the circle.
-
3
-
The new locator appears.
- Drag the arrow head to move the measurement along the curve.
- Click the middle mouse button to align the measurement horizontally. Click the right mouse button to align the measurement vertically.
- Click and drag the text or dimension line to change the length of the leader.
- Hold Shift and click off the measurement with the middle mouse button to toggle to a different display that shows the center of the circle.
To edit a radial locator:
-
1
-
Choose Windows > Information > Information window to open the Information window.
|
|

|
-
2
-
Click the Move locator icon, or choose Move locator from the Locator palette menu.
-
3
-
Click the locator you want to edit.
- Drag the arrow head to move the measurement along the curve.
- Drag the text or leader line to change the length of the leader.
- Hold Shift and click off the measurement with the middle mouse button to toggle display of the center of the circle (or center of curvature).
- Use the options in the Information Window to edit the object. See Parameters below.
Tips and Notes
- The measurements automatically update when you move or modify the objects/locators the measurements are attached to.
- You cannot add a radius measure to a straight line.
- You can add more than one radius locator to a curve or arc.
- When the "center of curvature" of a measurement is displayed (Shift-click off the measurement with the middle mouse button), you can snap to the centerpoint using Magnet snapping.
|
|
See Rational vs. Non-rational
Geometry on page 13.
|
- Using the Radius or Diameter tools on a non-rational circle will show that the circle is not perfectly round. For perfectly round circles, you must use rational geometry.
Parameters
|
|
You can change the
following parameters in the
Information window.
|
U
-
- The U parameter on the curve at which the measurement is taken.
-
- Note that non-rational circles will have slightly different radii at different points on the circle. See Rational vs. Non-rational Geometry on page 13.
Radius/Diameter
-
- The radius or diameter measured at this point on the circle. You cannot edit this field.
Offset
-
- The offset of the label from the measurement (length of the leader line).
|
|
This parameter applies to
radial measures only.
|
Length
-
- The length of the horizontal line beside the text (in pixels).
|
|
This parameter applies to
radial measures only.
|
Justify
-
- Choose whether to justify the annotation text Left or Right.
Window
-
- Show the locator in All windows or only the Current window.
See Also
|