|
|
Evaluate >
Cross section

|
Creating Cross-Section Lines
|
|
|
|
|
Purpose
Display cross-sections on the picked geometry, according to the current construction plane.
Overview
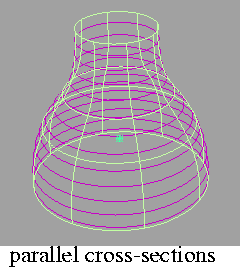
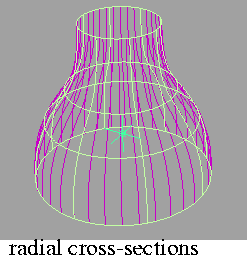
The Cross section tool can produce two types of cross-section lines: Parallel and Radial.
|
|
|
- Parallel cross-section lines are created by intersecting a series of parallel planes with the geometry. These planes are perpendicular to the main axes (X, Y or Z).
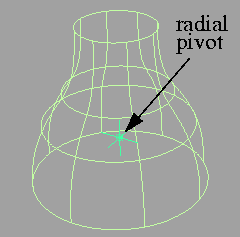
- Radial cross-section lines are created by intersecting a rotating plane with the geometry. The plane passes through a user-defined pivot point and axis, around which it rotates. This axis is parallel to either the X, Y or Z axis.
You can use the Cross section tool on shells as well as surfaces and trimmed surfaces.
How To
To show cross-section lines on a model:
-
1
-
Pick the surfaces on which you want to show cross-sections.
|
|
|
-
2
-
Click the Cross section icon, or choose Cross section from the Evaluate palette menu.
-
3
-
If the Section type option is set to Radial, you must position the radial pivot.
-
4
-
A locator appears in the scene. Move the locator with the mouse, then click Go.
|
|
|
-
The Cross section tool creates cross section curves from the
picked geometry.
-
If Create History is on, you can modify the model and the
cross-section lines will automatically update.
To remove cross-section lines:
-
1
-
Pick only the group of cross-section curves.
-
2
-
Choose Delete > Active.
Tips and Notes
- Try to avoid situations where cross-sections pass through the pole of an object (such as a sphere). Cross sections around poles are not created.
-
As a workaround, you can try to move the surface slightly.
- Cross-section lines are actually grouped degree 3 curves. They appear as a compressed node in the SBD window.
Options
|
|
See Overview above for more
details on these two types.
|
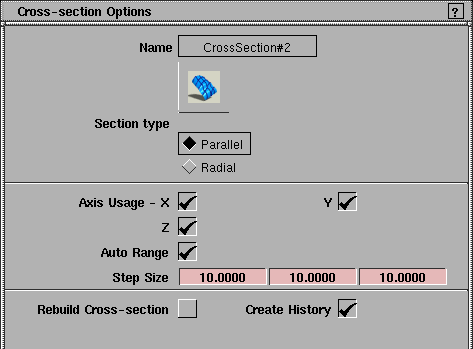
Section Type
-
- Parallel-the cross-section lines are parallel to each other.
-
- Radial-the cross-section lines are created from intersections with a rotating plane.
|
|
This option appears when
Section Type is Radial.
|
Radial pivot point
-
- X,Y,Z coordinates of the pivot point for radial cross-section lines.
|
|
This option appears when
Section Type is Radial.
|
Number of radial sections
-
- Number of radial cross-section lines.
Axis Usage X/Y/Z
-
- Choose the axes perpendicular to which you want to create parallel cross-sections, or around which you want to create radial cross-sections.
Auto Range
-
- Use the bounding box of the picked objects to determine where to compute the cross-sections, independently of the obkect's position in space.
|
|
These options appears when
Auto Range is off.
|
Start/End Coordinate
-
- Enter the 3D coordinates of two corners of a bounding box. The cross-sections will be calculated for the region of the selected object(s) that intersect this box.
-
- If Start Coord equals End Coord, a single cross-section line is created.
Step Size
-
- The spacing between cross-section lines along the X, Y, and Z axes.
Rebuild Cross-section
-
- Rebuild the cross-section curves to remove multi-knots. Leave this option off if you are using the cross-section lines for evaluation. If you want to use the cross-section curves for modeling, turn this option on.
Create History
-
- Save the construction history of the cross-section curves. If you turn Create History on, you can modify the surfaces that were used to create the cross-section curves, and the cross-section curves will update.
See Also
|
Evaluate > Dynamic
section

|
Viewing a Dynamic Cross-Section
|
|
|
|
|
Purpose
View cross-sections on surfaces by dragging a cross-section plane through the model.
Unlike the regular Cross section tool, this tool can produce cross-sections in an arbitrary orientation.
How To
To create a cross-section line:
|
|
|
-
1
-
Select one or more surfaces that you want to examine.
-
2
-
Click the Dynamic Section icon, or choose Dynamic Section from the Evaluate palette menu.
-
3
-
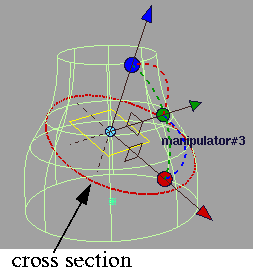
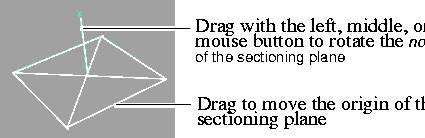
Use the plane manipulator to set the cross-section plane, as shown below.
-
As you modify the plane, the cross section (which appears
as a red line) is updated. To create more sections, change
the value of Number in the option window.
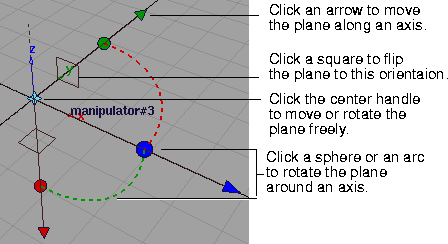
- Drag a handle to move/rotate interactively.
- Click an arrow to change the center handle to the free move handle. Then drag the center handle to move the plane freely.
- Click a sphere to change the center handle to the free rotate handle. Then drag the center handle to rotate the plane freely.
-
The visual lines created by the Dynamic section tool do not
persist after you choose another tool.
|
|
|
-
4
-
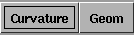
Optionally, click one of the buttons in the bottom-right hand corner of the view window:
- Click Geom to create real curves from the cross-section lines.
|
|
|
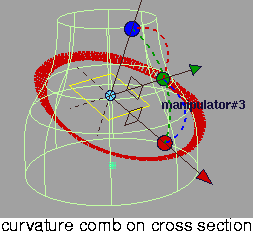
- Click Curvature to create curvature combs on the cross-section lines.
>
|
Note:
|
If you cannot see the combs, click the Curvature tool in the
Control Panel, and adjust the scale slider.
|
Options
Step Size
-
- The distance between cross-section lines (when Number is greater than 1).
Number
-
- The number of cross-section lines to create.
See Also
|
Evaluate >
Surface evaluate

|
Creating Curves on Surface for Various Criteria
|
|
|
|
|
Purpose
Create curves on surface corresponding to highlights, iso-curvature lines, contours, or horizon lines.
How To
To create curves-on-surface from highlights:
-
1
-
Pick the surfaces on which you want to create curves-on-surface.
-
2
-
Double click the Surface evaluate icon, or choose Surface evaluate-
 from the Evaluate palette menu. from the Evaluate palette menu.
-
The Surface Evaluate control window opens.
-
3
-
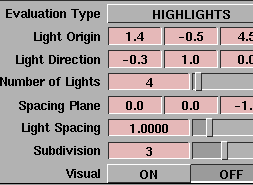
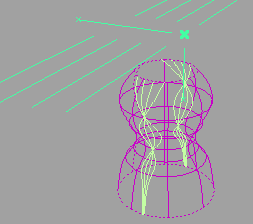
Set the Evaluation Type to Highlights.
-
The highlight manipulator appears.
|
|
|
-
4
-
Set the following options (see Highlights Options on page 544 for more details):
- The number of lights you want to create highlights from.
- The spacing between the lights (if there is more than one)
- The width of the light (if there is only one).
- Set the Subdivision option from 1 to 6. The higher the value, the more precise the result. Use low values for draft quality, use higher values for final results.
-
The manipulator reflects the changes.
-
5
-
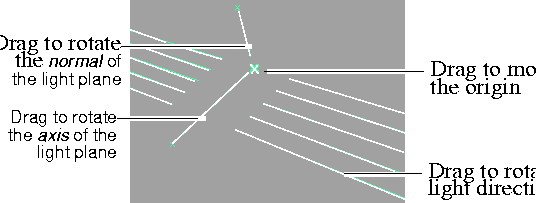
Drag different handles on the manipulator to orient the light(s):
-
Or type exact values into the Light Origin, Light Direction, and
Spacing Plane fields of the Surface Evaluate window.
|
|
|
-
6
-
Click Go to create the curves-on-surface.
-
You can click the Undo button in the control window to
remove the curves on surface, or change the manipulator
and click Recalc.
To create curves on surface along lines of constant curvature:
-
1
-
Pick the surfaces on which you want to create curves-on-surface.
|
|

|
-
2
-
Double click the Surface evaluate icon, or choose Surface evaluate- from the Evaluate palette menu.
-
The Surface Evaluate control window opens.
-
3
-
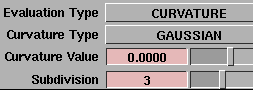
Set the Evaluation Type to Curvature.
|
|
|
-
4
-
Set the following options (see Curvature Options on page 545 for more details):
- The Curvature Value at which you want to create curves on surface. For example, enter 0 to create curves-on-surface along inflection lines.
- Set the Subdivision option from 1 to 6. The higher the value, the more precise the result. Use low values for draft quality, use higher values for final results.
|
|
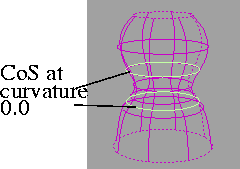
|
-
5
-
Click Go to create the curves-on-surface.
-
You can click the Undo button to remove the curves on
surface, or change the manipulator and click Recalc.
To create curves-on-surface along a contour line:
-
1
-
Pick the surfaces on which you want to create curves-on-surface.
|
|

|
-
2
-
Double click the Surface evaluate icon, or choose Surface evaluate- from the Evaluate palette menu.
-
The Surface Evaluate control window opens.
-
3
-
Set the Evaluation Type to Contour.
-
The contour manipulator appears.
-
4
-
Drag different handles on the manipulator to orient the cross-section plane:
|
|
|
-
Or type exact values in the Plane Origin and Plane Normal
fields of the Surface Evaluate window. (See Contour Options
on page 545 for details.)
|
|
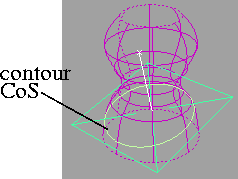
|
-
5
-
Click Go to create the curves-on-surface.
-
You can click the Undo button to remove the curves on
surface, or change the manipulator and click Recalc.
To create curves on surface along the horizon line:
-
1
-
Pick the surfaces on which you want to create curves-on-surface.
|
|

|
-
2
-
Double click the Surface evaluate icon, or choose Surface evaluate- from the Evaluate palette menu.
-
The Surface Evaluate control window opens.
-
3
-
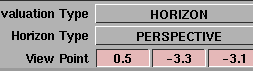
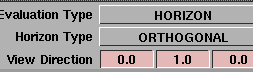
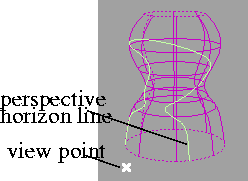
Set the Evaluation Type to Horizon.
-
4
-
Set the Horizon Type.
|
|
|
-
If the Horizon Type is Perspective, a viewpoint locator
appears. Drag this locator to move the viewpoint, or type
exact coordinates in the View Point fields in the Surface
Evaluate window.
|
|
|
-
If the Horizon Type is Orthogonal, type a direction in the View
Direction fields in the Surface Evaluate window.
-
See Horizon Options on page 546 for more details on these
options.
|
|
|
-
5
-
Click Go to create the curves-on-surface.
-
You can click the Undo button to remove the curves on
surface, or change the manipulator and click Recalc.
Tips and Notes
- When using the Horizon evaluation type, note that if the horizon does not cross the surfaces when viewed from the point or direction you set, the Surface evaluate tool will not create any curves on surface.
Surface Evaluate Option Window
Evaluation Type
Highlights
-
- Create curves-on-surface corresponding to highlight lines produced by light sources.
Curvature
-
- Create curves-on-surface along lines of constant curvature.
Contour
-
- Create curves-on-surface from a single-plane cross-section.
Horizon
-
- Produce curves-on-surface from horizon lines as seen from a point in space or from a direction.
|
|
These options appear when
Evaluation Type is
Highlights.
|
Highlights Options
Light Origin
-
- The 3D coordinates of the first light's origin (center point).
-
- You can set this interactively with the highlight manipulator when you use the tool.
Light Direction
-
- The direction in which the light sources point.
-
- You can set this vector interactively with the highlight manipulator when you use the tool.
Number of Lights
-
- The number of lights from which to create curves-on-surface highlights.
-
- If you use more than one light, the multiple lights are always parallel to each other.
|
|
This option appears when
Number of Lights is 1.
|
Light Width
-
- The width of the single light source.
-
- Set the width to 0 to create a single curve-on-surface. Set the width greater than 0 to create two curves-on-surface corresponding to the edges of a wide highlight.
-
- This option has no effect if Visual is turned on.
|
|
This option appears when
Number of Lights is greater
than 1.
|
Light Spacing
-
- The spacing between multiple light sources.
|
|
This option appears when
Number of Lights is greater
than 1.
|
Spacing Plane
-
- The vector perpendicular to the plane of the lights.
-
- You can set this vector interactively with the highlight manipulator when you use the tool.
Subdivision
-
- The quality of the curve-on-surface projection, from 1 to 6. The higher the value, the more precise the result. Use low values for draft quality, use higher values for final results.
Visual
-
- Draw fast polylines instead of curves-on-surface.
-
- Unlike curves-on-surface, these lines are for display only, and cannot be picked or used to create geometry.
-
- The lines are represented in the SBD window by one node that contains a white box and no text/name.
-
- To delete these lines, open the SBD window and delete the node representing the lines.
|
|
These options appear when
Evaluation Type is
Curvature.
|
Curvature Options
Curvature Type
-
- Choose the method of calculating curvature on the surface:
-
- Mean-average the two principal curvatures at each point on the surface.
-
- Gaussian-multiply the two principal curvatures at each point on the surface.
-
- Principal Min/Principal Max-use the minimum or maximum curvature values (that is, the curvature of the steepest or flattest curves that pass through each point).
-
- Mean or Gaussian curvature is most useful for detecting surface irregularities. Principal Min or Max curvature is most useful for detecting inflection points.
Curvature Value
-
- Enter the curvature value for the iso-curvature lines you want to create.
-
- The Surface evaluate tool will create curves-on-surface along these lines of constant curvature.
|
|
These options appear when
Evaluation Type is Contour.
|
Contour Options
Plane Origin
-
- The 3D coordinates of the origin of the plane which will intersect the surfaces to create curves-on-surface.
-
- You can set this interactively with the contour manipulator when you use the tool.
Plane Normal
-
- The vector perpendicular to the plane.
-
- You can set this vector interactively with the contour manipulator when you use the tool.
|
|
These options appear when
Evaluation Type is Horizon.
|
Horizon Options
Horizon Type
-
- Choose how to project the horizon line onto the surfaces.
-
- Perspective-use the horizon as seen from a certain point in space.
-
- Orthogonal-view the horizon from a certain direction. With this technique, the "sightlines" are parallel and the viewpoint is infinity.
-
- Note that if the horizon does not cross the surfaces when viewed from this point or direction, the Surface evaluate tool will not create any curves on surface.
|
|
This option appears when
Horizon Type is Perspective.
|
View Point
-
- The point in space from which to look at the picked surfaces and the horizon.
-
- You can set this interactively with the viewpoint locator when you use the tool.
|
|
This option appears when
Horizon Type is Orthogonal.
|
View Direction
-
- The view direction from which to look at the picked surfaces and the horizon.
Control Options
Create History
-
- Save the history of the new curves-on-surface for later editing. If you turn Create History on, you can modify the surfaces and the curves-on-surface will update.
Auto Recalc.
-
- Update the curves-on-surface automatically as you change the values in the Surface Evaluate window.
Buttons
Recalc
-
- When Auto Recalc. is off, use this button to update the curves on surface to correspond to the current options.
Undo
-
- Undo all the changes made by the Evaluate surface tool and return to the original surface.
Next
-
- Finish creating curves-on-surface on the current surface and prompt for a new surface to evaluate.
See Also
|
Evaluate >
Min/max curvature

|
Measuring Minimum and Maximum Curvature
|
|
|
|
|
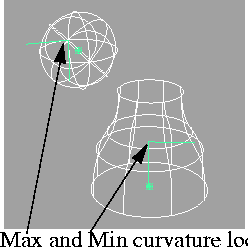
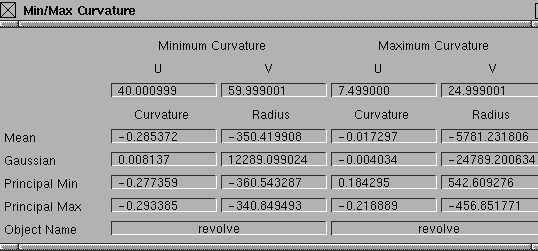
Purpose
Find the points with minimum and maximum curvature on a surface or a set of surfaces.
How To
To show the minimum and maximum curvature values on one or more surface(s):
-
1
-
Pick the surface(s) you want to evaluate.
-
2
-
Double-click the Min/max curvature icon, or choose Min/max curvature- from the Evaluate palette menu.
-
3
-
In the option window, set Mode to Active.
|
|
|
-
The Min/max curvature tool places temporary locators at the
minimum and maximum curvature points on the
surface(s), and opens a window displaying detailed
information about the points.
>
|
Note:
|
When selecting more than one surface, the Min and Max
curvatures are calculated over all the surfaces, rather than
for each surface individually.
|
Options
Mode
-
- Choose whether to compute the curvatures on only Active (picked) objects, or All objects. All is the default.
Curvature Type
-
- Choose how to calculate the curvature values:
-
- Mean-use the average of the two principal curvatures to approximate the average curvature through each point.
-
- Gaussian-use the product of the two principal curvatures.
-
- Princ Min/Princ Max-use the minimum or maximum curvature values (that is, the curvature of the steepest or flattest curves that pass through each point).
-
- From Curvature Texture-use the same type as in the Surface Curvature > Surf curv params window.
-
- The Mean and Gaussian options are most useful for detecting surface irregularities. The Princ Min/Max options are most useful for finding inflection points.
See Also
|
Evaluate >
Mass properties

|
Measuring Mass Properties
|
|
|
|
|
Purpose
Display mass properties (such as volume) of a model.
Overview
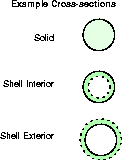
The Mass properties tool provides three ways of specifying the object to measure:
|
|
|
- Solid: the surfaces you pick represent the boundaries of a closed, solid object.
- Shell Interior and Shell Exterior: the surfaces you pick represent one side of a thin shell enclosing a hollow space (e.g. modeling a bottle with a single surface of revolution). You specify the thickness of the shell.
Restrictions
To get accurate statistics on an object, the following conditions must be met:
- The surfaces must completely enclose a volume. The edges of surfaces must meet within the tolerance value set in the Mass properties option window.
- The normals on all NURBS surfaces must point out of the solid, and, when moving along a face boundary in the increasing U direction, the face area must be to the left when viewed from outside the solid.
-
or
-
The normals on all NURBS surfaces must point into the
solid, and, when moving along a face boundary in the
increasing U direction, the face area must be to the right
when viewed from outside the solid.
You can check the seam between two surfaces by placing a Deviation measurement on the seam (see page 515). You can check the orientation of normals using the Reverse direction tool (see Reversing Direction and Normals on page 120)
Display
The Mass properties window displays the following information:
|
Label
|
Description
|
Formula
|
|---|
|
volume
|
Volume enclosed by the picked surfaces,
or volume occupied by shell surface with given thickness.
|

|
|
origin inertia
|
Moment of inertia about the origin.
|

|
|
area
|
Area of the picked surfaces.
|

|
|
cur. dimen
|
Current unit of measurement (default is centimeters).
|
|
|
centroid
|
X, Y, Z coordinates of the center of the object
|

  
|
|
inertia
|
Moments of inertia about the X, Y, and Z axes.
|
 (X axis) (X axis)
 (Y axis) (Y axis)
 (Z axis) (Z axis)
|
|
1st moment
|
First moments along the X, Y, and Z axes.
|


|
|
2nd moment
|
Second moments along the X, Y, and Z axes.
|


|
>
|
Note:
|
If you are using a construction plane when you click the
tool, the calculations use the X, Y, and Z axes of the current
construction plane.
|
How To
To show the mass properties of a model:
-
1
-
Pick all the surfaces that make up the model. Make sure the surfaces completely enclose the volume of the object.
|
|

|
-
2
-
Click the Mass properties icon, or choose Mass properties from the Evaluate palette menu.
-
When the Mass properties tool completes its calculations,
the Mass properties window appears, containing statistics
about the object.
-
If you change the options of the Mass properties tool, the
window will update.
Tips and Notes
- Using the Mass properties tool with the Solid option on a group of surfaces with gaps will not produce an error.
-
In fact, the results are still meaningful if the gaps between
surfaces are not too large.
|
|
See Reversing Direction and
Normals on page 120.
|
- If some of the inertia and moment values are negative, some of the surfaces probably have normals pointing inward. Use the Reverse direction tool to find and reverse the surfaces so they have normals pointing out.
- Depending on surfaces and normals, it is possible to confuse Shell Int. and Shell Ext. as to which are the exterior and which are the interior surfaces.
-
When in doubt, run the calculations with both and
compare. The results with the smaller volume and surface
area are those associated with Shell Int (i.e the picked
surfaces are the exterior surfaces).
Options
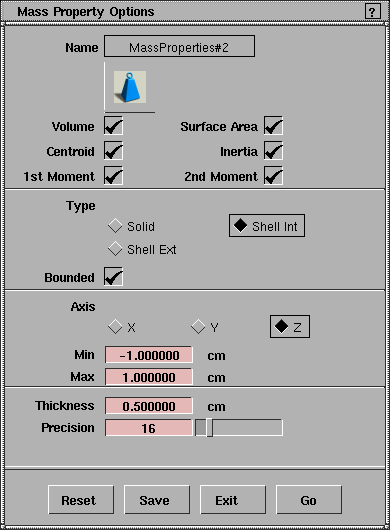
Volume, Surface Area, Centroid,
Inertia, 1st Moment, 2nd Moment
-
- Check the values you want to display in the Mass properties window.
Type
-
- Describe the way the selected surfaces or faces define the solid.
-
- Solid: the surfaces you pick represent the boundaries of a closed, solid object.
-
- Shell Int/Shell Ext: the surfaces you pick represent the exterior/interior of a thin shell enclosing a hollow space (e.g. modeling a bottle with a single surface of revolution). The Thickness option (below) specifies the thickness of that shell.
|
|
|
Bounded
-
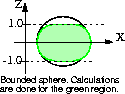
- Turn this option on to calculate mass properties for only that part of a solid bounded between two planes (see below).
Axis
-
- Specify whether the two bounding planes are perpendicular to the X, Y or Z axis (in the current corrdinate system).
-
- In the diagram on the left, the Axis is Z.
|
|
The Axis, Min and Max
options appear when
Bounded is on.
|
Min
Max
-
- Specify the values for the position of the planes along the chosen axis.
-
- In the diagram on the left, the Min and Max are -1.0 and 1.0.
|
|
This appears only when
Solid is on.
|
Tolerance
-
- The maximum distance allowed between adjacent surfaces for them to form a closed volume
|
|
The Thickness and Precision
options appear only when
Shell Int or Shell Ext is on.
|
Thickness
-
- The uniform thickness of the shell when using the Shell Int or Shell Ext options (above). In these cases, the Volume corresponds to the volume of the shell, rather than that of the enclosed space. The Area corresponds to the sum of the interior and exterior surface areas.
Precsion
-
- Control the accuracy of the result. The higher this value is, the more accurate the result. The default value of 16 results in less than 1% error. Doubling the precision number usually quadruples the amount of calculations and the computational time.
|


