|
|
Object Edit >
Extend

|
Extending Edges
|
|
|
|
|
Purpose
Extend a curve or surface beyond its current endpoint or edge by adding new geometry.
How To
|
|
|
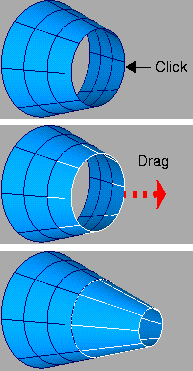
To extend a curve or surface:
-
1
-
Click the Extend icon, or choose Extend from the Object Edit palette menu.
-
2
-
Click near the endpoint of a curve, or an edge of a surface.
-
3
-
The endpoint or edge highlights.
- Drag the mouse to change the extend length.
- Type a value to extend by that exact length or angle.
- Click another surface to extend or choose another tool when you are finished.
>
|
Note:
|
By default, the extension is part of the original object. To
make it a separate object, turn off the Merge option.
|
To undo a Linear or Circular Extend operation that used the Merge option:
(The Linear, Circular and Merge options are described later.)
-
1
-
Use the Detach tool at the point or isoparm where you started the extension.
-
2
-
Pick the extension.
-
3
-
Delete the extension with Delete > Del Active.
Tips and Notes
- The three types of extension can produce very different results.
|
|
|
- The Merge option creates a multi-knot at the connection point for Linear and Circular extensions. Curves with multi-knots may not be usable as construction curves, and CAD packages cannot import them. (See Multi-knots and CV Multiplicity on page 9.)
|
|
|
Options

|
|
|
Linear
-
- Extend the curve or surface in a straight line.
-
- Because this extension is linear and has no curvature, there will usually be a curvature discontinuity at the point or edge where the geometry was extended.
|
|
|
Circular
-
- Extend the curve or surface along an arc.
-
- This extension will have a constant curvature, equal to the curvature at the point or edge where the geometry was extended.
|
|

|
Extrapolate
-
- Extend the curve or surface with the same rate of change in curvature as at the endpoint or edge.
-
- This option will produce the smoothest and most seamless extension without adding any edit points to the original surface.
|
Tip:
|
To fix rough rendering that may result, increase the
subdivisions in Windows > Information > Render Stats.
|
Merge
-
- Merge the extended part with the original surface to form one object. It is turned on by default.
Distance
-
- Default length or angle of the extension when it is first created.
-
- For Linear and Extrapolate extensions, Distance is expressed in the current linear unit. For Circular extensions, it is expressed in the current angular unit. This option is originally set to 0.0.
|
Object Edit >
Fit B-spline

|
Converting Linear Geometry to Cubic
|
|
|
|
|
Purpose
|
|
See Degree on page 12.
|
Create new cubic B-spline (degree 3) curves/surfaces from linear (degree 1) geometry, such as digitized or imported CAD data.
How To
To create cubic b-spline objects from linear objects:
-
1
-
Pick the linear (degree 1) curves and/or surfaces to which you want to fit cubic geometry.
-
2
-
Click the Fit b-spline icon, or choose Fit b-spline from the Object Edit palette menu.
-
Fit b-spline creates new cubic b-spline curves that fit the
original linear geometry, and unpicks the originals.
Tips and Notes
- When creating a degree 3 surface from a degree 1 surface, the original surface cannot have two consecutive points at the exact same location (multi-knots). This restriction only applies to surfaces.
- For linear curves with very long distances between edit points, the Uniform parameterization option may create an inaccurate fit. Try using Chord length parameterization instead.
Options
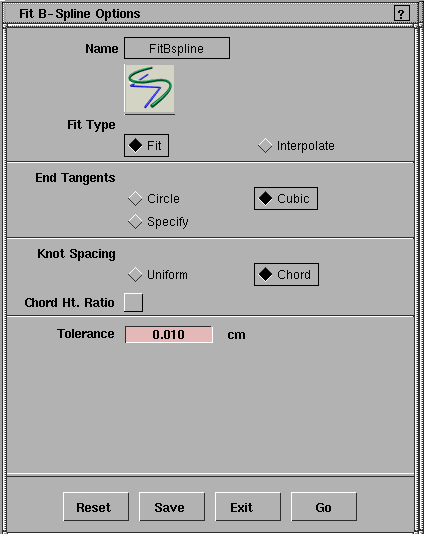
Fit Type
Fit
-
- Create a potentially less accurate curve, but reduce complexity.
Interpolate
-
- Create a perfectly accurate curve, but with no reduction in complexity.
-
- For example, if the original linear curve has 56 edit points, the new cubic b-spline will also have 56 edit points.
End Tangents
Circle/Cubic
|
|
To see the difference in curve
quality produced by these
two types, turn on Curve
curvature (see page 376).
|
-
- Choose either Circle or Cubic for two different ways of setting the end tangents. The default is Cubic.
Specify
-
- Click this option if you know the exact values of the end tangent vectors that you want the fitted cubic geometry to have. Twelve slider fields are displayed.
Tolerance
-
- Acceptable deviance between original and new curve/surface. The default is 0.010 cm. Only Used when Fit Type is Fit.
|
|
These options appear when
End Tangents is set to
Specify.
|
Start/End U/V Tangent
-
- These four fields allow you to specify the exact (X,Y,Z) components of the end tangent vectors of the fitted curve or surface.
-
- Only Start U Tangent and End U Tangent are used for curves.
Other Options
Knot Spacing
-
- This option controls the type of curve parameterization used by the new cubic b-spline objects. See Parameterization on page 10.
-
-
|
|

|
>
|
Note:
|
The following options only apply to surfaces.
|
Chord Ht Ratio
-
- Enforce a ratio between the height of the curve off the chord (a line connecting two consecutive edit points) and the chord length. Where the ratio is exceeded, new edit points are added to the new curve.
-
- Use this option to break up long or high-curvature spans of the original surface into shorter, simpler spans.
|
|
This option appears when
Chord Ht Ratio is on.
|
Ratio Value
-
- The factor by which the height must exceed the chord length before Fit b-spline adds new edit points.
-
- For example, if the Ratio Value is 10.000, the height must be ten times the chord length before additional edit points are created. The lower the value, the more edit points will be added in high curvature areas.
See also
|
Object Edit >
Smooth

|
Smoothing
|
|
|
|
|
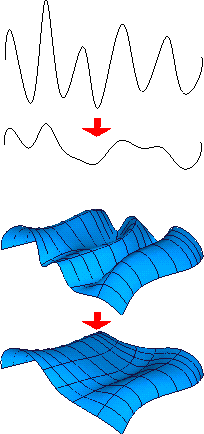
Purpose
Interactively smooth all or part of a curve or surface.
|
|
|
How To
To smooth a curve or surface:
-
1
-
Pick the curves and/or surfaces you want to smooth.
-
or
-
Pick CVs or edit points to define the area of the curve or
surface you want to smooth.
-
2
-
Click the Smooth icon, or choose Smooth from the Obj Edit palette menu.
- Drag the left mouse button left and right to smooth and unsmooth the objects interactively.
- Click the middle mouse button to smooth the objects one step.
- Click the right mouse button to unsmooth the objects one step.
Tips and Notes
- You cannot smooth the following:
- Objects or parts of objects containing multi-CV's.
- Objects that are already considered perfectly smooth, such as circles or straight lines.
- Closed (periodic) objects.
- You may not be able to smooth endpoint/edge CVs, depending on the curve degree and continuity options.
-
(See Making Sharper Bends in Curves with Multiplicity on
page 165.)
- You cannot unsmooth an object beyond its original shape.
- The endpoints of curves remain fixed during smoothing.
Options
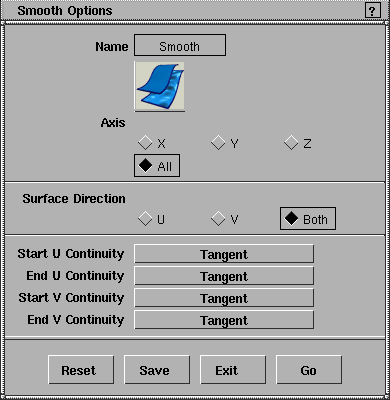
Axis
-
- The direction in which to smooth the object. Default is All. If you choose X, Y or Z, the smooth operation will only move CVs along that axis.
|
|
This option only applies to
surfaces.
|
Surface Direction
-
- The parametric axis along which to smooth the surface. Default is Both. If you choose U or V, the smooth operation will only affect isoparms running in that direction.
|
|
The Start/End V options
only apply to surfaces.
|
Start/End U/V Continuity
-
- These options control what degree of continuity you want to maintain at the ends of a smoothed section.
-
- For example, smoothing part of a curve may create an abrupt transition at the ends of the smoothed section. To prevent this, change the continuity option from Off to Position, Tangent or Curvature.
See Also
|
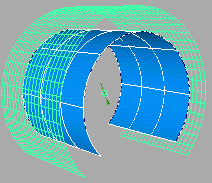
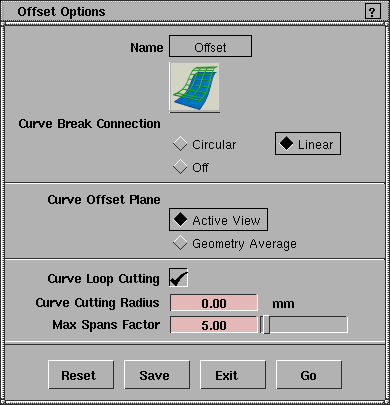
Object Edit > Offset
> Offset

|
Creating an Offset Copy
|
|
|
|
|
Purpose
Create a new object offset a specific distance from an original.
|
|
|
Overview
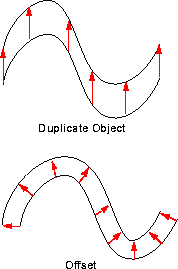
Unlike the Duplicate Object command in the Edit menu, Offset does not simply create an exact copy some distance away from the original.
Instead, Offset creates a new object by offsetting each point of the original by some distance.
How To
To create an offset copy of a curve, surface, or curve on surface:
-
1
-
Pick the object you want to copy.
-
2
-
Click the Offset icon, or choose Offset > Offset from the Object Edit palette menu.
|
|
|
-
3
-
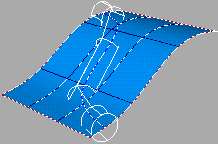
An approximation of the new curve or surface appears.
- Drag the left mouse button to change the offset distance interactively.
- Type a number to set the offset distance exactly.
- Drag the middle mouse button to change the curve cutting radius when Curve Loop Cutting is on (see Curve Loop Cutting and Curve Cutting Radius options below).
- Click Go to create the offset copy.
Tips and Notes
- If your curve is not in one of the main planes or on a construction plane, you may get strange results. If this happens, use Geometry Average as the Curve Offset Plane.
- To offset multiple surfaces and maintain continuity between them, use the Claymate tool. See page 348.
Options
|
|
|
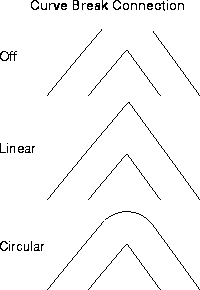
Curve Break Connection
-
- Control how the offset curve will connect breaks caused by corners in the original curve. This option does not apply to surface offsets.
-
- Off-Do not connect the break. Note that this option can create two or more separate new curves.
-
- Linear-Connect the break with tangental lines.
-
- Circular-Connect the break with an arc.
>
|
Note:
|
Curve break connection is not used for curves created with
the Curves > Lines > Polyline tool or degree 1 curves. In both
of these cases, the result is like linear.
|
Curve Offset Plane
-
- Active View-the copy is offset in the plane of the active view. For example, in Z-up environment, the Top view would offset in the XY plane.
-
- Geometry Average-the copy is offset in the average plane of the curve. Planar curves will be offset in the curve's plane, 3D curves will be offset in 3D.
|
|
|
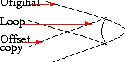
Curve Loop Cutting
-
- Remove loops caused by concave angles in the original curve.
-
- Note that Curve Loop Cutting creates multi-knots, which can cause problems for some surface creation tools such as Birail.
|
|
|
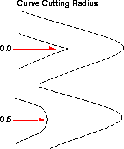
Curve Cutting Radius
-
- Set this value greater than 0 to create a smooth arc with the given radius where the Offset tool cuts loops, instead of a corner.
Max Spans Factor
-
- The maximum number of times the offset geometry will be subdivided for more accurate approximation of the original. The default is 5 (each span of the original can be represented by up to 5 spans on the offset copy).
-
- If you do not mind extra edit points (a more complex curve), you can increase this number for a more accurate offset copy of complex geometry.
See Also
|
Object Edit > Offset
> Tubular offset

|
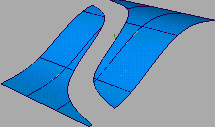
Creating Ridges and Grooves
|
|
|
|
|
Tubular Offset Purpose
Offset a series of surface curves (curves on surface, isoparms, or trim edges) on both sides to create rails for ridges, grooves, parting lines, etc.
How To
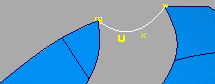
To create a ridge or groove on a surface:
|
|
|
-
1
-
Draw a curve or curves on surface representing the centerline of the new ridge or groove.
- You can use more than one curve on surface, as well as isoparms and trim edges, as long as they have positional continuity.
- You can use curves on multiple surfaces as long as they have positional continuity.
-
2
-
Click the Tubular Offset icon, or choose Offset > Tubular Offset from the Object Edit palette menu.
-
3
-
Pick the first curve of the centerline.
|
|
|
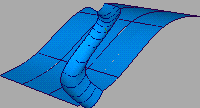
-
4
-
A rough approximation of the trim tube appears.
- Pick the next curve(s) in the centerline to extend the trim tube.
- Click and drag on the trim tube to change its radius interactively.
- Type a number to set the radius of the trim tube exactly.
- Click Go to create the offset curves on surface.
|
|
|
-
5
-
When you click Go, Tubular Offset creates new curves on surface on each surface the centerline extends across. These new curves mark where the trim tube intersected the surface.
|
Tip:
|
If the Create CoS and Create History options are on, you
can change the original centerline curve and the two rail
curves will automatically update.
|
|
|
|
-
6
-
If the Auto Trim option is on, it automatically trims the surface between the two new curves on surface.
-
If Auto Trim is not on, you will need to trim the surface
manually.
- Pick the centerline (Pick > Object Types > Curve on surf) and delete it.
|
|

|
- Pick the surface you want to trim, then click between the two offset curves on surface.
- Click the Discard button, then click Go.
-
(See Trimming Surfaces with Curves-on-Surface on page 329
for more on the Trim tool).
|
|
|
-
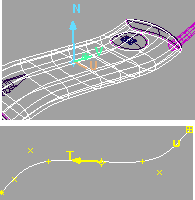
7
-
Create a profile curve between the trimmed edges. This curve will be the cross section of the new ridge or groove.
-
Use curve snapping to make sure the ends of the profile
curve are the trim edge curves.
|
|
|
-
8
-
Use Birail to sweep the profile curve along the edge curves, creating the ridge or groove surface. (See Sweeping a Curve Along Two Paths with Birail on page 251).
-
The Birail tool is an advanced option. If Birail is not
available, you may be able to use Extrude. (See Extruding a
Curve on page 237).
Tips and Notes
- The Auto Trim option takes care of the work of trimming the surface, but you lose construction history.
-
If you are planning to experiment with the curves, use the
Create CoS option with Create History, then trim manually
when the curves are perfected.
- If the curves on surface used to create the trim tube do not extend to the surface edges, Tubular Offset extends them automatically.
Options
Create Options
-
- Create CoS-create the two rail curves by intersecting a tube with the surface(s).
-
- Auto Trim-create the two rail curves and automatically trim the surface between them.
>
|
Note:
|
Auto Trim does not work with construction history, since the
original curve on surface is trimmed away.
|
Create History
-
- Keep construction history for the tubular offset, so that modifying the original centerline curve or the radius of the tube will recalculate the two offset curves.
-
- To modify the radius of the tube after quitting Tubular offset, select the two rails, then select the tool again.
See Also
|
Object Edit >
Reverse direction

|
Reversing Direction and Normals
|
|
|
|
|
Purpose
- Reverse the direction of a curve or surface.
- Orient the normals of a group of surfaces toward or away from a point.
- Swap the U and V parameters of a surface.
How To
To reverse the direction of a curve or surface interactively:
-
1
-
Double-click the Reverse direction icon, or choose Reverse direction options from the Object Edit palette menu.
-
2
-
Set Editing Mode to Interactive editing and click Go.
|
|
|
-
3
-
Click a curve or surface. An indicator appears on the object to show the current normal.
- A light blue arrow means the normal is pointing toward you.
- A yellow arrow means the normal is pointing away from you.
-
You can select and drag over multiple curves or surfaces
to check their direction.
-
4
-
With a curve or surface highlighted, click the Reverse One button in the bottom right corner of the view window, or click the middle mouse button.
-
Click the Reverse All button, or the right mouse button, to
reverse the direction of all the curves/surfaces selected
within the tool so far.
To orient the normals of surfaces toward or away from a point:
-
1
-
Pick the geometry you want to reverse.
-
2
-
Double-click the Reverse direction icon, or choose Reverse direction options from the Object Edit palette menu.
-
3
-
Set Editing Mode to Orient surfaces around point.
-
Select Toward point or Away from point.
-
If you know the exact point you want to orient normals
toward/away from, you can type the coordinates in the
Orientation Point text boxes.
-
4
-
Click Go.
-
5
-
An indicator appears for the orientation point.
- Drag in an orthographic window to move the orientation point.
- Type a 3D coordinate to set the orientation point exactly.
- Click the Go button in the bottom right corner of the view window to orient the surface normals.
Tips and Notes
- Some tools, such as Stitch, require that all normals in a group of surfaces point in the same direction, usually "outward".
- If you are using one-sided geometry, only the normal side of a surface is visible when rendered. You will usually want the normals on surfaces to point "outward", toward the camera.
- Use Orient surfaces around point mode to quickly orient all surfaces in a model that has a clear geometric center.
-
For models without a clear center point, use Interactive
mode to check surfaces individually.
Options
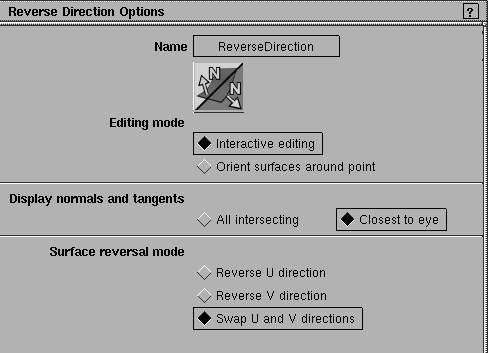
Editing Mode
-
- Interactive editing-Flip surfaces using the mouse.
-
- Orient surfaces around a point-Arrange normals to point toward or away from a point.
Interactive Editing Options
Display normals and tangents
-
- All intersecting-display the normals of all surfaces under the cursor.
-
- Closest to eye-display the normal of the nearest surface under the cursor.
Orient Surfaces Options
Orient surfaces
-
- Choose whether the normals should point Toward or Away from the orientation point.
Orientation point
-
- The 3D coordinates of the point which normals will point toward or away from.
Surface Reversal Mode
Reverse U
-
- Reverse the direction of the U isoparms.
Reverse V
-
- Reverse the direction of the V isoparms.
Swap U and V
-
- Swap the isoparms so that the U direction becomes the V direction and vice versa.
See Also
|


