|
|
7
|
Editing Curves
|
|
In This Section:
See also Creating Curves from Other Curves on page 201.
|
|
|
|
|
|
Curve Edit > Modify
>Add points

|
Adding Points to a Curve
|
|
|
|
|
Purpose
Add points to the beginning or end of a completed curve.
How To
To add points to one end of an existing curve:
|
|
|
-
1
-
Pick the first or last CV or edit point to extend the curve.
- Picking the first point will extend the curve from the beginning. Picking the last point will extend the curve from the end.
- If you pick a CV (Pick > Point Types > CV), you will extend the curve by adding CVs. If you pick an edit point (Pick > Edit point), you will extend the curve by adding edit points.
-
2
-
Click the Modify > Add points icon, or choose Modify > Add points from the Curve Edit palette menu.
-
The Add points tool highlights the end of the curve.
|
|
|
-
3
-
Click to place the new points. You can continue to move the new point while the mouse button is down. When you release the mouse button, the new point is added to the curve.
- Click the left mouse button to place a point.
- Click the middle mouse button to align the point horizontally to the previous one.
- Click the right mouse button to align the point vertically to the previous one.
- Type a 3D coordinate to place a point exactly.
|
|
|
-
4
-
Choose another tool to finish adding points.
Tips and Notes
- Add points does not actually add points to the beginning of a curve. If you have picked the first CV or edit point, the tool reverses the curve and then adds the new points to the end.
- In orthographic windows, the new points will be in the same plane as the previous point, unless you use curve or magnet snapping.
- If you use the Add points tool when an entire curve is selected, it will add CVs to the end of the curve.
See Also
|
Curve Edit > Modify
> Adjust weight

|
Changing the Weight of CVs
|
|
|
|
|
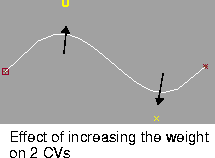
Purpose
Control the shape of a curve by adjusting the weight of a CV (the amount the CV pulls the curve from a straight line).
How To
|
|
|
To change the weight of CVs:
-
1
-
Use Pick > Point Types > CV to pick all the CVs you want to modify.
-
2
-
Click the Adjust weight icon, or choose Modify > Adjust weight from the Curve Edit palette menu.
|
|
|
- Drag the mouse left and right to set the weight interactively.
- Type a value from 0.0001 to 10 000.0 to set the weight exactly.
Important
- Some other software package cannot import Alias wire files with adjusted CV weights.
- Changing the weighting of CVs will increase render times.
- In practice, trying to model by weighting CVs is difficult and usually not worth the effort on a large scale.
Tips and Notes
|
|
|
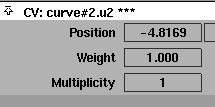
- To see the current weighting factor of a CV, pick the CV and open the Information Window.
- Curves are created with all CV weights set to 1.0.
See Also
CVs on page 8, and Rational vs. Non-rational Geometry on page 13
|
Curve Edit >
Modify >
Multiplicity

|
Making Sharper Bends in Curves with Multiplicity
|
|
|
|
|
Purpose
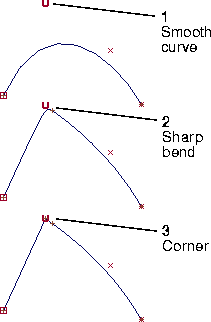
Change the sharpness of bends in a curve by setting the multiplicity of CVs.
How To
|
|
|
To set the multiplicity of CVs:
-
1
-
Use Pick > Point Types > CV to pick all the CVs you want to modify.
-
2
-
Click the Multiplicity icon, or choose Modify > Multiplicity from the Curve Edit palette menu.
-
The Multiplicity tool sets the multiplicity of the picked CVs
to match the value in the option box (see below).
-
3
-
Type a number (1, 2 or 3) to set the multiplicity of the picked CVs.
Important
- Some other software package cannot import Alias wire files with multiplicity.
- Many of the advanced surfacing tools cannot work with curves with multiplicity.
Options
Multiplicity
-
- The initial multiplicity the picked CVs are set to, when the Multiplicity tool is selected.
Tips and Notes
- Often you can achieve the same sharpening effect by placing several CVs close together, without using multiplicity.
- Multiplicity only works on degree 3 curves or surfaces.
See Also
|
Xform >
Drag keypoints

|
Editing Keypoint Curves
|
|
|
|
|
Purpose
Edit keypoint curves by moving the keypoints that define the shape of the curves.
How To
To move a keypoint:
-
1
-
Click the Drag keypoints icon, or choose Drag keypoints from the Xform palette menu.
-
2
-
Pick a keypoint and drag to move it.
- Remember that you must use snapping to move a point in the perspective window.
- If you drag a line keypoint with the mouse over a guideline, the point is constrained to the guideline.
To edit a keypoint attribute:
|
|

|
-
1
-
Choose Windows > Information > Information window to open the Information Window.
-
2
-
Pick the curve you want to edit.
-
3
-
Open the Attributes (or Ellipse Information) section of the Information Window.
Tips and Notes
- Dragging a part of a keypoint curve that is controlled by an extra attribute will remove the extra attribute.
-
For example, if you change the angle of a line that was
drawn parallel to another line, the Line offset attribute will
no longer be available in the Information Window.
- When you join a keypoint curve to a normal curve, keypoints are added to the normal curve. You can drag the keypoints to stretch the curve. The curve shows up as an arc with an Angle/Sweep of zero in the Information Window.
Keypoint Attributes
|
Curve type
|
Length/
Radius
|
Angle/Sweep
|
Line Offset
|
Rel Angle
|
Arc
Compl.
|
Arc
Offset
|
Major
Axis
|
Minor
Axis
|
Sweep
|
|---|
|
Line
|
4
|
4
|
|
|
|
|
|
|
|
|
Parallel Line
|
4
|
4
|
4
|
|
|
|
|
|
|
|
Line at Angle
|
4
|
4
|
|
4
|
|
|
|
|
|
|
Arc
|
4
|
4
|
|
|
4
|
|
|
|
|
|
Circle
|
4
|
4
|
|
|
|
|
|
|
|
|
Concentric Arc
|
4
|
4
|
|
|
|
4
|
|
|
|
|
Ellipse
|
|
|
|
|
|
|
4
|
4
|
4
|
>
|
Note:
|
Composite curves created by Polyline and Line-arc list
separate attributes for each segment of the curve.
|
Length/Radius
-
- For lines, the length of the line from the start point.
-
- For arcs, the radius.
Angle/Sweep
-
- For lines, the angle from the horizontal axis when it was drawn.
-
- For arcs, the number of degrees of a full circle.
Line Offset
-
- For parallel lines, the distance from the first line (or tangent line if it's a curve).
Rel Angle
-
- For lines drawn at an angle, the relative angle from the first line.
Arc Complement
-
- Click this button to draw the arc in the opposite direction.
Arc Offset
-
- For concentric arcs, the distance from the first arc.
Major Axis
-
- For ellipses, the length of the major axis.
Minor Axis
-
- For ellipses, the length of the minor axis.
Sweep (ellipse)
-
- For ellipses, the Sweep the ellipse was drawn with (set in the options window of the Ellipse tool. See Drawing Keypoint Ellipses on page 157). You cannot edit this attribute.
|
Curve Edit > Modify
> Stretch

|
Stretching Curves
|
|
|
|
|
Purpose
Stretch or reshape a curve by moving handles attached to the curve.
How To
To stretch a curve by moving handles:
-
1
-
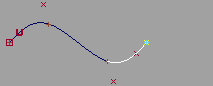
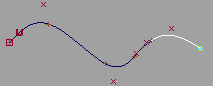
Click the Stretch icon, or choose Modify > Stretch from the Curve Edit palette menu.
-
2
-
Click the curve you want to stretch.
|
|
|
-
3
-
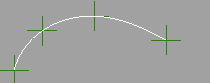
Handles appear on the curve, regularly spaced between the beginning and end points.
|
|
|
-
4
-
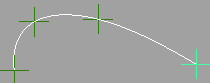
Drag a handle to move that part of the curve and stretch the rest of the curve.
To change the location of a handle on the curve:
|
|
|
-
1
-
Hold down the Shift key and click a handle to turn it into a locator.
-
2
-
Drag the locator along the curve.
-
3
-
Click the locator to turn it back into a handle.
To change the number of handles:
-
1
-
Double click the Stretch icon, or choose Modify > Stretch-
 from the Curve Edit palette menu. from the Curve Edit palette menu.
-
2
-
Set the Number of Points option to the number of handles you want on the curve. You cannot use more handles than the curve's degree + 1. For example, a degree 3 curve cannot have more than 4 handles.
-
3
-
Click Go.
|
|

|
-
4
-
Click a curve to use the Stretch tool.
Tips and Notes
- The Stretch tool is harder to explain than to use. Try creating a curve and stretching it to see how the tool works.
- You can still use curve, magnet, and grid snapping when moving handles.
- You can use the Information Window to set the parameters of the handles exactly.
- The first and last handles stay locked to their parameters while dragging, even when the Parameter option is set to Floating.
Options
Number of Points
-
- The number of handles (from 2 to 8) on the curve.
-
- You cannot use more handles than the curve's degree + 1. For example, a degree 3 curve cannot have more than 4 handles.
|
|
This option is available
when the Number of Points
is greater than 2.
|
Parameter
-
- Locked-the handles stay at the same parameter on the curve as they move (default).
-
- Floating-the handles can slide along the curve as you drag it. This option minimizes the changes to the curve from using Stretch. This option does not affect the first and last handles.
See Also
|
Curve Edit > Modify
> Adjust intersection

|
Making Curves Intersect
|
|
|
|
|
Purpose
- Modify a curve to intersect another where they cross in a view window, at a specific edit point, or simply at the closest point.
- Check for an intersection between two curves.
Overview
The Adjust intersection tool has many options that let you vary the behavior of the tool from almost automatic to full user control.
Because of this, the procedures in the "How To" section are more a small cookbook of common uses than a complete guide to all that the Adjust intersection tool can do.
The following list explains the types of control available:
-
1
-
Decide what to do with the first curve (Modification Mode):
- move the entire curve (Global) to create an intersection,
- deform the curve (Segment) to create an intersection, or
- simply check for an existing intersection (None).
-
2
-
If you choose to move or deform the curve, you must decide where exactly the intersection will occur (Intersection Selection):
- at the point where the curves cross visually in the view window (View),
- at the closest point to the second curve (Closest), or
- at a specific edit point on the first (Manual Base) or second (Manual Target) curve.
-
3
-
If you choose to deform the curve you must decide which part of the curve will be deformed (Segment Selection):
- the entire curve (Entire Curve),
- a segment of the curve automatically calculated based on the other options (Auto), or
- a segment you choose by picking start and end edit points (Manual).
-
4
-
If you choose to deform the curve you must also decide whether the start/end point of the deformed segment (Start/End Modification):
- stays fixed and maintains its tangent (Tangent Fixed).
|
Tip:
|
Once you set these options in the options window, messages
in the prompt line will lead you through the different steps
of using the tool.
|
How To
To quickly move a curve to intersect another curve:
|
|

|
-
1
-
Double-click the Adjust intersection icon, or choose Modify > Adjust intersection- from the Curve Edit palette menu.
-
2
-
Set Modification Mode to Global. Set Intersection Selection to
- View if the curves already cross visually in the view window.
- Closest if the curves are already close to the correct intersection.
-
Then click Go.
-
3
-
Click the "base" curve. The Adjust intersection tool will move this curve to intersect the "target" curve.
-
4
-
Click the target curve.
-
5
-
The Adjust intersection tool moves the base curve and creates an edit point at the new intersection if one does not already exist.
To move a curve to intersect at a specific edit point with another curve:
|
|

|
-
1
-
Double-click the Adjust intersection icon, or choose Modify > Adjust intersection- from the Curve Edit palette menu.
|
|
If the edit point is on the
second (target) curve, use
Manual Target instead.
|
-
2
-
Set Modification Mode to Global. Set Intersection Selection to Manual Base. Then click Go.
|
|
If you chose Manual Target,
click the base curve
anywhere.
|
-
3
-
Click an edit point on the base curve. The Adjust intersection tool will move this curve to intersect the target curve at this edit point.
|
|
If you chose Manual Target,
click an edit point on the
target curve. The Adjust
intersection tool will move
the base curve to intersect
this curve at this edit point.
|
-
4
-
Click the target curve.
-
5
-
The Adjust intersection tool moves the base curve and creates an edit point on the target curve at the new intersection if one does not already exist.
To deform a curve to intersect another curve at a specific edit point:
|
|

|
-
1
-
Double-click the Adjust intersection icon, or choose Modify > Adjust intersection- from the Curve Edit palette menu.
-
2
-
Set Modification Mode to Segment. Set Intersection Selection to Manual Target. Set Segment Selection to Manual. Then click Go.
-
3
-
Click the base curve.
-
4
-
Pick two edit points on the base curve to define the segment that will be deformed to create the intersection.
-
5
-
Click an edit point on the target curve. The Adjust intersection tool will deform the base curve to intersect this curve at this edit point.
-
6
-
The Adjust intersection tool deforms the segment of the first (base) curve and creates an edit point at the new intersection if one does not already exist.
To check for an intersection between two curves
-
1
-
Double-click the Adjust intersection icon, or choose Modify > Adjust intersection- from the Curve Edit palette menu.
-
2
-
Set Modification Mode to None. Then click Go.
-
3
-
Click one curve, then the other.
-
4
-
If an intersection already exists between the two curves, an edit point is inserted on both curves at the intersection (unless one already exists) and the prompt line reads:
-
Done intersecting.
-
If no intersection exists, nothing happens. The prompt line
reads:
-
With modification NONE, curves must
intersect. No edit points added.
Tips and Notes
- The first (base) curve must be degree 3. The second (target) curve must be degree 1 or degree 3.
Options
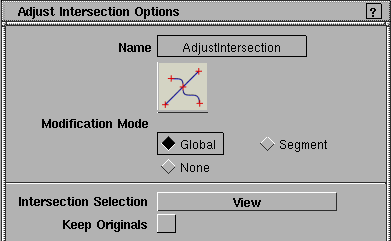
Keep Originals
-
- Keep a copy of the original curve before it is modified.
Modification Mode
Control what the tool does with the curves.
Global
-
- Move the first curve so that it intersects the target curve.
Segment
-
- Modify the first curve using the Intersection Selection setting so that it intersects the target curve.
None
-
- If an intersection exists, an edit point is added to both curves at the intersection (unless one already exists). This option does not modify the shape or position of either curve.
|
|
These options are available
when the Modification Mode
is Global or Segment.
|
Intersection Selection
Manual Base
-
- Asks you to click an edit point on the first (base) curve where the curves will intersect.
Manual Target
-
- Asks you to click an edit point on the second (target) curve where the curves will intersect.
|
|
This option has no effect
when used in a perspective
window.
|
View
-
- Create the intersection where the curves cross in the view window.
- If the curves do not cross in the view, the Adjust intersection tool reports an error and does not modify the curves.
- If the curves cross more than once, the Adjust intersection tool will ask you to click near the intersection you want.
Closest
-
- Move or deform the first (base) curve to intersect the second (target) curve at the nearest possible point.
-
- That is, the base curve moves or is deformed the minimum distance necessary to intersect the target curve.
|
|
These options are available
when the Modification Mode
is Segment.
|
Segment Options
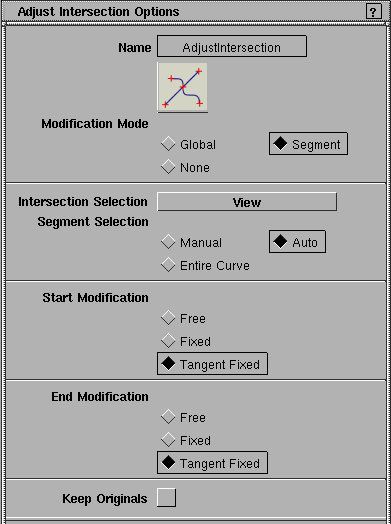
Segment Selection
-
- Manual-asks you to pick the start and end edit point of the segment to be modified.
-
- Entire Curve-modifies the entire curve proportionally. The curve is modified less the further from the intersection.
-
- Auto- automatically picks the segment to be modified based on the other options.
Start /End Modification
-
- Free-the start/end of the modified segment can move.
-
- Fixed-the start/end of the modified segment stays fixed.
-
- Fixed Tangent-the start/end of the modified segment stays fixed as well as its tangent.
|