|
|
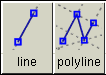
Curves > Lines >
Line, Polyline
|
Drawing Keypoint Lines
|
|
|
|
|
Purpose
Create single or composite keylines.
How To
To draw a single key line:
|
|

|
-
1
-
Click the Line icon, or choose Lines > Line from the Curves palette menu.
|
|

|
-
2
-
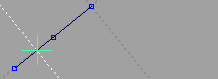
Click to place the starting point for the line, or type a 3D coordinate to place the point exactly.
-
If you click the endpoint of an existing keypoint curve, the
new line will attach itself to the end of the existing curve.
Dragging the common endpoint will move both curves.
|
|
|
-
3
-
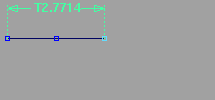
Click to place the end point for the line, or type a 3D coordinate to place the point exactly.
- Click the left mouse button to add the point freely.
- Click the middle mouse button to align the point horizontally to the first point.
- Click the right mouse button to align the point vertically to the first point.
-
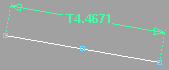
As you drag the end point, the Line tool displays the
length of the line in current linear units.
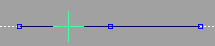
To draw a series of connected lines (polyline):
|
|

|
-
1
-
Click the Polyine icon, or choose Lines > Polyline from the Curves palette menu.
-
2
-
Click to place the starting point for the polyline, or type a 3D coordinate to place the point exactly.
-
If you click the endpoint of an existing keypoint curve, the
new line will attach itself to the end of the existing curve
to create a composite curve.
-
3
-
Click to place the next point in the polyline, or type a 3D coordinate to place the point exactly.
- Click the left mouse button to add the point freely.
- Click the middle mouse button to align the point horizontally to the first point.
- Click the right mouse button to align the point vertically to the first point.
-
As you drag the end point, the Polyline tool displays the
length of the line in current linear units.
-
4
-
You can now:
- Repeat step 3 to add another line segment.
- Click the Polyline tool to start another polyline.
- Click any other tool to finish the polyline.
Tips and Notes
- You can use guidelines and curve snapping to quickly draw parallel lines, tangent lines, perpendicular lines, and right angles.
-
See Snapping to Grids, Curves, and Points on page 35 and
Working With Guidelines on page 36.
- You can use Edit > Undo to undo points in a polyline all the way back to the start point.
See Also
|
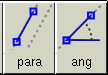
Curves > Lines >
Parallel line, Line at
angle
|
Drawing Keypoint Lines Parallel or at an Angle
|
|
|
|
|
Purpose
Create key lines parallel to a curve, or at an angle to a curve.
How To
To draw a line parallel to a curve:
|
|

|
-
1
-
Click the Parallel line icon, or choose Lines > Parallel line from the Curves palette menu.
|
|

|
-
2
-
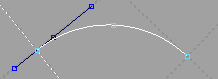
Click the curve to which the new line will be parallel.
- Guidelines are added for the curve, allowing you to line up the start and/or end points of the new line if needed.
- If you click a curved line, the new line will be parallel to the tangent where you click.
|
|
|
-
3
-
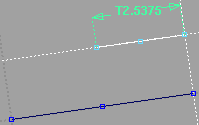
Click the start point of the parallel line, or type a 3D coordinate to place the point exactly.
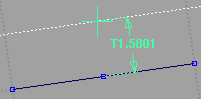
-
As you drag the start point, the Parallel Line tool displays
the distance between the lines in current linear units.
|
|
|
-
4
-
Click the end point of the parallel line, or type a 3D coordinate to place the point exactly.
-
As you drag the end point, the Parallel Line tool displays
the length of the line in current linear units.
To draw a line at an angle to a curve:
|
|

|
-
1
-
Click the Line at angle icon, or choose Lines > Line at angle from the Curves palette menu.
|
|
|
-
2
-
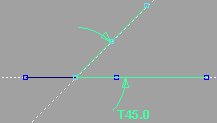
Click the start point of the new line on the curve from which it will angle off.
-
If you click a curved line, the new line will be drawn at an
angle to the line that passes through the end point of the
curve.
|
|
|
-
3
-
If you want to project the line at an exact angle, type the value of the angle and press Enter. The Line at angle tool adds a new guideline at that angle.
|
|
|
-
4
-
Click the end point of the new line.
-
As you drag the end point, the Line at angle tool displays
the angle in current angular units (degrees by default).
Tips and Notes
- You can continue to change the offset distance (for parallel lines) or angle in the Information window. (See Getting Detailed Information in the Basic Tools book.)
- These special relationship attributes remain with the lines until you manually modify one of the lines.
- The relationship attribute for lines created with the Line at angle tool is called Rel Angle (Relative angle). All lines have an attribute called Angle/Sweep, which is the angle to the orthographic window's horizontal axis, as well as a Length attribute.
See Also
|
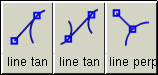
Curves > Lines
(Tangent)
|
Drawing Keypoint Lines Tangent to Curves
|
|
|
|
|
Purpose
Draw a key line tangent to one or two curves, or perpendicular to a curve.
How To
To draw a line tangent to a curve:
|
|

|
-
1
-
Click the Lines (Tangent) > Line tangent to curve icon, or choose Lines (Tangent) > Line tangent to curve from the Curves palette menu.
-
2
-
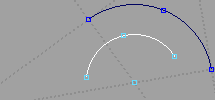
Click the start point of the tangent line.
-
3
-
Click the curve you want the line to be tangent to.
-
The Line tangent to curve tool calculates the end point for
the line to be tangent to that curve.
- If it cannot find a tangent, it prints a message in the prompt line.
- If it finds more than one tangent, it uses the tangent closest to where you clicked.
To draw a tangent line between two curves:
|
|

|
-
1
-
Click the Lines (Tangent) > Line tangent from/to curve icon, or choose Lines (Tangent) > Line tangent from/to curve from the Curves palette menu.
-
2
-
Click the first curve the tangent line will touch.
-
3
-
Click the second curve the tangent line will touch.
-
The Line tangent from/to curve tool calculates the line
tangent to both curves.
- If it cannot find a tangent, it prints a message in the prompt line.
- If it finds more than one tangent, it uses the tangent closest to where you clicked.
To draw a line perpendicular to a curve:
|
|

|
-
1
-
Click the Lines (Tangent) > Line perpendicular to curve icon, or choose Lines (Tangent) > Line perpendicular to curve from the Curves palette menu.
-
2
-
Click the start point of the perpendicular line.
-
3
-
Click the curve you want the line to be perpendicular to.
-
The Line perpendicular to curve tool calculates the end point
for the line to be perpendicular to the curve.
- If it cannot find a perpendicular, it extends the ends of the curve.
- If it finds more than one perpendicular, it uses the perpendicular closest to where you clicked.
Tips and Notes
|
|
To get a true 3D tangent, use
the Line tool with curve
snapping to place the first
point on the curve, then snap
to the tangent guideline.
|
- The tangent lines are tangent in the current view. It is only a true 3D tangent when the curve and start point are planar.
- In an orthographic window, the perpendicular is relative to the view. In a perspective window, it is a 3D perpendicular.
- Do not use the tangent line tools in the perspective window.
See Also
|
Curves >
Line-arc

|
Drawing a Sequence of Lines and Arcs
|
|
|
|
|
Purpose
Draw a composite keypoint curve of alternating lines and arcs.
How To
To draw alternating lines and arcs:
|
|

|
-
1
-
Click the Line-arc icon, or choose Line-arc from the Curves palette menu.
|
|

|
-
2
-
Click the first point of the composite curve, or type a 3D coordinate to place the point exactly.
-
If you click the endpoint of an existing keypoint curve, the
new line will attach itself to the end of the existing curve.
Dragging the common endpoint will move both curves.
|
|
|
-
3
-
Click the endpoint of the first line segment, or type a 3D coordinate to place the point exactly.
- Click the left mouse button to add the point freely.
- Click the middle mouse button to align the point horizontally to the previous point.
- Click the right mouse button to align the point vertically to the previous point.
-
As you drag the end point, the Line-arc tool displays the
length of the line in current linear units.
|
|
|
-
4
-
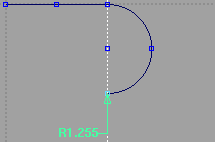
Click the endpoint of the arc segment, or type a 3D coordinate to place the point exactly.
- Click the left mouse button to add the point freely.
- Click the middle mouse button to align the point horizontally to the previous point.
- Click the right mouse button to align the point vertically to the previous point.
-
As you drag the end point, the Line-arc tool displays the
radius of the arc in current linear units.
|
|
|
-
5
-
You can now:
- Repeat steps 3-4 to add more segments.
- Click the Line-arc tool to start another composite curve.
- Click any other tool to finish the curve.
Tips and Notes
|
|
|
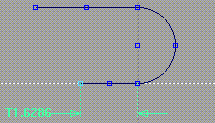
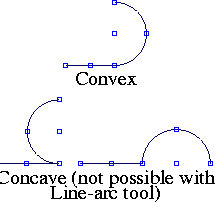
- Arcs segments are always convex. That is, the arc always projects "forward" from the previous line. You cannot create concave arcs with the Line-arc tool.
-
To get concave arcs, you must go back and edit the curve
after creating it. See Editing Keypoint Curves on page 167.
- Click the endpoint of a segment twice to make the next segment the same type.
-
For example, click the endpoint of a line segment twice to
make the next segment a line. Click the endpoint of an arc
segment twice to make the next segment an arc.
See Also
|
Curves > Arcs >
Arc (three point), Arc
(two point), Circular
arc
|
Drawing Keypoint Arcs and Circles
|
|
|
|
|
Purpose
Draw three point, two point, and circular arcs.
How To
To draw a three-point arc:
|
|

|
-
1
-
Click the Arcs > Arc (three point) icon, or choose Arcs > Arc (three point) from the Curves palette menu.
|
|

|
-
2
-
Click the start point of the arc, or type a 3D coordinate to place the point exactly.
-
If you click the endpoint of an existing keypoint curve, the
new arc will attach itself to the end of that curve. Dragging
the common endpoint will move both curves.
|
|

|
-
3
-
Click a second point that will lie on the arc, or type a 3D coordinate to place the point exactly.
- Click the left mouse button to add the point freely.
- Click the middle mouse button to align the point horizontally to the first point.
- Click the right mouse button to align the point vertically to the first point.
|
|

|
-
4
-
Click the end point of the arc, or type a 3D coordinate to place the point exactly.
- Click the left mouse button to add the point freely.
- Click the middle mouse button to align the point horizontally to the first point.
- Click the right mouse button to align the point vertically to the first point.
-
As you drag the end point, the Arc (three point) tool
displays the radius of the arc in current linear units.
To draw a two-point arc:
|
|

|
-
1
-
Click the Arcs > Arc (two point) icon, or choose Arcs > Arc (two point) from the Curves palette menu.
|
|

|
-
2
-
Click the start point of the arc, or type a 3D coordinate to place the point exactly.
-
If you click the endpoint of an existing keypoint curve, the
new arc will attach itself to the end of that curve. Dragging
the common endpoint will move both curves.
|
|

|
-
3
-
Click the end point of the arc, or type a 3D coordinate to place the point exactly.
- Click the left mouse button to add the point freely.
- Click the middle mouse button to align the point horizontally to the first point.
- Click the right mouse button to align the point vertically to the first point.
|
|
|
-
4
-
Click the centerpoint of the arc, or type the radius of the arc.
-
As you drag the center point, the Arc (two point) tool
displays the radius of the arc in current linear units.
To draw a keypoint circle:
|
|

|
-
1
-
Click the Arcs > Circular arc icon, or choose Arcs > Circular arc from the Curves palette menu.
-
2
-
Click the centerpoint of the arc, or type a 3D coordinate to place the point exactly.
-
3
-
Click a point that will lie on the arc, or type a 3D coordinate to place the point exactly.
-
As you drag the circumference, the Circular arc tool
displays the radius of the circle in current linear units.
Tips and Notes
- Key arcs are exported as IGES entity 100 (circular arc).
- Key lines are exported as entity 110 (line).
- Composite curves are exported as entity 102 (composite curve).
See Also
|
Curves > Arcs >
Arc tangent to curve,
Concentric arc
|
Drawing Keypoint Arcs in Relation to Other Curves
|
|
|
|
|
Purpose
Draw keypoint arcs tangent to a curve or concentric to another arc.
How To
To draw an arc tangent to a curve:
|
|

|
-
1
-
Click the Arcs > Arc tangent to curve icon, or choose Arcs > Arc tangent to from the Curves palette menu.
|
|
|
-
2
-
Click the start point of the new arc on the curve it will be tangent to.
|
|
|
-
3
-
Click the end point of the arc, or type a 3D coordinate to place the point exactly.
- Click the left mouse button to add the point freely.
- Click the middle mouse button to align the point horizontally to the first point.
- Click the right mouse button to align the point vertically to the first point.
-
As you drag the end point, the Arc tangent to curve tool
displays the radius of the arc in current linear units.
To draw an arc concentric to another arc:
|
|

|
-
1
-
Click the Arcs > Concentric arc icon, or choose Arcs > Concentric arc from the Curves palette menu.
-
2
-
Click the arc from which the new arc will be offset.
|
|

|
-
3
-
Click the start point of the arc, or type a 3D coordinate to place the point exactly.
-
As you drag the start point, the Concentric arc tool displays
the distance between the two radii.
|
|
|
-
4
-
Click the end point of the arc, or type a 3D coordinate to place the point exactly.
Tips and Notes
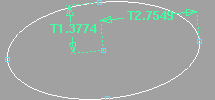
- Concentric arcs are always drawn in the direction that will create the smallest sweep angle. If you want an arc of more than 180 degrees, open the Information Window and click the Complement button under the Attributes section.
- To create a concentric circle, set the Angle/Sweep attribute to 360 degrees in the Information Window.
See Also
|
Curves >Ellipse

|
Drawing Keypoint Ellipses
|
|
|
|
|
Purpose
Create a keypoint ellipse by drawing the two major axis points, or by drawing a center point and a major axis point.
How To
To draw a keypoint ellipse from the center:
-
1
-
Double-click the Ellipse icon, or choose Ellipse--
 from the Curves palette menu. from the Curves palette menu.
-
2
-
Set Ellipse Definition to Center and end point. Click Go.
|
|

|
-
3
-
Click the center of the ellipse, or type a 3D coordinate to place the point exactly.
|
|
|
-
4
-
Click the end of the ellipse, or type a 3D coordinate to place the point exactly.
-
As you drag the end point, the Ellipse tool displays the
length of the two radii in current linear units.
To draw a keypoint ellipse end-to-end:
-
1
-
Double-click the Ellipse icon, or choose Ellipse-- from the Curves palette menu.
-
2
-
Set Ellipse Definition to Axis endpoints. Click Go.
|
|

|
-
3
-
Click the first end of the ellipse, or type a 3D coordinate to place the point exactly.
|
|
|
-
4
-
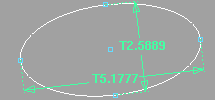
Click the opposite end of the ellipse, or type a 3D coordinate to place the point exactly.
-
As you drag the end point, the Ellipse tool displays the
length of the two axes in current linear units.
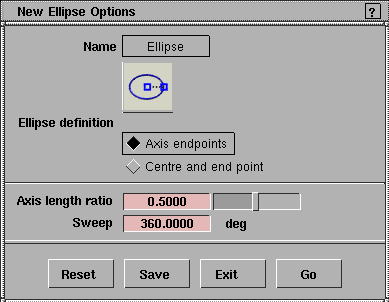
Options
|
|
|
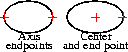
Ellipse Definition
-
- Axis endpoints-Draw the ellipse by specifying both endpoints of the major axis.
-
- Center and end point-Draw the ellipse by specifying the center and one endpoint of the major axis.
Axis length ratio
-
- The ratio of the length of the minor axis to the major axis.
-
- For example, a value of 0.5 will produce an ellipse half as tall as it is wide. A value of 1.0 will produce a circle.
|
|
|
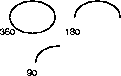
Sweep
-
- The number of degrees of the ellipse that will be drawn.
-
- For example, a value of 180 degrees will produce half of a full ellipse. A value of 90 degrees will produce a quarter ellipse.
See Also
|


