|
|
3
|
Working in Alias
|
|
In This Section:
Working With Construction History
|
|
|
|
|
Overview
For almost every tool, Alias gives you the option of saving the history of how an object was constructed. This means you can edit the curves, surfaces, and/or manipulators that were used to create an object, and the object will automatically update.
For example, when you use the Revolve tool to create an object with construction history, you can:
- reshape and edit the curves you revolved
- change the manipulator created by the Revolve tool
and the surface(s) will update automatically.
To create construction history when working with tools, turn on the Create History option in the option window. This option is on by default in all tools.
Objects that have construction history are drawn in green in the default color scheme.
Breaking Construction History
Certain modeling actions can disrupt construction history. This is called breaking construction history. Breaking can sometimes occurs when you move an object.
Whenever you try to perform an action which will break construction history, a dialog box will warn you.
Deleting Construction History
In almost all cases, you should keep construction history for as long as possible. The benefits of being able to go back and change design decisions without remodeling usually outweigh the extra storage requirements.
However, there are cases where you may want to delete construction history:
- To decrease the file size of extremely large files.
- To free construction curves/surfaces for new uses.
How To
To edit the construction history of an object:
|
|

|
-
1
-
Choose the Query edit tool from the Object Edit palette menu, or click its icon.
-
2
-
Click the object for which you want to edit construction history.
-
If the object has editable history, the Query edit tool will
automatically select the appropriate tool for editing.
To delete construction history from an object:
-
1
-
Pick the object from which you want to delete construction history.
-
2
-
Choose Delete > Del constr history from the menus.
See Also
|
Object Edit >
Edit comment

|
Adding Text Comments to an Object
|
|
|
|
|
Purpose
Attach a text comment to any DAG node.
How to Use
To add a comment to a DAG node:
-
1
-
Pick the object you want to add a comment to.
-
If you want to comment a node that does not have a
representation in the scene, use the SBD or ASBD windows
to pick the node.
-
2
-
Choose the Edit comment tool from the Object Edit tool palette or click its icon.
-
The Edit comment tool runs your default editor. If the object
already has a comment, it will be loaded into the editor.
-
3
-
Type or edit the comment using the editor. You can type any text and use more than one line.
>
|
Note:
|
The Edit comment tool runs your default editor on a
temporary file. Do not change the name or location of the file
when you save, or the comments will be lost.
|
-
4
-
When you are done entering or editing the comment, save the file and exit the editor.
To see any comments attached to a DAG node:
|
|

|
Tips and Notes
- You can usually change the default editor by setting the EDITOR environment variable. Ask your system administrator for details.
- If you minimize Alias while editing a comment, you cannot restore Alias again until you exit the editor.
|
Object Edit >
Query edit

|
Showing Basic Information About an Object
|
|
|
|
|
Purpose
- Show all basic information about an object in the scene, as well as any comments.
- Edit the construction history of an object.
How To
To show basic information about an object:
|
|
|
-
1
-
Choose the Query edit tool from the Object Edit palette menu, or click its icon.
|
|
|
-
2
-
Click the object with the right mouse button.
-
A floating box appears with all the vital statistics of the
object, as well as any comments you added to the object
with the Edit comment tool.
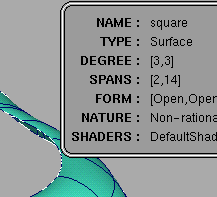
The following table describes the information items that may be displayed by the Query edit tool:
|
Information Item
|
Displayed For
|
Description
|
|---|
|
Name
|
|
You can set this in the Information window.
|
|
Layer
|
|
Name (or number) of the layer the object belongs to.
|
|
Type
|
|
Curve, Surface, Trimmed Surface, Light, Shell, etc.
|
|
Degree
|
|
Degree of the curve, or the degree of the surface in the U and V directions.
|
|
Spans
|
|
The total number of spans (sections between edit points) in the curve or the surface (U and V directions).
|
|
Non-empty Spans
|
|
The number of spans that are not empty (that is, have a length greater than 0). This field is only displayed for curves or surfaces that have empty spans.
|
|
Form
|
|
Open or Closed. See Making Objects Open or Closed on page 101.
|
|
Nature
|
|
Rational or Non-rational. See Rational vs. Non-rational Geometry on page 13.
|
|
Shader
|
|
The name of the shader assigned to the surface.
|
|
Comments
|
|
Any comments you have added to the node with the Edit comment tool (see page 48).
|
|
Number of Regions
|
|
The number of regions (separate parts) in a shell.
|
|
Closed Volume
|
|
True or False. Whether the shell completely encloses a volume of space.
|
|
Number of Open Edges
|
|
The number of exposed edges in an open shell.
|
|
Result Of
|
|
The tool used to create an object with construction history.
|
|
Used In
|
|
The names of objects with construction history using this object.
|
The Query edit tool also shows construction history dependencies graphically:
- The object you clicked is drawn in yellow.
- Curves and surfaces used to construct the object are drawn in green.
- Curves and surfaces built from the object are drawn in blue.
- Multi-knots are highlighted with a red arrow.
To edit the construction history of an object
This functionality only applies to objects that were built with a tool that uses a control window, i.e. an option window that remains on the screen while the tool operates (e.g. Surfaces > Swept surfaces > Birail).
-
1
-
Choose the Query edit tool from the Object Edit palette menu, or click its icon.
|
|
|
-
2
-
Click an object with construction history with the left mouse button.
-
If the object was built with an appropriate tool, the
corresponding control window appears, the object is
selected, and you can further modify the parameters to
rebuild the object.
-
Otherwise, the following message is displayed:
-
Object does not have an edit window.
See Also
|
Object Edit >
Patch precision, Hull
precision
Curve Edit >
Curve precision
|
Changing the Display Precision of Objects
|
|
|
|
|
Purpose
Increase or decrease:
- The number of isoparms drawn on a surface.
- The precision with which curves are drawn in the view windows.
- The precision with which surfaces are drawn in Simple display mode.
Overview
|
|
Each four-sided area of a
surface bounded by edit
point isoparms is called a
patch.
|
Patch precision tool
This tool sets the number of isoparms drawn for each span on a surface.
|
|

|
Higher numbers are very useful for getting a greater sense of the shape of an object, and for showing more isoparms to use for snapping or as construction curves. However, increasing the number of isoparms will slow down the display.
You can use values from 2 to 64. The default is 2, which only shows isoparms corresponding to edit points.
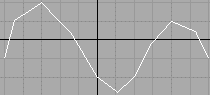
Curve precision tool
This tool sets the smoothness with which curves and isoparms are drawn on screen.
|
|
|
Increasing the precision will improve but slow down the display. Decreasing precision will speed up the display, but at the expense of coarser curves on screen.
You can use values from 1 to 129. This corresponds to the number of line segments drawn in each span. Values from 1-5 show noticeable coarseness. Values above 16 are generally wasteful, because the precision is greater than the monitor's resolution. The default is 16.
Note that the default precision is fine on most modern machines. You will only need to decrease curve precision to speed up extremely complex scenes.
Hull precision tool
|
|
|
This tool sets the coarseness of surfaces drawn in Simple Display mode (ObjectDisplay > Simple display), which only draws the hull of a surface for greater speed. This tool does not affect the normal display of objects.
>
|
Note:
|
None of these tools affect the actual geometry of objects.
They simply change how the objects are displayed on
screen.
|
How To
To set the number of isoparms drawn for a surface:
|
|

|
-
1
-
Pick any surfaces of which you want to change the display.
|
|

|
-
2
-
Choose the Patch precision tool from the Object Edit palette menu, or click its icon.
|
|

|
-
3
-
Drag the mouse left and right to decrease and increase the number of isoparms drawn per span, or type a number from 2 to 64.
To set the precision with which a curve or surface is drawn:
|
|
|
-
1
-
Pick any curves or surfaces of which you want to change the display.
|
|

|
-
2
-
Choose the Curve precision tool from the Curve Edit palette menu, or click its icon.
|
|
|
-
3
-
Drag the mouse left and right to decrease and increase the drawing precision, or type a number from 1 to 129.
-
Note that on all but the highest resolution displays, values
above 10 appear identical, so you may not see the display
change as you drag.
To set the coarseness of surfaces drawn in Simple display mode:
|
|
|
-
1
-
Pick the surfaces of which you want to change the simple display.
|
|

|
-
2
-
Choose the Hull precision tool from the Object Edit palette menu, or click its icon.
|
|
|
-
3
-
You can now do the following:
- Drag the left mouse button to increase or decrease the coarseness of the simple display.
- Drag the middle mouse button to increase the coarseness in the U direction.
- Drag the right mouse button to increase the coarseness in the V direction.
- Type a number from 1 to 64 to set the coarseness. The default is 1 (the least coarse).
-
Remember that you must use ObjectDisplay > Simple display
to see the simpler version of the surface.
Tips and Notes
- The Curve precision and Hull precision tools include options for setting the default precision values for objects created in the future.
-
If you find yourself using the display precision tools to
change most of the objects you create, use the option
windows to change the defaults.
Options
Curve precision options
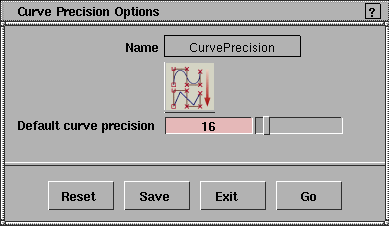
Default curve precision
-
- Sets the default curve drawing precision (from 1 to 129) of all curves created from now on.
Hull precision options
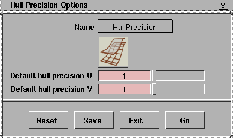
Default hull precision U
Default hull precision V
-
- Sets the default simple display coarseness (from 1 to 12) of all surfaces created from now on.
-
- A value of 1 is the least coarse (the closest to the actual object). A value of 12 is the most coarse (often a single line).
See Also
|
Preferences >
Construction options

|
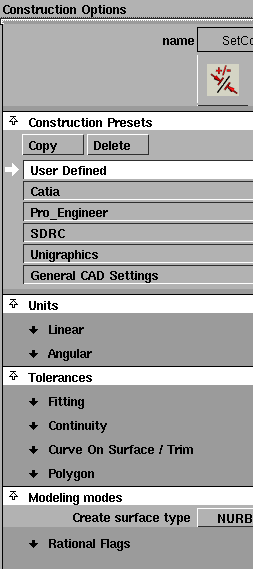
Setting Options for Modeling
|
|
|
|
|
Purpose
Set the options that control modeling NURBS curves and surfaces, including tolerances and units of measure.
How To
|
|
|
To open the construction options window:
- Choose Construction options from the Preferences menu.
-
The Construction Options window appears.
To model for transfer to a specific CAD package:
-
1
-
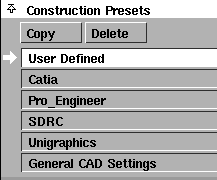
Open the Construction Presets section of the Construction Options window.
-
2
-
Choose one of the settings profiles from the list:
- Click the CAD software you want to model for. This sets the construction options to values needed for maximum compatibility with that CAD package.
- Click General CAD Settings if the CAD package you want to model for is not on the list. This sets the construction options to generic CAD values that will be compatible with most CAD packages.
- Click User Defined to set the construction options yourself (see below for explanations of each option).
To add a set of presets to the list of CAD packages:
-
1
-
Open the Construction Presets section of the Construction Options window.
-
2
-
Choose one of the settings profiles from the list:
- If the settings you want to add are very similar to one of the preset CAD packages, click the name of the CAD package.
- Otherwise, click User Defined.
-
3
-
Click the Copy button.
-
A new entry is added to the list of presets.
-
4
-
Double click the new profile to rename it.
-
5
-
Set the construction options to the values you want in the new profile (see below for explanations of all the options).
To set up site-wide construction presets:
This procedure must be performed by your system administrator.
-
1
-
Set the options you want for all users in the Construction Options window.
-
2
-
Copy the local file ~/.Alias/Prefs.2/Options/ConstructionPresets to the Alias directory $ALIAS_LOCATION/.Alias.
-
3
-
The first line of the ConstructionPresets file specifies the profile to use when Alias starts up. If you don't want every user to start up with the same construction options, delete this first line.
To enable typing fractional units on the prompt line:
-
1
-
Open the Units > Linear or Units > Angular section of the Construction Options window.
-
2
-
Turn on the Scale Factor option.
-
Scale factor sliders appear below the unit choices.
-
3
-
Use the scale factor sliders to change a unit from whole to fractional or multiple.
-
For example:
- Set the Sub Units to Inches.
- Set the Scale Factor slider below the Sub Units box to 0.125.
- The sub unit is now eighths of an inch rather than whole inches.
-
- or
- Set the Sub Units to centimeters.
- Set the Scale Factor slider below the Sub Units box to 10.0
- The sub unit is now decimeters (10 centimeters) rather than centimeters.
-
4
-
Now when you type numbers on the prompt line, the main units, sub units, or positional units will use the scaling factor you specified.
-
For example, in a typical scenario, you might set the main
unit to feet, the sub unit to inches, and the positional unit
to inches with a scaling factor of 0.125.
-
Now you can type the fractional unit on the prompt line.
So in the m:s:p form, you would type 3:5:1 for three
feet, five inches, plus one eighth of an inch.
-
See Units on page 61.
Tips and Notes
- If you are using a CAD software preset, you cannot change the tolerances. They are locked to the factory settings for the CAD software.
- You cannot edit or delete the original CAD package presets.
-
If you want to change a set of presets, use the Copy button
to create a copy of the set you want to edit, then edit the
copy.
- Changes to the settings in this panel are always saved automatically. You do not have to click a Save button or choose Preferences > User options > Save settings.
Construction Presets
|
|
|
Copy
-
- Copy the highlighted settings profile to a new profile.
-
- If you want to change some of the settings in one of the presets (for example, SDRC), make a copy of the preset profile, then edit the copy.
Delete
-
- Delete the highlighted settings profile.
-
- You cannot delete the preset settings profiles.
List of settings profiles
-
- Click a profile to use the settings in that profile.
-
- The preset profiles (for example, SDRC) contain the settings needed for best compatibility with various CAD systems.
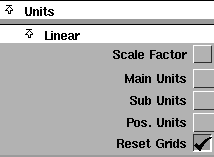
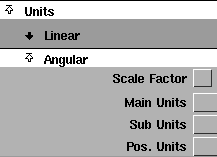
Units
|
|
|
Linear Unit options
Scale Factor checkbox/sliders
-
- Check this box to show Scale Factor sliders for the unit choices (Main Units, Sub Units, and Pos Units).
-
- Use the scale factor sliders to change a unit from whole to fractional or multiple units. For example:
- Set the Sub Units to Inches.
- Set the Scale Factor slider below the Sub Units box to 0.125.
|
|
See To enable typing fractional
units on the prompt line: on
page 59 for more details.
|
- The sub unit is now eighths of an inch rather than whole inches.
Main Units
-
- The unit of measurement for all linear measurements (in locators, on the prompt line and in windows).
-
- Choose Miles, Yards, Feet, Inches, KM (kilometers), M (meters), CM (centimeters) or MM (millimeters). The default is centimeters.
Sub Units
-
- The intermediate level of linear units.This is the unit of the second number when you type numbers using the m:s or m:s:p form on the prompt line. This unit is only used in keyboard input.
-
- Choose Miles, Yards, Feet, Inches, KM (kilometers), M (meters), CM (centimeters) or MM (millimeters). The default is millimeters.
Pos. (positional) Units
-
- The smallest level of linear units. This is the unit of the last number when you type numbers using the m:s:p form on the prompt line. This unit is only used in keyboard input.
-
- Choose Miles, Yards, Feet, Inches, KM (kilometers), M (meters), CM (centimeters) or MM (millimeters). The default is centimeters.
Reset Grids
-
- Set the grid spacing to 1.0 of the current Main Unit (taking into account the scaling factor, if set).
|
|
|
Angular Unit options
Scale Factor checkbox/sliders
-
- Check this box to show Scale Factor sliders for the unit choices (Main Units, Sub Units, and Pos Units).
-
- Use the scale factor sliders to change the different units from whole to fractional or multiple. For example:
- Set the Sub Units to minutes.
- Set the Scale Factor slider below the Sub Units box to 0.5.
|
|
See To enable typing fractional
units on the prompt line: on
page 59 for more details.
|
- The sub unit is now half minutes rather than whole minutes.
Main Units
-
- The unit of measurement for all angular measurements (in locators, on the prompt line and in windows).
-
- Choose Deg (degrees), Min (minutes), Sec (seconds), or Rad (radians). The default is degrees.
Sub Units
-
- The intermediate level of angular units.This is the unit of the second number when you type numbers using the m:s or m:s:p form on the prompt line. This unit is only used in keyboard input.
-
- Choose Deg (degrees), Min (minutes), Sec (seconds), or Rad (radians). The default is minutes.
Pos. (positional) Units
-
- The smallest level of angular units. This is the unit of the last number when you type numbers using the m:s:p form on the prompt line. This unit is only used in keyboard input.
-
- Choose Deg (degrees), Min (minutes), Sec (seconds), or Rad (radians). The default is seconds.
Tolerances
|
|
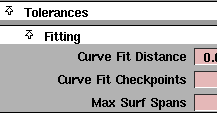
|
Fitting
Curve Fit Distance
-
- The value and units of the maximum distance allowed between two points for the system to consider them coincident (occupying the same space).
- For surface creation tools such as Swept, Birail and Square, this value controls the accuracy of the fit of the surface edge to the construction curves.
- For fillet surfaces, this value controls the positional accuracy of the fillet surface.
- For the Stitch tool (used to stitch surfaces into a shell), this value determines which sides to check for gaps. However, the gap is actually checked against the Maximum Gap Distance tolerance (see below). If the gap is within the tolerance, the sides are joined.
Curve Fit Checkpoints
-
- The sampling rate for curve fit constraints such as Continuity Angle and Curve Fit Distance.
Max Surf Spans
-
- The maximum number of spans to create when building surfaces.
- If a rebuild operation on a curve or surface requires adding more than the Max Surf Spans, the operation is cancelled.
- If maintaining continuity requires adding more than the Max Surf Spans, the continuity will not be achieved.
|
|
|
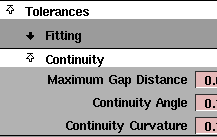
Continuity
Maximum Gap Distance
-
- The maximum distance allowed between two curves or two surfaces for the system to consider them contiguous (touching).
- For the Stitch tool, this value controls whether two edges will be joined when stitching surfaces into a shell.
- For the Surface continuity tool, this value controls whether common edges pass the check for gaps.
Continuity Angle
-
- The maximum angle allowed between two surface normals for the system to consider the normals pointing in the same direction.
-
- A smaller value gives better continuity, but usually requires tools to add more spans to the surface.
Continuity Curvature
-
- The maximum deviation allowed in curvature.
-
- A smaller value gives better continuity, but requires tools to add more spans to the surface.
|
|
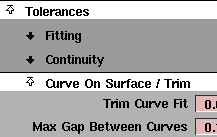
|
Curve on Surface/Trim
Trim Curve Fit
-
- The maximum deviation allowed between the original curve-on-surface and trim edges.
|
|
|
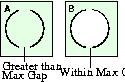
Max Gap Between Curves
-
- The maximum distance allowed between endpoints of different curves-on-surface for the system to consider them continuous for the purposes of defining a trim region.
-
- In example A at left, the gap between the two curves-on-surface is greater than Max Gap Between Curves, so the curves do not define an area.
-
- In example B, the gap between the curves-on-surface is within Max Gap Between Curves, so the curves define an area for the purpose of trimming.
|
|
|
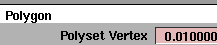
Polygon
Polyset Vertex
-
- The maximum distance allowed between polyset vertices for the system to consider them coincident (occupying the same space).
-
- See the Polygonal Modeling book for more information on polygons and modeling with polygons.
|
|
|
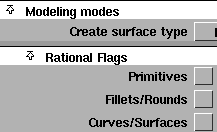
Modeling Modes
Create surface type
-
- Choose whether the surface creation tools create NURBS surfaces or POLYSETs.
-
- See the Polygonal Modeling book for more information on polygons and modeling with polygons.
Rational Flags
>
Primitives
-
- Create new primitives using rational geometry.
|
|
See Creating a Fillet Between
Surfaces on page 288 and
Creating Rounded Edges,
Corners and Fillets on
page 295.
|
Fillets/Round
-
- Create new fillets and rounds (that is, surfaces created by the Fillet and Round tools) using rational geometry.
Curves/Surfaces
-
- Create all other new curves and surfaces (that is, all curves and all surfaces that are not primitives, fillets or rounds) using rational geometry.
See Also
|


