|
|
Surfaces >
Swept Surfaces >
Swept

|
Sweeping a Curve Along a Path
|
|
|
|
|
Purpose
Create a new surface by sweeping one or more generation curves along a path curve, with optional rotation, scaling, and pivot options.
Overview
The Swept tool is a superset of the Extrude tool, with more options and more power.
Swept allows you to control the spatial relationship between the generation and path curves, unlike Extrude which uses the initial set-up of the two curves. The Swept tool also lets you rotate and/or scale the generation curve as it sweeps along the path curve.
You can combine these features to create complex sweeps, including helices, corkscrews, and funnels.
How To
>
|
Note:
|
The procedure for using the Swept tool has several optional
steps, depending on the settings in the Swept Control
window.
|
To sweep a generation curve along a path curve:
|
|
|
-
1
-
Double-click the Swept icon, or choose Swept surfaces > Swept-
 from the Surfaces palette menu. from the Surfaces palette menu.
-
The Swept Control window appears.
-
2
-
Make sure Create History is checked.
-
You will almost always want construction history on. This
allows you to change the settings after you sweep the
curves.
-
|
|
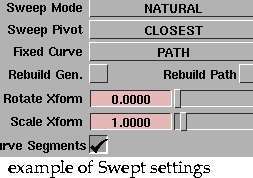
This example uses the settings
shown above.
|
-
When you are satisfied with the new surface, you can
delete the history information with Delete > Del constr
history.
|
|
|
-
3
-
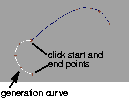
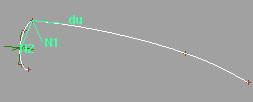
Click the generation curve. This is the curve that will be swept along the path curve to create the new surface.
-
The generation curve can be a free curve, isoparm, curve
on surface, or trim edge.
-
4
-
If Curve Segments is on, click the start and end edit points of the generation curve.
-
5
-
If Sweep Pivot is On Curve or Off Curve, use the locator to set the pivot point of the generation curve.
- Click the locator and drag to move the locator along the curve (On Curve) or in space (Off Curve).
- Type a parameter (On Curve) or 3D coordinate (Off Curve) to set the pivot exactly.
|
|
|
-
6
-
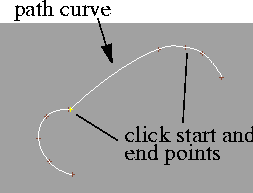
Click the path curve. This is the path along which the generation curve will travel.
-
The path curve can be a free curve, isoparm, curve on
surface, or trim edge.
-
7
-
If Curve Segments is on, click the start and end edit points of the path curve.
-
8
-
If Sweep Pivot is On Curve or Off Curve, use the locator to set the pivot point on the path curve.
- Click the locator and drag to move the locator along the curve.
- Type a parameter to set the pivot exactly
|
|

|
-
9
-
If the Sweep Mode is Spine, click the spine curve. This curve controls the orientation of the generation curve as it travels along the path curve.
To create a helical shape:
-
1
-
Create a generation curve and a path curve. The distance between the generation curve and path curve will be the radius of the helix.
-
2
-
Double-click the Swept icon, or choose Swept surfaces > Swept- from the Surfaces palette menu.
-
3
-
In the Swept Control window:
- Set the Sweep Projection to the plane to which the generation curve is parallel.
- Set the Sweep Pivot to Off Curve.
-
4
-
Click the generation curve.
-
5
-
A 3D locator appears and you are prompted for the generation curve pivot. Use magnet snapping to move it to the starting point of the path curve. Then click Go.
-
6
-
Click the path curve.
-
7
-
A curve locator appears and you are prompted for the path curve pivot. Move the locator to the starting point of the path curve. Then click Go.
-
The generation curve's pivot point moves along the path
curve. Since the pivot is offset from the actual generation
curve, the generation curve sweeps the new surface at an
offset from the path curve.
-
8
-
In the Rotate Xform field, enter the degrees of rotation you want as the generation curve travels around the path curve.
-
For example, if you enter 360, the generation curve will
make one full revolution as it travels the length of the path
curve.
To create a funnel shape:
-
1
-
Create a generation curve and a path curve.
-
2
-
Double-click the Swept icon, or choose Swept surfaces > Swept- from the Surfaces palette menu.
-
3
-
In the Swept Control window:
- Set the Sweep Pivot to Off Curve.
|
|
|
-
4
-
Click the generation curve.
-
5
-
A 3D locator appears and you are prompted for the generation curve pivot. Use magnet snapping to move it to the center of the generation curve. Then click Go.
|
|
|
-
6
-
Click the path curve.
-
7
-
A curve locator appears and you are prompted for the path curve pivot. Move the locator to the starting point of the path curve. Then click Go.
|
|
|
-
8
-
In the Scale Xform field, enter the factor by which you want the generation curve to grow as it travels along the path curve.
-
For example, if you enter 2, the generation curve will grow
twice as large as it travels the length of the path curve. If
you enter 0.5, it will shrink by half.
To edit the construction history of a Swept surface:
-
1
-
Pick the surface you want to edit.
-
2
-
Click the Swept icon, or choose Swept surfaces > Swept from the Surfaces palette menu.
-
The Swept Control window appears.
-
3
-
Use the curve modification tools (in the Xform, Curve Edit, and Object Edit palettes) to reshape the curves used to create the surface, and use the Swept Control window to change the surface creation options.
Tips and Notes
- The Spine sweep mode can be very tricky. If you have trouble with it, try the following:
- Create a copy of the path curve to use as the spine curve.
- Turn on Create History and Auto Recalc in the Swept Control window.
- Reshape the spine curve in small steps and observe the effect on the surface.
- You cannot sweep along a path curve with multi-knots or weighted CVs.
-
Turn on the Rebuild Path option to remove multi-knots
from the path curve and set the weight of all CVs to 1
before creating the surface.
- It is the generation curve pivot that travels along the path curve. If the pivot is not on the generation curve, the new surface will be offset.
- Changing the settings after you have clicked the generation curve does not affect the rest of the procedure for using the Swept tool.
-
For example, if you turn on the Curve Segments option
after you have already picked the generation curve, you
will not be asked to define curve segments. However, after
the surface is built, text boxes will appear in the Swept
Control window where you can change the start and end
parameters for the curve segments. You can also click the
Next button and start again.
- After you start a surface in Natural, Parallel, or View mode, you cannot convert it to Spine mode.
Swept Control window
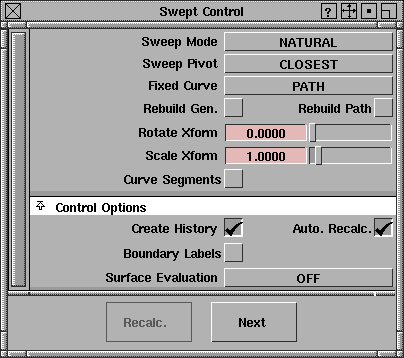
Sweep Mode
|
|
This option has the same
effect as the Tube option in
the Extrude tool.
|
Natural
-
- As the generation curve sweeps along the path, it pivots to maintain the same angle relative to the path curve.
|
|
This option has the same
effect as the Flat option in
the Extrude tool.
|
Parallel
-
- As the generation curve sweeps along the path, it maintains its original orientation.
|
|
|
View
-
- As the generation curve sweeps along the path, it only rotates in one plane (choose the plane with the Sweep Projection pop-up menu). This maintains the visual angle between the generation and path curves.
Spine
-
- Use a spine curve to control the orientation of the generation curve as it sweeps along the path.
|
|
This option appears when
Sweep Mode is View.
|
Sweep Projection
This option controls the plane in which the generation curve is allowed to rotate when the Sweep Mode is View.
|
|
|
Active
-
- Take the rotation plane from the current view window.
XY
XZ
YZ
-
- Use a global plane (XY, XZ, or YZ) as the rotation plane.
|
|

|
User
-
- Type a 3D vector in the View Plane text boxes to define a plane.
Sweep Pivot
Sweeping involves two pivot points:
- The point on or off the generation curve (the Generation Pivot) that stays on the path curve as the generation curve sweeps.
-
The generation curve rotates around and scales from this
point.
- The point on the path curve (the Path Pivot) that corresponds to the generation curve before it is swept.
-
In other words, the part of the surface corresponding to
this point on the path curve will have the exact cross
section of the generation curve.
You can have Swept set the pivot points automatically (as in Extrude), or set them manually for the generation and path curves.
Closest
-
- Set the pivots to the closest points on the two curves.
-
This option is the default. It works best when the
generation curve is close to the start or end points of the
path curve.
On Curve
-
- Set the pivots to specific parameters on the two curves.
|
|

|
- Use the Gen. Pivot Parameter and Path Pivot Parameter sliders to set the parameters for each curve.
Off Curve
-
- Set the pivots to a specific parameter on the path curve and a 3D point in space for the generation curve.
|
|

|
- Use the Path Pivot Parameter slider to set the parameter for the path curve.
- Use the Gen. Space Pivot text boxes to set the 3D pivot point for the generation curve.
Fixed Curve
This option determines which of the curves will be moved in order to make the two pivot points coincide before the sweep. This in turn controls where the new surface will be created.
Generation
-
- Keep the generation curve fixed and move the path.The new surface is built beginning at the generation curve.
Path
-
- Keep the path fixed and move the generation curve. The new surface is built along the path curve.
Rebuild Options
Rebuild Gen.
Rebuild Path
-
- Before creating the surface, rebuild the generation and/or path curves to reduce the number of edit points/spans.
-
- This can improve the parameterization and reduce the complexity of the new surface when the curves are complex.
-
- The Rebuild Path option also removes multi-knots and resets the weight of all CVs in the path curve to 1. This is necessary for path curves with multi-knots or CV weights.
Xform Options
Rotate Xform
-
- The degree of rotation as the generation curve sweeps along the path curve.
-
- For example, if Rotate Xform is 45, the generation curve will rotate 45 degrees as it sweeps along the length of the path curve. Use negative numbers to rotate in the opposite direction.
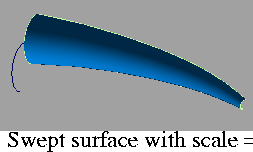
Scale Xform
-
- The scale factor as the generation curve sweeps along the path curve.
-
- For example, if Scale Xform is 2, the generation curve will double in size as it sweeps along the length of the path curve. If Scale Xform is 0.5, the generation curve will shrink by half as it sweeps.
Curve Segments
Specify sections of the generation and path curves to use in the sweep.
When this option is on, you will be prompted, during the sweep procedure, to click start and end edit points on both curves to specify the segments to use.
After the surface is built:
|
|

|
- Use the Gen. Segment text boxes to change the start and end parameters of the generation curve.
- Use the Path Segment text boxes to change the start and end parameters of the path curve.
Control Options
Create History
-
- Save the history of the new surface for later editing. If you turn Create History on, you can modify the curves that were used to create the surface, and the surface will update.
Auto Recalc
-
- Update the new surface automatically as you change the values in the Swept Control window.
Boundary Labels
-
- Label the generation, path, and spine curves in the view windows.
Surface Evaluation
None
-
- Do not perform any surface evaluation on the surface.
Curvature
Highlight
Quick Render
-
- Display a curvature render, highlight render, or Quick Render of the new surface.
-
- For more information, see:
Cross Section
-
- Calculate and display cross-section lines on the new surface. Choosing this option displays the Show Previous Xsect option.
-
- For more information, see Creating Cross-Section Lines on page 535.
|
|
This option appears when
the Surface Evaluation type
is Cross Section.
|
Show Previous Xsect
-
- Display the previous cross-section lines along with the current cross-section lines.
-
- This lets you make changes to the surface creation options and observe the effect on the cross-sections.
Buttons
Recalc
-
- Recalculate the surface with the current values in the Swept Control window.
Next
-
- Finish the current surface and prompt for new curves.
See Also
|
Surfaces >
Swept Surfaces >
Birail

|
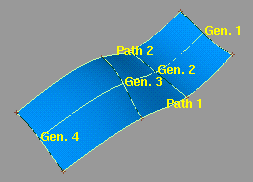
Sweeping a Curve Along Two Paths with Birail
|
|
|
|
|
Purpose
Create a surface by sweeping or blending one or more generation curves along two path curves (rails).
Overview
The Birail tool takes its name from its use of two "rail" curves. The generation curves maintain contact with the rails at the same points through the sweep, like a train traveling on a track.
How To
>
|
Note:
|
The procedure for using the Birail tool has several optional
steps, depending on the settings in the Birail Control
window.
|
To sweep one or more generation curves along two rail curves:
-
1
-
Double-click the Birail icon, or choose Swept surfaces > Birail- from the Surfaces palette menu.
-
The Birail Control window appears.
-
2
-
Make sure Create History is checked.
-
You will almost always want construction history on. This
allows you to change the settings after you sweep the
curves.
-
When you are satisfied with the new surface, you can
delete the history information with Delete > Del constr
history.
-
3
-
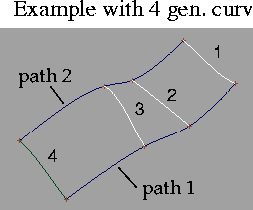
In the Generation Curves pop-up menu in the Birail Control window, choose the number of generation curves to use:
- Choose 1 to sweep one curve along the rails.
- Choose 2 to blend from one generation curve to another along the rails.
- Choose 2+ to blend a series of generation curves along the rails.
|
|
|
-
4
-
Click the first generation curve.
-
The generation curve(s) can be a free curve, isoparm,
curve on surface, or trim edge.
-
5
-
If Generation Curves is 2, choose the second generation curve.
-
If Generation Curves is 2+, pick all the generation curves in
order, then click Go.
|
|
|
-
6
-
Click the first rail curve, then click the second rail curve.
-
The generation curve(s) must intersect both rail curves.
-
The rail curves can be free curves, isoparms, curves on
surface, or trim edges.
-
7
-
If the Sweep Mode (in the Birail Control window) is Spine, click the spine curve. This curve controls the orientation of the generation curves as they travel along the rail curves.
To edit the construction history of a Birail surface:
-
1
-
Pick the surface you want to edit.
-
2
-
Click the Birail icon, or choose Swept surfaces > Birail from the Surfaces palette menu.
-
The Birail Control window appears.
-
3
-
Use the curve modification tools (in the Xform, Curve Edit, and Object Edit palettes) to reshape the curves used to create the surface, and use the Birail Control window to change the surface creation options.
Tips and Notes
- Birail does not support rail curves with sharp corners (cusps).
- Use curve snapping to make sure the generation curves intersect the rail curves.
- Birail tests whether the curves intersect using the Curve Fit Distance value in Construction Options. The default tolerance is 0.01 cm (i.e. if the curves are within 0.01 cm of each other, they are seen as intersecting).
-
To change the Curve Fit Distance option, choose Construction
Options from the Preferences menu.
Birail Control window
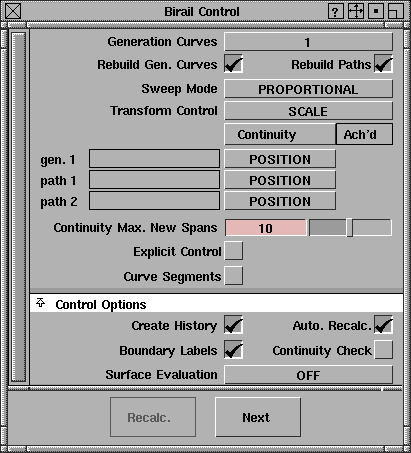
Generation Curves
1
-
- Sweep one generation curve along the rail curves.
2
-
- Blend between a start and end generation curve along the rail curves. Use the Gen. Blend Value slider to control the midpoint of the blend.
2+
-
- Blend between a series of generation curves along the rail curves.
|
|
These options appears when
Generation Curves is 2.
|
Blend Control
-
- Enable the Gen. Blend Value slider to control the midpoint of the blend between the two generation curves.
|
|
|
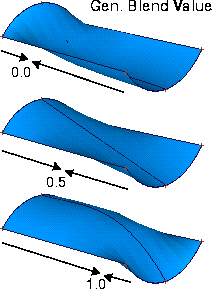
Gen. Blend Value
-
- The percentage of the distance (from 0 to 1) along the paths where the influence of both generation curves is equal.
-
- For example, a value of 0.5 (the default) blends the two curves equally, so that the halfway point of the blend occurs at the midpoint of the rails.
-
- A value of 0.25 places the halfway point of the blend 25% of the distance along the rail curves, hence giving more influence to the second generation curve. Conversely, a value of 0.75 would give more influence to the first generation curve.
-
- The values 0.0 and 1.0 still blend the two curves a minimum amount.
Rebuild Options
Rebuild Gen.
Rebuild Path
-
- Before creating the surface, rebuild the generation and/or path curves to reduce the number of edit points/spans.
-
- This can improve the parameterization and reduce the complexity of the new surface when the curves are complex.
-
- The Rebuild Path option also removes multi-knots and resets the weight of all CVs in the path curve to 1. This is necessary for path curves with multi-knots or CV weights.
|
|
This option appears when
Rebuild Paths is on.
|
Sweep Mode
Proportional
-
- Rebuild the path curves to create a surface with proportionally spaced spans and smooth parameterization based on the first path curve.
View
-
- Orient the isoparms of the new surface in a plane. Choose the plane with the Sweep Projection pop-up menu.
Spine
-
- Use a spine curve to control the orientation of the generation curve as it sweeps along the path.
|
|
This option appears when
Sweep Mode is View.
|
Sweep Projection
This option controls the plane in which the generation curve is allowed to rotate when the Sweep Mode is View.
Active
-
- Take the rotation plane from the current view window.
XY, XZ, YZ
-
- Use a global plane (XY, XZ, or YZ) as the rotation plane.
|
|

|
User
-
- Type a 3D vector in the View Plane text boxes to define a plane.
Transform Control
This option controls how the Birail tool modifies the generation curves to stay on the rail curves during the sweep.
Scale
-
- Scale the generation curve proportionally, to the size necessary for the curve to stay on both rails.
Non-Prop Scale
-
- Scale the generation curve non-proportionally, along the vector connecting the rail curves.
|
|
This option only applies
when Generation Curves is
1.
|
Rotate & Trim
-
- Rotate the generation curve around the intersection with the first rail curve, so that the generation curve stays on both rails. Trim away any part of the new surface that goes beyond either rail curve. The generation curve is not scaled.
|
|
This option only applies
when Generation Curves is
1.
|
Rotate No Trim
-
- Rotate the generation curve around the intersection with the first rail curve, so that the generation curve stays on both rails. The generation curve is not scaled.
Continuity Table
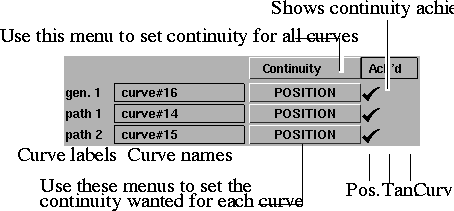
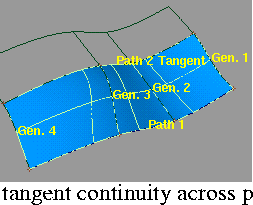
The Continuity table displays one row for each boundary curve involved in the birail operation (the first and last generation curves, and both rail curves).
|
|

|
- Use the pop-up menu next to each curve to set the level of continuity wanted across each boundary curve.
|
|

|
- Use the Continuity pop-up menu above the table to set the continuity of all the curves at once.
|
|
|
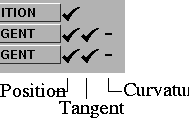
- The checkmarks at the end of each row show what level of continuity the Birail tool was able to achieve given the geometry. From left to right, the checkmarks indicate positional, tangent, and curvature continuity.
-
A dash (-) means there was another surface adjacent to the
edge, but that level of continuity could not be achieved.
Position
-
- Only keep positional continuity. This is the default.
|
|
|
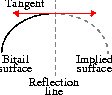
Implied Tangent
-
- Try to keep tangency with an implied surface that shares this edge. The implied surface is the surface that would be created by mirroring the new surface.
-
- This is a powerful feature. It lets you model one half of a symmetrical surface (such as a car body), and maintain continuity at the seam. When you duplicate the surface to create the other half, the seam will already be continuous. (See also Setting Symmetry on Layers in the Basic Tools book.)
Tangent Angle
-
- Try to keep tangency at an angle with a surface that shares this edge.
-
- The Birail tool calculates the tangent angle at both ends of the common edge. If the two angles are different, Birail blends between them to determine the angle to keep at every point along the edge.
-
- A tangent angle of 0.0 (or 180, -180, 360) is equivalent to Tangent continuity.
|
|
|
Tangent
-
- Try to keep tangency with a surface that shares this edge.
Curvature
-
- Try to keep curvature continuity with a surface that shares this edge.
Continuity Max. New Spans
Specify the maximum number of spans that can be added to the surface (in both the U and V direction) when attempting to maintain the requested levels of continuity.
If this number is too small, continuity may fail along some of the edges.
|
|
Explicit Control is only
available in Studio,
AutoStudio and
SurfaceStudio.
|
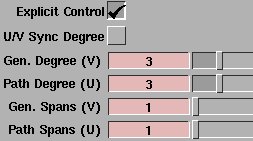
Explicit Control
Specify the degree and number of spans of the Birail surface in both the U and V directions by adjusting the following sliders:
U/V Sync Degree
-
- Couple the Gen. Degree and Path Degree sliders. When this control is turned on, adjusting one slider automatically adjusts the other to the same value.
Gen. Degree (V)
-
- Degree of the birail surface in the V direction (along the generation curves).
Path Degree (U)
-
- Degree of the birail surface in the U direction (along the path curves).
|
|
More spans may be added if
needed to maintain the
requested level of continuity,
up to the value of Continuity
Max. New Spans.
|
Gen. Spans (V)
-
- Number of spans of the birail surface in the V direction.
Path Spans (U)
-
- Number of spans of the birail surface in the U direction.
|
|
This option only applies
when Generation Curves is
1.
|
Curve Segments
Specify sections of the generation and path curves to use in the sweep.
When this option is on, you will be prompted during the sweep procedure to click start and end edit points on the first path curve and possibly (depending on the other settings) on the second path and/or the generation curve.
After the surface is built:
|
|

|
- Use the Gen. Segment text boxes to change the start and end parameters of the generation curve.
- Use the Path 1 Segment and Path 2 Segment text boxes to change the start and end parameters of the path curves.
Control Options
Create History
-
- Save the history of the new surface for later editing. If you turn Create History on, you can modify the curves that were used to create the surface, and the surface will update.
Auto Recalc
-
- Update the new surface automatically as you change the values in the Birail Control window.
Boundary Labels
-
- Label the generation, path, and spine curves in the view windows. The labels also show
- the kind of continuity wanted,
- whether the continuity failed, and
- which tangents are implied.
|
|
See Checking Continuity
Between and Within Surfaces
on page 512 for information
on the surface continuity
locator.
|
Continuity Check
-
- Display the surface continuity locator at the boundaries between the birail surface and adjacent surfaces. The locator is persistent and will remain after you exit the Birail tool. To remove it, use Locators > Move Locator to pick the locator, then select Del > Del locators > Active, or toggle the checkmark off when entering birail again.
Surface Evaluation
None
-
- Do not perform any surface evaluation on the surface.
Curvature
Highlight
Quick Render
-
- Display a curvature render, highlight render, or Quick Render of the new surface.
-
- For more information, see:
Cross Section
-
- Calculate and display cross-section lines on the new surface. Choosing this option displays the Show Previous Xsect option.
-
- For more information, see Creating Cross-Section Lines on page 535.
|
|
This option appears when
the Surface Evaluation type
is Cross Section.
|
Show Previous Xsect
-
- Display the previous cross-section lines along with the current cross-section lines.
-
- This lets you make changes to the surface creation options and observe the effect on the cross-sections.
Buttons
Recalc
-
- Recalculate the surface with the current values in the Birail Control window.
Next
-
- Finish the current surface and prompt for new curves.
See Also
|
Surfaces >
Swept Surfaces >
Anim sweep

|
Sweeping an Animated Curve
|
|
|
|
|
Purpose
Create a surface by sweeping out the movements of an animated curve through time, as if the animated curve was leaving a "trail" of construction curves as it moved.
Overview
If you are proficient using the animation tools, you can use Anim sweep to easily accomplish complex or unusual effects that are difficult or impossible using Extrude or Swept. Instead of using options to change the sweep, you have total control over the cross-section of the new surface at every point.
The Anim sweep tool can sweep curves animated by:
You can animate the whole curve, and/or the CVs of the curve.
How To
To sweep an animated curve:
-
1
-
Animate the curve. (See the Animating in Alias book for more information on using the animation tools.)
-
2
-
Pick the animated curve.
-
3
-
Click the Anim sweep icon, or choose Swept surfaces > Anim sweep from the Surfaces palette menu.
-
4
-
If the Frame Range option is set to Prompt, type the start frame, end frame, and frame increment, separated by spaces, on the prompt line.
-
The frame increment is the number of frames to step
through between each snapshot. For example, an
increment of 1 takes every frame, 2 takes every other
frame, 3 takes every third frame, and so on.
-
5
-
The Anim sweep tool takes a snapshot of the curve at each step of the animation, creating a series of construction curves.
- If the Sweep option is set to Snapshots, the Anim sweep tool asks you whether you want to keep the curves. If the snapshot curves look wrong and you want to change the animation and try again, click No.
- If the Sweep option is set to Connect Snapshots, the Anim sweep tool automatically skins a new surface along the snapshots of the animated curve.
Tips and Notes
- When the Sweep option is set to Connect Snapshots and you pick the curve in the SBD window, you must pick the node directly above the curve.
- To use CV animation, set the Hierarchy option to Below or Both.
Options
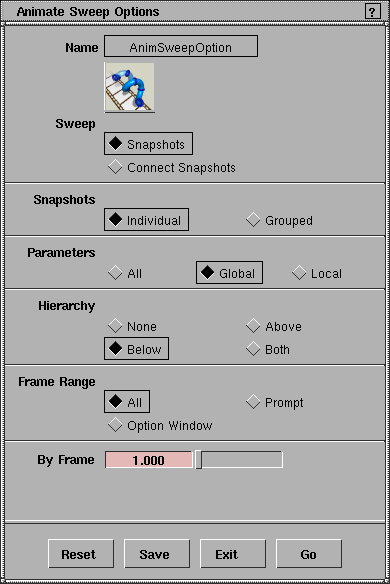
Sweep
Snapshots
-
- Create new curves from the "snapshots" of the animated curve. You can use these curves as construction curves for tools such as Skin, Extrude, Swept, and Birail.
Connect Snapshots
-
- Create a new skinned surface from the snapshots of the animated curve.
|
|
This option is has no effect
when Sweep is set to
Connect Snapshots.
|
Snapshots
Individual
-
- Do not group the resulting "snapshot" curves.
Grouped
-
- Group the resulting "snapshot" curves, as if you had picked them and chosen Group from the Edit menu.
Parameters
|
Tip:
|
Set global and local animation parameters using
Param Control in the Animation menu.
|
All
-
- Animate all parameters of the animated curve.
Global
-
- Animate only the global parameters of the animated curve.
Local
-
- Animate only the local parameters of the animated curve.
Hierarchy
This option controls whether extra objects are animated in addition to the curve.
None
-
- Only animate the picked curve.
Below
-
- When Sweep mode is Snapshots, animate the picked curve and any geometry below it in the DAG.
-
- When Sweep mode is Connect Snapshots, animate the picked curve and associated CVs.
Above
-
- Animate the picked curve and any geometry above it in the DAG.
Both
-
- Animate the picked curve, associated CVs, and any geometry above and/or below it in the DAG.
Frame Range
All
-
- Animate the picked curve over the entire range of available frames of animation.
-
- Use the By Frame slider to set the interval between snapshots.
Prompt
-
- Prompt for the start frame, end frame, and frame interval every time you use the tool.
Option Window
-
- Set the start frame, end frame, and frame interval once in the option window, for every subsequent use of the Anim sweep tool.
|
|
These options appears when
Frame Range is Option
Window.
|
Start/End Frame
-
- The start and end frames of the curve's animation to create snapshots from.
|
|
This option appears when
Frame Range is All or Option
Window.
|
By Frame
-
- The number of frames in each step between snapshots.
-
- For example, a value of 1 takes every frame, 2 takes every other frame, 3 takes every third frame, and so on.
See Also
- The Animating in Alias book.
|


