|
|
Edit > Group
|
Grouping Objects
|
|
|
|
|
Purpose
|
|
When an object is part of a
group, it retains its own
transformations (position,
rotation and scale) and can
also be affected by any
transformations made to the
group.
|
To group a number of objects into a more complex object so that transformations can be applied to all of them at once.
How to Use
-
1
-
Pick the items (objects, lights, etc.) that you want to group together.
-
2
-
Select Edit > Group. The objects are now part of a group.
The grouping method that is applied depends on the type of items that are active when this operation is selected:
- The first type of operation makes two or more objects sub-objects of one larger new object. This same operation can be performed on sub-objects (on the same level in the hierarchy and in the same object).
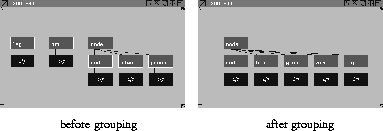
- The second type of operation adds objects to an existing group. Pick one or more ungrouped objects and one sub-object, and select Edit > Group. The ungrouped objects become part of the sub-object's group, as shown in the following example.
|
|
|
|
|
In the SBD window, empty
objects and sub-objects are
shown as brown boxes with
nothing under them.
|
- The third type of operation puts an existing object under an empty object or sub-object. Pick exactly one ungrouped object and one empty object and select Edit > Group. The two are grouped. Any other combination of picked items will cause either one of the first two types of operation, or nothing, to occur.
-
(In the SBD window, the picked nodes are moved down
one level, under a new parent block.)
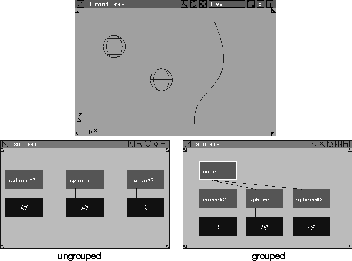
An SBD example
|
|
For more on the SBD
window, see The SBD
Window on page 337.
|
Grouping adds a level to the hierarchy of an object. This level can be seen easily in the SBD window, which is thus recommended for group and ungroup operations.
The following example shows what the SBD window displays when two primitive spheres and a curve are created and then grouped.
|
|
|
Hints and Tips
|
|

|
- To magnify the view of an SBD window, click on the magnifying glass icon found in the upper right corner of the window.
|
|

|
-
A magnified version of the window is displayed in the top
left portion of the screen, and a target icon appears in the
original window.
-
Move the target icon in the parent window to change the
area shown by the Magnify window.
- You can also group an object to itself to create another hierarchy level.
- If you use Pick > Object
in a modeling window, picking any part of a group picks the whole group. To pick parts separately, use Pick > Component and pick them by name or directly from the SBD window.
- Cameras can be grouped. Transformations applied to the group above the camera in the hierarchy (scaling, rotating, and translating) will also be applied to the camera components.
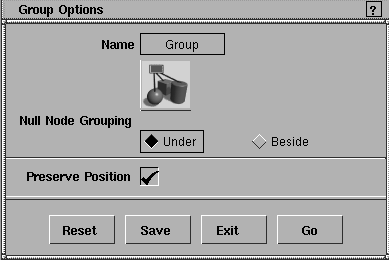
Group Options
Select Edit > Group- to display the Group Options window. to display the Group Options window.
|
|
|
Null Node Grouping
|
|
A null node is a node
without geometry below it.
|
-
- Use for grouping a node with a NULL node (for example, a construction plane or a joint
).
-
- Under
- the grouped node will be grouped under the NULL node as a child node.
-
- Beside
- the grouped node will be grouped beside the NULL node as a sibling node.
Preserve Position
|
|
You cannot group nodes
containing instances if
Preserve Position is toggled
ON.
|
-
- If toggled ON (indicated by a check mark), the geometry will not move in world space when it is grouped under a hierarchy that has transformations. This is done by transforming the leaf geometry to take into account the added transformations of the hierarchy.
-
- If toggled OFF,
the geometry takes on the additional transformations of the hierarchy under which it is being grouped.
|


