|
Windows > SBD |
The SBD Window | ||
|
| |||
|
|
The SBD window is a hierarchical representation of the objects, lights, textures, and cameras that make up a scene. It is a convenient way to change specific attributes of a complex scene, because you can pick and manipulate any item without disturbing the rest of the scene. How To Use | ||
|
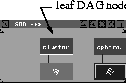
The boxes in the SBD window are representative of the tool that you are using. For instance, the Up camera is represented as an up arrow in a blue box. If an object is animated, it is represented as a slanted box. If there are clusters, a cluster of grapes is displayed in the box. |
To move around in the SBD Window: You can control the view in the SBD window in a variety of ways. | ||
|
|
To track around in the window, either:
To dolly in and out, either: | ||
|
|
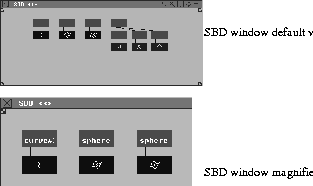
To open a separate magnified view of a particular part of the SBD window: | ||
|
|
Here is an example for using the SBD window: | ||
|
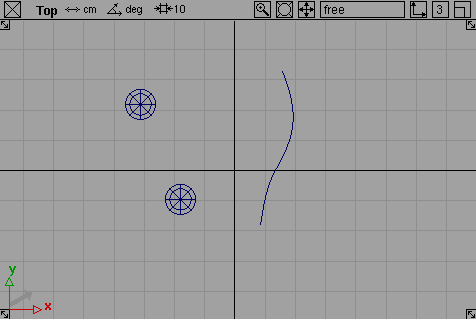
A curve and two primitives ungrouped in the Top window. |
| ||
| |||
To rearrange the nodes in the window: | |||
|
|
Use the Swap icon (located at the top of the SBD window) to rearrange the order of the DAG nodes in the SBD window. This re-arrangement only affects the SBD window and does not alter any geometry or transformations.
To compress and expand the SBD window display: By default, the display in the SBD window is expanded. To visually compress a portion of an object hierarchy in the SBD window:
To expand the display again, select ObjectDisplay > Expand SBD.
Notes:
| ||
|
|
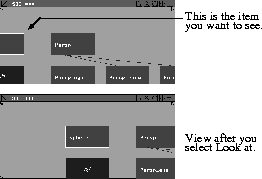
To display visible and invisible objects: When you select Object Display > Invisible, picked objects disappear in all windows and are represented by a dashed line box in the SBD window. To find hard-to-see objects: If you have dollied the view in the SBD window and you cannot see the active item, select Cameras > Look at, click in the SBD window, and that item is displayed in the center of the SBD window.
| ||
|
|
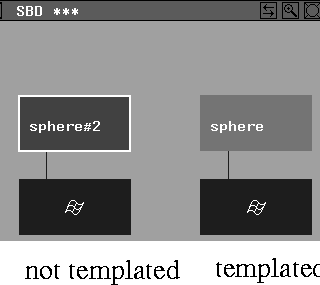
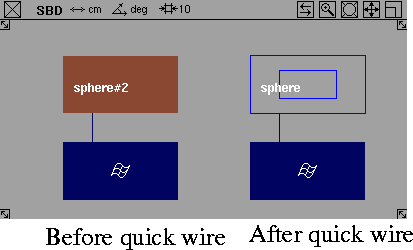
To display templated objects: The SBD DAG node changes to another color when an object has been templated (by using ObjectDisplay > Template) . The side example shows two spheres as seen in the SBD window. To display quick wired objects To display an object as quick wire, use ObjectDisplay > Quick wire. If an object is displayed as quick wire, the SBD DAG node appears as two blue rectangular outlines.
To group and ungroup objects: Grouping adds a level to the hierarchy of objects so that you can perform operations on all of them at the same time. | ||
|
The group operation will not create an object with more than 100 levels. |
We recommend that you use the SBD window for group and ungroup operations, because it gives you the opportunity to verify that all objects that need to be grouped are selected. | ||
|
For more information on Edit > Group, see Grouping Objects on page 221. |
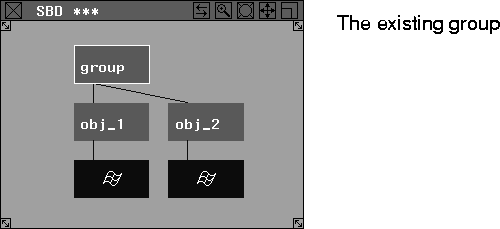
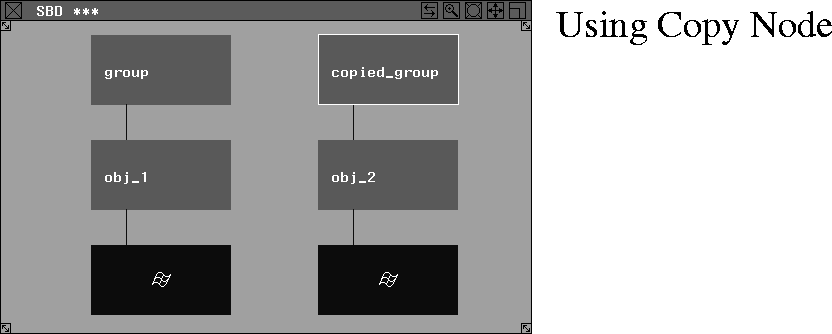
To group objects: The following example shows what the SBD windows display when two primitive spheres and a curve are created and then grouped: | ||

| |||
When an object is part of a group, it retains its own local transformations (position, rotation and scale), but can be altered by transformations made to the group. | |||
|
For more information on Edit > Ungroup, see Ungrouping Objects on page 225. |
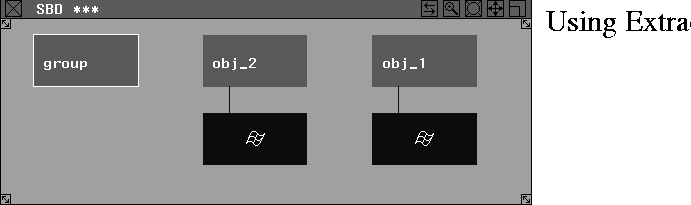
To ungroup the objects again, select their parent DAG node and then select Edit > Ungroup. The following examples show what is displayed in the SBD window for the various Ungroup options.
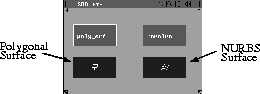
To display polygons: The following shows how a revolved surface is represented when you change the splines to polygons.
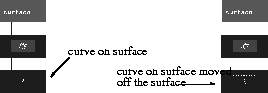
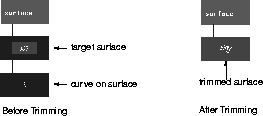
To display a curve-on-surface element: When viewed in the SBD window, a curve-on-surface element appears as a DAG node below the surface node itself, and is marked with a vertical wavy line.
To move it back onto the surface, select Pick > Object types > Curve on surf, click the curve-on-surface box in the SBD window, and then use Xform > Move. To display trimmed and untrimmed objects: If a curve-on-surface element is present on a surface, the system automatically assumes that this surface has been set up for a trimming operation. The SBD window displays the surface as a target surface, which can be used in a trim operation. When a surface has been trimmed, curves-on-surface that define the trim boundaries are absorbed into the surface defintion and are no longer displayed below the trimmed surface node. Untrimming will turn these trim boundaries back into curves-on-surface, displayed below the surface node.
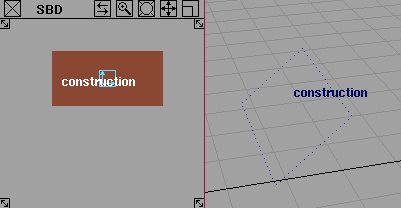
To display construction planes: The following shows a construction plane in the perspective and SBD windows. This construction plane can be created using Grids > Free Plane or Grids > Surface Plane.
| ||
|
|
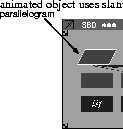
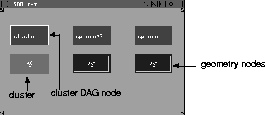
To display animation: If a DAG node, camera, image plane or CV of some geometry is animated, its box in the SBD window becomes a slanted parallelogram. To display clusters: A geometry node that is part of a selected cluster has an additional blue rectangle around its node. If the cluster is unpicked, the blue rectangle around the geometry box disappears.
To pick clusters: | ||
|
|
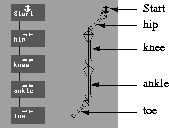
To pick a cluster from the Cluster List window, click directly on the name of the cluster. (For information on the Cluster editor, see the Animating in Alias book.) To toggle its pick status, click on the cluster's name. If you select cluster in the Cluster List window, the leaf DAG node above the cluster is also picked, as in the side example. To display skeletons: When you create each joint, Alias creates a bone in the modeling windows with its pivot point at the new position, and adds a DAG node to the SBD display.
The following shows the hierarchical display of a skeleton's leg.
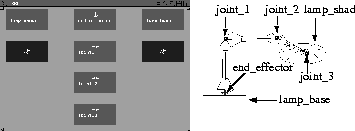
The following shows the SBD display for a lamp created using various modeling tools and the Objects > Draw skeleton function from the Tool Palette. | ||
| |||
|
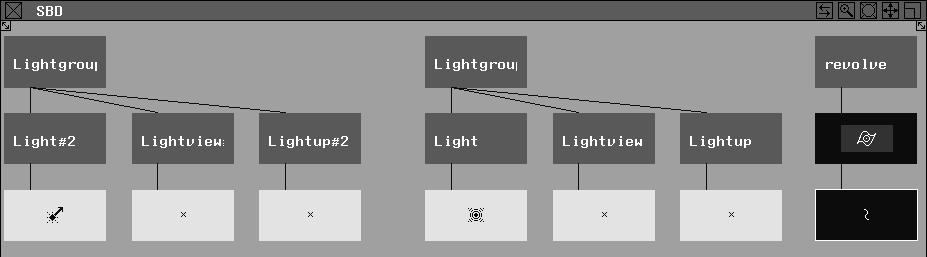
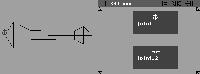
To add default lights and textures When you perform a toggle shade, a quick render or a fast render, default lights are added to the scene. The following example shows how the SBD window is updated with a toggle shade on a revolved object. | |||
| |||
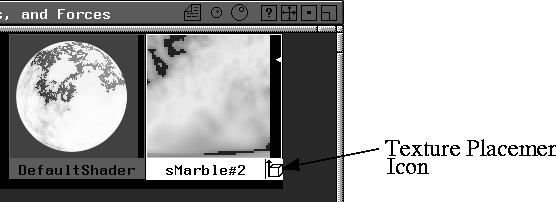
The following icon is also displayed in the SBD window as a separate transformation node beneath the Solid texture node.
| |||
|
See Windows
|
In the MultiLister, the Solid or Environment texture icons display a cube with an arrow pointing upward to the right of the texture name.
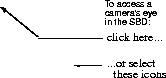
To pick the camera node: To access the camera's eye, view and up components, click the camera icon in the title bar of the Perspective window, or the camera's leaf DAG nodes in the SBD window using Pick > Component or Pick > Object.
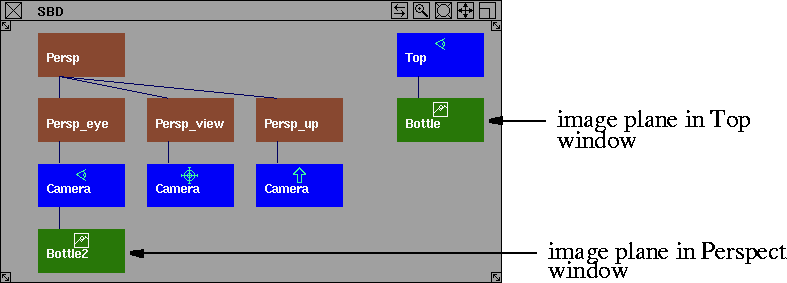
To import image planes: If you load an image plane into the perspective window, a green icon with a landscape outline appears below the camera's eye node in the SBD window. If the image plane is loaded into an orthographic window instead, a new eye node appears with an image plane icon below it, as shown below. | ||
| |||
| |||
| Copyright © 1998, Alias|Wavefront, a division of Silicon Graphics Limited. All rights reserved. | Please send questions or comments regarding the documentation to: [email protected] |


 Multi-lister
in Rendering in Alias for more
information.
Multi-lister
in Rendering in Alias for more
information.