7 |
Working with Layers |
Layers provide a way to organize your model and improve your workflow by dividing the model into big separable chunks. In this Section:
Layers Menu Summary |
||||||||||||||||||||||||||
|
| ||||||||||||||||||||||||||||
Most layers tools are located in the Layers menu, as described in the table below. See also The Layer Stats Window on page 246.
Introduction to Layers | ||||||||||||||||||||||||||||
|
| ||||||||||||||||||||||||||||
Layers provide a way to organize your model and improve your workflow, by dividing the model into big separable chunks. Layers provide various attributes, such as visibility and restricted pickability, that help in applying that attribute to all the objects in that layer. Layers can be named interactively by entering a name or number. What is a Layer? | ||||||||||||||||||||||||||||
|
For information on stages, see Using Stages on page 404. |
A layer is an association or a collection of objects independent of any group hierarchy in your model, with an independent set of attributes. Each stage in Alias has a different set of layers. Layers let you manage complex models by organizing various objects into more easily manageable chunks. This model management improves your workflow and performance by:
Notes:
Layers Bar | |||||||||||||||||||||||||||
|
For more information on the layers bar, see The Layers Bar on page 251. |
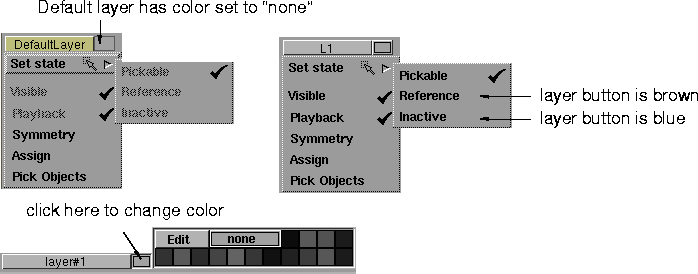
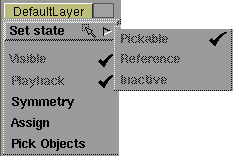
The layers bar is located below the prompt line at the top of the Alias window. It contains a list of all existing layers. The layers bar always contains at least one layer, named DefaultLayer. Clicking on the layer name displays a menu from which you can set different attributes for this layer, assign an active object to the layer or pick the objects belonging to the layer. Layer AttributesUse the following attributes to organize your model. Pickable layers
Reference layers
Inactive layers
| |||||||||||||||||||||||||||
|
Colors
| ||||||||||||||||||||||||||||
| ||||||||||||||||||||||||||||
Visible
| ||||||||||||||||||||||||||||
|
See Setting Animation Playback on page 267 for more information. |
Playback
Name
Number
Layer name or number
How Attributes are appliedAttributes are applied in the following set hierarchy:
Attributes Associated with Layer StatesIn the following table, a check mark indicates if the attribute in the left column can be assigned or used in conjunction with the given layer (layer types are discussed later in this section). An "X " means the attribute cannot be used with the layer.
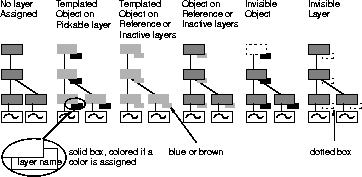
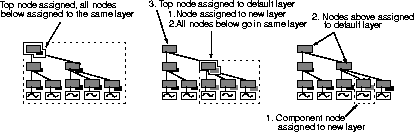
Viewing Layers in the SBD and ASBD WindowsIn the SBD window, a small box in the lower right corner of the node shows the layer assignment of the node. Nodes in the default layer do not have a box. The color of this box is the same as the object in the modeling windows. The name or number of the layer also appears in this box. An invisible layer appears as a box with a dotted outline. The following example shows the SBD window's layer representation. | |||||||||||||||||||||||||||
| ||||||||||||||||||||||||||||
The ASBD window displays layer information in the same way. However, by placing the cursor over a node, you can also see the node name and its layer name on the prompt line of the ASBD window. | ||||||||||||||||||||||||||||
|
|
Default LayerOne layer with fixed attributes is always present when layers are toggled on. This is the default layer, and is initially the creation layer, so new objects will always appear in it. The default layer always has the number 0 and its name and attributes cannot be modified. Creation LayerYou can make any layer (including the default) the creation layer by clicking the layer's button in the layers bar or by selecting Layers > Set creation layer. Whenever you create a new layer, that layer automatically becomes the creation layer. The creation layer's button appears in yellow. >
Layer assignment | |||||||||||||||||||||||||||
|
See The Layers Bar on page 251 for more information on assigning layers. |
Any picked DAG node or object can be assigned to a layer. When you assign a node to a layer, the following rules apply:
All new nodes are automatically assigned to the current Creation layer. While grouping and duplicating the layered DAG nodes, the layer assignments of the original nodes remain the same. The layer assignment can be easily changed at any time. | |||||||||||||||||||||||||||
| ||||||||||||||||||||||||||||
Finding a node's layer assignmentAny node's assigned layer can be found in:
In addition, the user colors help in differentiating nodes belonging to different layers. Selecting Multiple Layers | ||||||||||||||||||||||||||||
|
See also Layer Categories on page 249. |
Sometimes you may want to set the attributes for multiple layers. Press the Shift key and click on the layers' buttons in the layers bar to simultaneously select layers. Once you select the desired layers, their attributes can be set collectively in the Layers menu. Saving and Retrieving LayersThe following describes the methods that you use to save and retrieve your layers. Retrieving Layers | |||||||||||||||||||||||||||
|
For information on File > Open, see Opening Files on page 84 . |
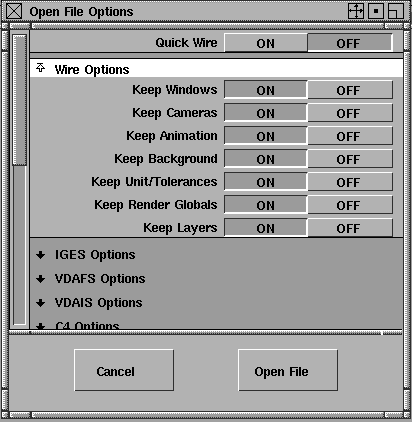
Your retrieve layers as though they were files. To retrieve a layer, select File > Open -
Click the Open File button at the bottom of the Open File Options window and select the file you want from the file list, or type its name in the File Browser. All the layers are retrieved, along with the layer assignment of the objects. If a layer with the same name as one in the retrieved file already exists in the current stage, the retrieved layer is merged with the existing one. >
If you set Keep Layers to OFF, all the DAG nodes in the retrieved file are automatically loaded into the creation layer, and the layers stored in the retrieved file are ignored. Similarly, older versions (previous to Version 8.0) are also retrieved into the creation layer. If you import one file into another and they have more than 255 different layers between them, then all the objects on the extra layers of the imported file are put into the default layer. This is summarized in the table below. Layer Behavior with files
Saving LayersThe layers are automatically saved in the wire file. | |||||||||||||||||||||||||||
|
|
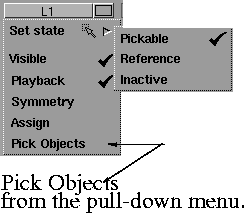
Pick Objects OptionWhen you select Pick Objects from a layer's pull-down menu, the root node of the hierarchy is selected, as shown in the following SBD view.
The highest node in the hierarchy (not necessarily the root node) is picked so that it is not above a node on an unpickable layer. Layers and StagesStages are completely independent of each other, so the layers in each stage are totally separate. You can create up to 255 layers in a single stage, and reference the layers with a layer name. Each stage can have its own set of layers. >
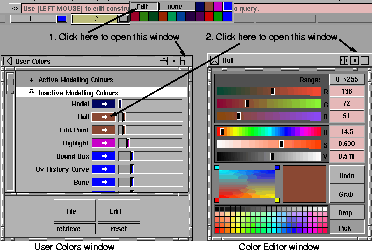
Layer workflow examplesTo transfer all the objects from one layer to another:To turn on the bounding box for a layer:This workflow applies to a whole range of functions. For example, saving a layer's contents to a wire file (with File > Export > Active as), or turning the simple display ON. In fact, with this mechanism, any function used for picked objects can also be applied to the layer. Editing the Colors in LayersYou can change any one of the fifteen layer colors by following the steps below. These colors correspond to the default inactive modeling colors found in the User Colors window.
| |||||||||||||||||||||||||||
| ||||||||||||||||||||||||||||
>
| ||||||||||||||||||||||||||||
| Copyright © 1998, Alias|Wavefront, a division of Silicon Graphics Limited. All rights reserved. | Please send questions or comments regarding the documentation to: [email protected] |
 and make sure Keep Layers is set to ON
in the Open File Options window.
and make sure Keep Layers is set to ON
in the Open File Options window.