|
|
File > Open stage
set
File > Save stage set
Windows > Edit >
Stages
|
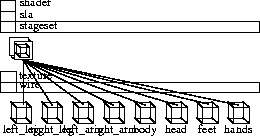
Using Stages
|
|
|
|
|
Summary
Introduction to Stages and Stage Sets
Stages and stage sets:
- Provide a structure for managing complex models and scenes.
- Let more than one user work on different parts of a single model using referenced wirefiles on separate stages.
- Provide prefabricated backgrounds, stages, or scenes in which you can place complex models.
What are stages?
A stage is an Alias wirefile that you have opened and can work on. You are always working on a stage whenever you are in Alias, but if you only use File > Open,
then you will not notice stages because any data is appended to your current stage. Each stage is independent - you can have as many wirefiles of your models open at the same time to work on as you need, without one model affecting another, and of course you can use them together to create a single complex model or scene.
Stages are standard wirefiles that contain Alias information including models, lights, cameras, shaders, and animation. A stage will be saved as a single Alias wirefile.
Why would you want to use stages?
Most models are built from a variety of independent objects or components. Building them all in one wirefile can result in a too much complexity. For example, a phone is made from many components that when combined, make an object. By using stages, the main surface components can be created in one stage, the buttons on a second stage, graphics on a third stage, and the environment on the fourth. When combined using the Stage Editor, all these items make a complete model. By taking advantage of the Stage Editor, many alternatives can be loaded, rendered, and evaluated.
The advantages of creating stages
You might choose to create a modeling stage on which to develop your models, an environment stage for the source environment and background, and a lighting stage for the source of general lighting for the scene.
The Stage Editor also helps you render and animate a complex model in record time. It lets you modify any stage inside a scene or model with a minimum number of mouse clicks. You can easily vary the colors, lighting, reflections, and shading.
What are stage sets?
Stage sets are the complete collection of all the individual components of a complex model or scene. They are editable text files that hold the references to the wirefiles that make up the model and the states in which they were saved. For example, the stage set file specifies which one is the working stage, which one supplies the windows, the background, which ones are loaded automatically, and which ones will not be saved. A stage set file includes the Stage Editor information as well as a name and a wirefile reference for each stage.
Stage sets are stored in the stageset
directory which is located below the current project. They are automatically accessed using the stage set commands from the File menu in the Stage Editor and the File menu in the main Alias menu bar.
What is the Stage Editor?
|
|
See Using the Stage Editor
Window on page 409.
|
The Stage Editor is a powerful tool that you use for quick interchangeable effects. For example, in one simple operation you can swap one lighting stage for another to create a completely different lighting effect.
It offers a broad scope of design potential, from car showrooms to animation and package design. This flexible environment has tools that are layered into an easy-to-understand interface.
How To
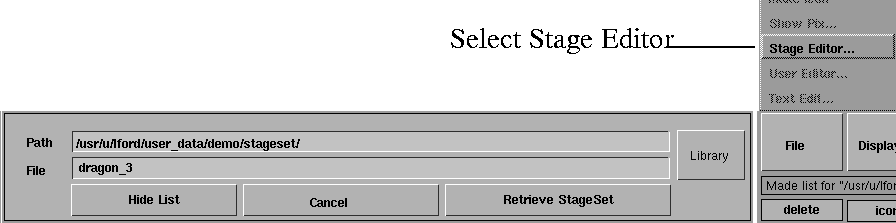
To open stage sets
|
|
When you open a stage set
rather than a file, the wirefile
is maintained separately on
an independent stage. This
keeps the sizes of the
individual wirefiles down,
and also speeds the rate of
interaction on the screen
when you modify
information.
|
Either:
- Select File > Open stage set from the Alias modeling window, or click its icon (see below).
- Select File > Open stage set in the Stage Editor.
>
|
Note:
|
You do not need to have the Stage Editor open to open a
stage set, but it may be a good idea if you are unsure of what
stages may already be included.
|
From the Alias modeling window:
|
|

|
-
1
-
Select File > Open stage set
or click its icon. The File Requestor is displayed.
-
2
-
Click the Show List button to see the list of your saved stage sets, or if you know the name of the stage set, type its name in the File box.
-
3
-
Click the Retrieve StageSet button. A dialog box appears asking if you want to delete existing stages:
- Click YES to delete existing stages before the new stage set is loaded.
- Click NO to add the new stage set to the existing stages in the Stage Editor.
- Click CANCEL to stop the operation and close the dialog box.
>
|
Note:
|
Selecting NO
when the Delete confirmation box appears
turns all previously viewed models a pale, low-key green
and places them in an inactive stage. The new model is
placed in the active stage. Open the Stage Editor to switch
between or merge stages.
|
-
4
-
If you click YES or NO, the information line displays that the system is retrieving the stage set.
-
Once opened, the stage set is displayed in the Stage Editor
(with the last stage as the working stage), and the wire
files are displayed in the modeling windows.
To save stage sets
-
1
-
Either:
- Select File > Save stage set from the main Alias window.
- Select File > Save stage set in the Stage Editor.
|
|

|
>
|
Note:
|
You do not have to have the Stage Editor open to save a
stage set.
|
-
2
-
The File Requestor is displayed. Click the Show List button to see the list of your previously saved stage sets. If you know the name under which you want to save the current stage set, type it in the File box.
-
3
-
Click the Save StageSet button.
-
Each of the stages is saved to its referenced wirefile as long
as the Wire Store column is checked for each stage in the
Stage Editor.
|

|
|
-
If Wire Store
is not checked for a stage, that stage is not
saved.
>
|
Note:
|
The stage files will only be saved as wirefiles. It is not
possible to save the files in any other format using this
command.
|
-
If you have already named the Stage Set, that name will be
displayed in the File Requestor.
-
If there is no reference wirefile for a stage, the following
File Requestor is displayed:
|

|
|
-
4
-
The File Requestor defaults to the stage name for a file name. If you want to save the stage under a different name, double-click on the name in the File field and type the new name of the stage you want to save.
-
5
-
To create a shaded icon for the wirefile, click the Quick Render button. A small representation of the stage replaces the Store Icon. This icon is the same as the icon that appears in the Stage Editor.
-
6
-
Click the Save Wire button.The stages do not disappear from the Stage Editor.
To manage stages:
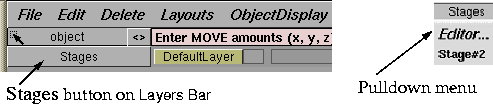
Stages can be selected and the Stage Editor invoked from a pulldown menu located at the left end of the Layers Bar. This menu appears when at least two stages are present. It provides easy access to any of the stages available, thus simplifying model management.
|
|
|
Using the Stage Editor Window
To use the Stage Editor, select Windows > Edit > Stages.
|
|
|
|
Tip:
|
You can expand the Stage Editor by clicking and dragging
the corner of the window border.
|
|
|
|
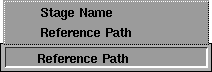
The Stage Editor menu lists the stages you have retrieved or saved either by their Stage Name or Reference Path.
If you select Reference Path, the reference path is displayed in the name box:
|

|
|
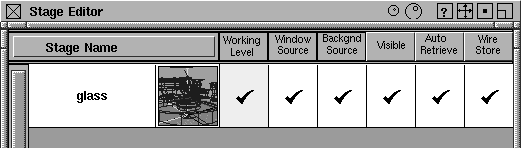
If you select Stage Name, only the name of the stage is displayed in the name box:
|
|
|
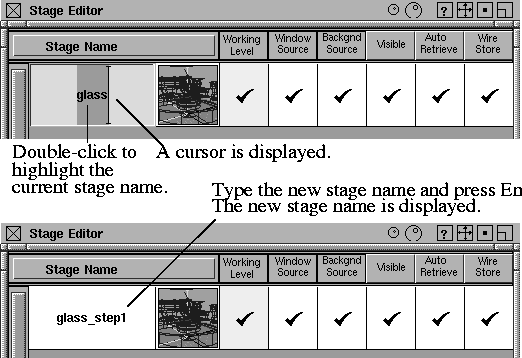
To change the stage name:
-
1
-
Double-click on the current stage name in the name box. The stage name is highlighted and a cursor is displayed.
-
2
-
Type the new stage name and press Enter.
|
|
|
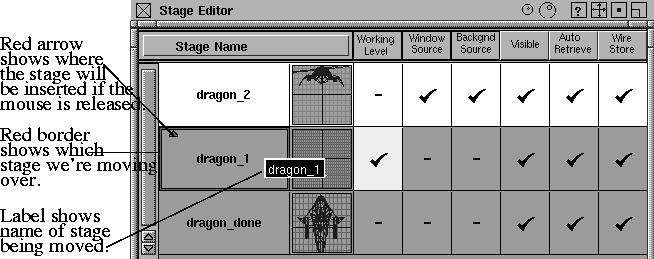
To change the order of stages:
To change the order of stages in the Stage Editor:
-
1
-
Click with the middle mouse button and hold over the name of the stage you want to move. The stage name is displayed as a label under the cursor.
-
2
-
Drag in the direction you want to move the stage. A red arrow shows the direction in which the stage is being moved, and a red border is drawn around the stage over which the label is located.
|
|
|
-
3
-
Release the middle mouse button when the label is positioned over the location you want the stage to move to. The stage now appears in its new location.
|
|
|
Stage Editor Icons
|
|
|
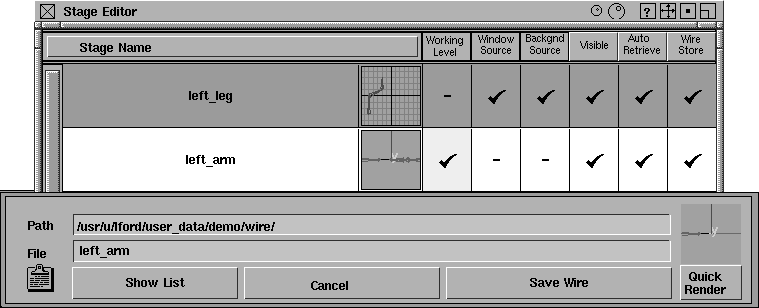
When a stage is referenced to a wirefile, it displays the wirefile icon next to the reference path or stage name.
This icon is updated each time the stage is saved or retrieved, so saving regularly helps keep the icon up to date.
- If the stage is not referenced to a wirefile, the icon is labeled "UNDEFINE."
- If a file is retrievable but has no picture icon associated with it, the icon is labeled "NO ICON."
To change the size of the icons:
Click the round buttons in the title bar of the Stage Editor:
|

|
|
|
|

|
If you are working on many stages and are familiar with their names, the small icon may suit your needs best.
However, if you are working with a small number of stages, or if you are unfamiliar with the stage names, the large icons allow for better recognition.
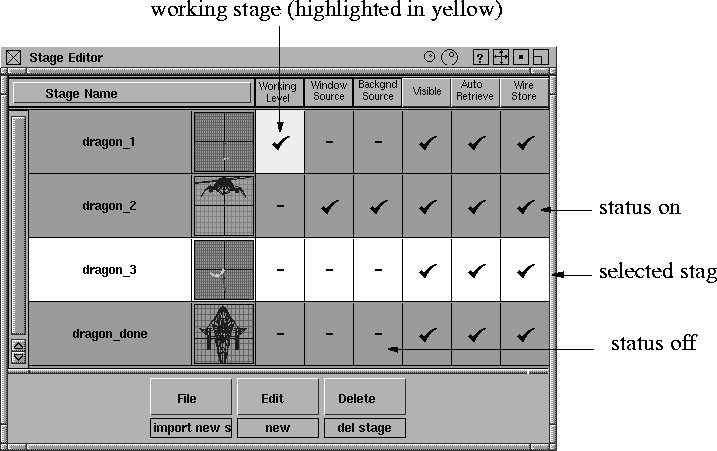
Status Columns
There are six status columns in the Stage Editor. In these columns, a check mark indicates that a status is ON for a specific stage. A dash indicates that a status is OFF
. Click the check mark or dash to change the stage status.
|
|
|
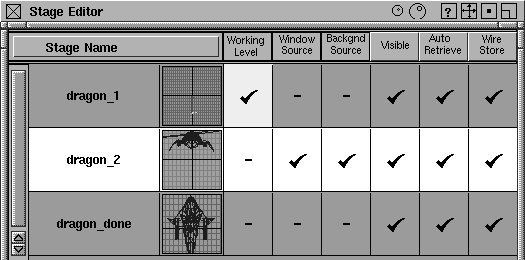
The difference between selected and working stages
The selected stage and the working stage are somewhat different.
The stage that is highlighted across all six columns is the selected stage. This stage can now be saved using File > Save (selected) stage
in the Stage Editor, dragged to a new position in the stage list, or merged with the working stage. (A stage doesn't have to be selected for you to drag it.)
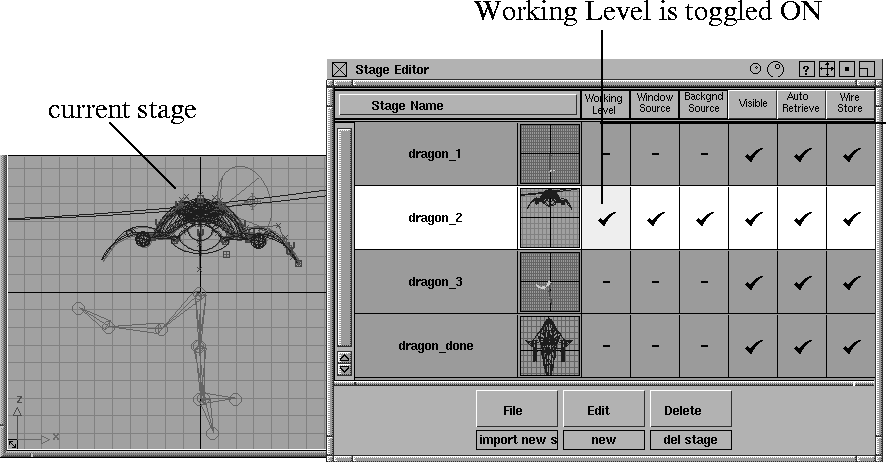
The stage that has a check mark in the Working Level column (which is displayed in yellow) is the working stage and is accessible for the changes you want to make. Its geometry is displayed in the regular colors in the modeling windows.
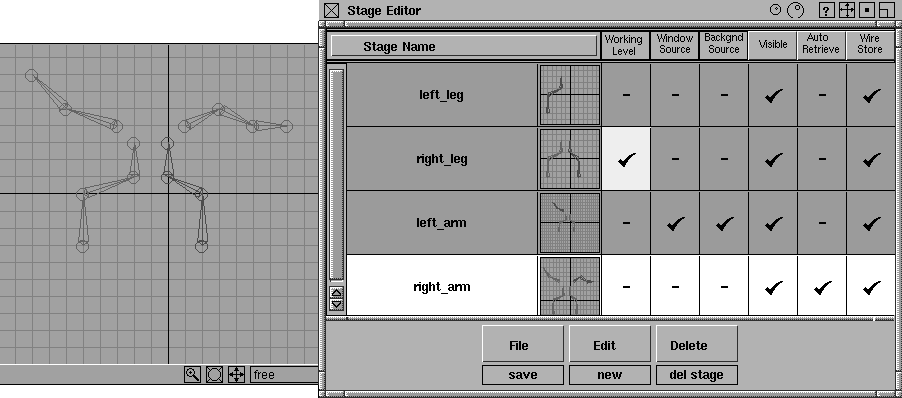
The following picture shows a selected stage with the Working Level checked on. This means that the stage is both selected and its wireframe model is accessible, while all other parts of the model are drawn in the inactive stage color (pale green by default) and not pickable. (To learn how to change the inactive stage color, see Modeling Window Colors on page 514.)
|
|
|
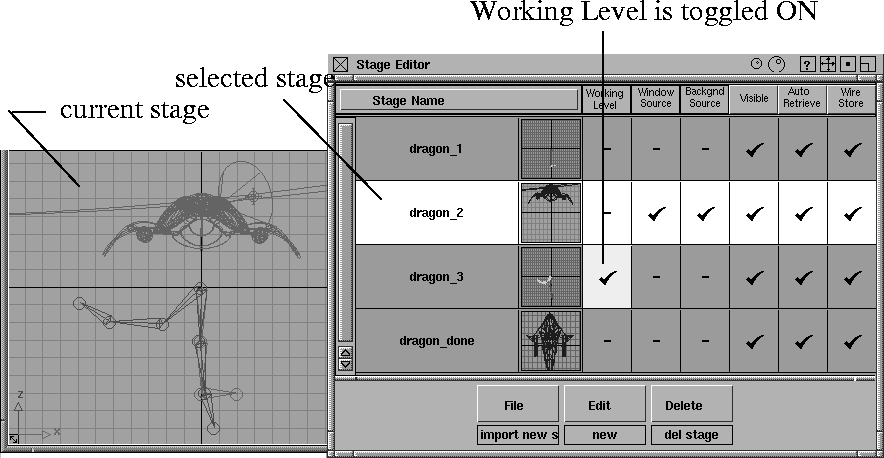
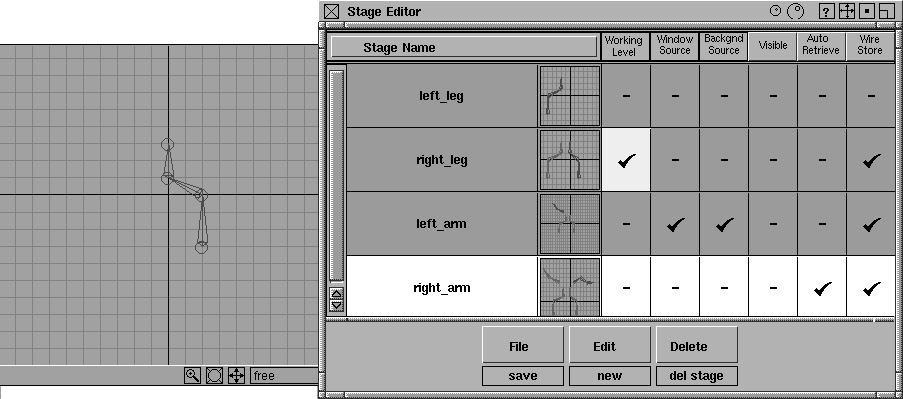
In the next example, although the same stage is highlighted (selected) in the Stage Editor, the Working Level column is checked OFF, which toggles the wireframe model for that stage off.
However, the Working Level column for a different piece of the wireframe model is checked ON, making that part of the model accessible for changes.
|
|
|
Saving and the Padlock icon
If a padlock icon appears instead of a check mark or dash, it indicates that you do not have write permission for the wirefile.
|
|

|
A white padlock means that there are no write permissions and you cannot save this stage.
|
|

|
If the stage has ever been the working stage, the Padlock
icon appears in red. This means that even though you can't save the file to that reference, you may still have made changes to it.
That is, there are no write permissions, you cannot save this stage, and you have made the stage active so it may have changed.
Stage Editor column descriptions
Working Level
-
- You can only make changes to the wireframe model if the Working Level stage is checked ON for its stage. If this column has a check mark, it is highlighted in yellow and indicates which stage is current. This makes it easy to organize your scene, especially if it contains a lot of information or library-type objects that are used in a number of different scenes.
>
|
Note:
|
Some tools may make changing the working level
impossible. This is indicated by the name fields of all the
stages becoming grayed out. This helps to prevent switching
levels in the middle of geometry operations, such as
building a curve or creating a patch. To regain the ability to
switch your working stage, choose a neutral function such
as Pick > Object.
|
Window Source
-
- The modeling window source can be any stage.
-
- If you select File > Open
(with Keep Windows set to ON in the Open File Options window), the wirefile and its associated windows are imported to the working stage. The selected stage does not affect this. File > Open only and File > Open always imports to the working stage.
-
- If you create a perspective or orthographic window, the window belongs to the stage that is the current Window Source
, which may not necessarily be the working stage.
-
- Each stage can have its own set of modeling windows. The application windows that are displayed always belong to the current Window Source stage. If that stage is stored, then its windows are also stored (by making it the current Working Level and using File > Save, or clicking the stage name in the Stage Editor to select it, then selecting File > Save (selected) stage in the Stage Editor). The stored windows do not have to match the visible ones, as the current Working Level does not have to match the current Window Source.
-
- Notes:
- Only one stage can be selected as the Window Source at a time.
- Statistics windows and the SBD window are derived from the Working Level stage. The application (perspective and orthographic) windows that are shown belong to the current Window Source stage.
Background Source
-
- This is a way to choose which background (environment shader) you want when you render a scene. To edit the Background Source, set the Working Level to the same stage as the Background Source and open the Multi-Lister.
Visible
-
- This shows which stages are visible. Toggling a stage invisible produces results similar to toggling objects invisible (ObjectDisplay > Invisible). The entire stage and all its objects become invisible.
-
- You can click in the Visible box for an individual stage to make it visible or invisible without affecting the other stages.
-
- All stages can be made invisible except for the Working Level. The check mark for the working level's visibility can be turned off, but the stage remains visible.
-
- If you render the scene when all the stages are set to invisible, the image produced will be completely black.
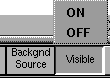
Visible Menu
|
|
|
-
- The header at the top of the Visible
column is also a button. Click the Visible button to quickly make all stages either visible or invisible. A pop-up menu appears.
-
- Select ON to make all of the stages visible, or OFF to make all the stages invisible.
-
- In the following example, all stages are visible.
|
|
|
-
This is what happens when you select OFF from the Visible
pop-up menu. Notice that the working
stage is still visible.
|
|
|
Auto Retrieve
-
- If you place a check mark in the Auto Retrieve
column beside a stage name, the wirefile is retrieved the next time you retrieve a stage set. If you remove the check mark, the file will not be retrieved. This will only take effect when the stage set is saved.
-
- Auto Retrieve lets you control which of the files identified in the stage set file are loaded when the stage set file is retrieved.
-
- More than one user can be working on a common stage set, each one owning one or more of the referenced wirefiles, and their own copy of the stage set file. Not everyone will want to retrieve all the stages at one time - it is more likely that multiple users will want to retrieve only the particular files they need to use, a combination of their own files, and a few from other users as reference files.
|
Tip:
|
You can retrieve a referenced file at any time during a
session, even if it has already been retrieved.
|
|
|

|
Auto Retrieve Menu
-
- The header at the top of the Auto Retrieve
column is also a button.To quickly set all stages to be automatically retrieved, click this button to use its pop-up menu.
-
- Select ON
to retrieve all of the stages automatically.
Wire Store
-
- If you place a check mark in the Wire Store column beside a stage name, this stage will be saved when the stage set is saved. If you remove the check mark, the stage will not be saved, and so it will not be overwritten accidently. This means that any changes another user may make to the stage will not be saved.
-
- More than one user can be working on a common stage set, so if you make changes to one of your own stages and want to use this particular reference data as a default each time you start (such as reference geometry or windows), toggle the Wire Store column OFF for that stage.
|
|

|
Wire Store Menu
-
- The header at the top of the Wire Store
column is also a button.To quickly set all stages so that the wirefiles will be stored, click this button and use the pop-up menu that is displayed:
-
- Select ON to store all of the stage's wirefiles.
Stage Editor Menu Bar
Three menus are included at the bottom of the Stage Editor: the File menu, the Edit menu, and the Delete menu.
|

|
|
The following describes the Stage Editor menu items.
|
|
|
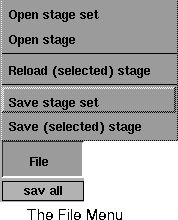
Click the File button to display the File pop-up menu.
File > Open stage set
Retrieves a new stage set. The File Requestor is displayed so you can select a stage set to open.
- If you know the name of the stage set, type its name in the File box and then click the Retrieve StageSet
button.
- To see the list of your saved stage sets, click the Show List button. Double-click to select a stage set from the list, and then click the Retrieve StageSet
button.
|

|
|
If you already have a stage set loaded, a dialog box is displayed asking if you want existing stages to be deleted before the new stage set is loaded:
- Click YES if you want to delete the current stages in the Stage Editor
.
- Click NO if you want to add the new stage set to the existing stages.
- Click CANCEL to stop the stage set retrieval and close the dialog box.
>
|
Note:
|
Selecting File > Open stage set in the Stage Editor is the
same as selecting File > Open stage set from the Alias main
menu.
|
To edit a stage set:
-
1
-
Select File > Open stage set in the Stage Editor.
-
2
-
When the File Requestor is displayed, click the Show List
button.
|
|
|
-
3
-
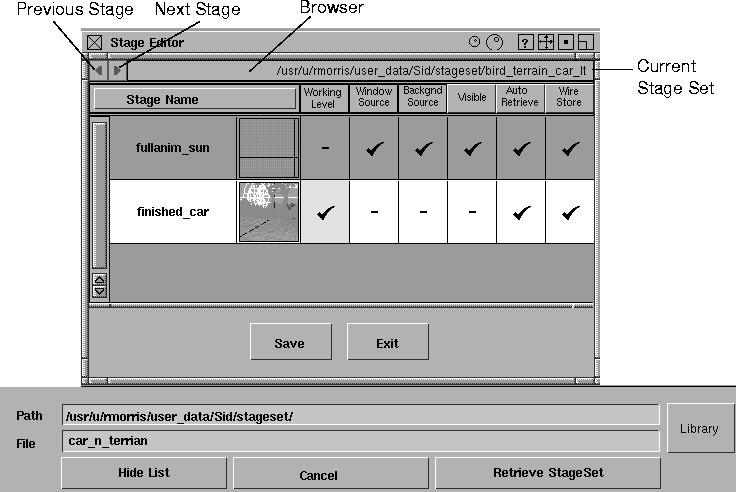
Select one or more stage sets from the file list. (Hold the Shift key to select more than one item).
-
The picture in the margin shows an example
-
4
-
Select File > Stage Editor in the File Browser.
|
|
|
-
A special version of the Stage Editor is displayed. Notice
that the menu buttons have been replaced by Save and Exit
buttons.
-
If more than one stage set was selected, you can use the
arrows in the top left corner of the editor to browse
through the stage sets. The browser field shows the name
of the stage set currently displayed in the Stage Editor.
|
|
|
-
5
-
Change the status of the columns to suit your needs by toggling the check marks ON or OFF.
-
6
-
Click the Save button in the Stage Editor to save the changes you made.
-
7
-
Click the Retrieve StageSet button in the File Requestor to retrieve the stage set with the new settings.
File > Open stage
Retrieves a wirefile as a new stage, automatically making the wirefile the reference for that stage.
A File Requestor is displayed so you can select a file (stage) to retrieve:
- Select the Show List button to see the list of your saved wirefiles and double-click to select the one you want from the list, or if you know the name of the file, type the name in the File box.
- Select the Retrieve New Stage
button to retrieve the file as a new stage.
>
|
Note:
|
Selecting File > Open Stage in the Stage Editor is the same
as selecting File > Open from the Alias main menu.
|
File > Reload (selected) stage
Replaces the selected stage with the last saved version. It is useful if you want to change a stage reference and update your model to the latest copy of someone else's file, or go back to an earlier saved version of a file.
For instance, if you want to update someone else's file information for a particular stage, this options lets you return to the last saved version of that stage, make the updates, and then save the stage.
A File Requestor is displayed so you can select a file (stage) to retrieve:
- Click the Show List button to see the list of the saved stages and double-click to select the one you want from the list, or if you know the name of the stage, type the name in the File
box.
- Click the Select Stage Reference button to retrieve the stage again.
File > Save stage set
Saves a stage set.
A File Requestor is displayed to let you save the stage set under a different filename if you wish.
To save the current stage set file, click the Save StageSet button.
To save the stage set under a different filename:
-
1
-
In the File Requestor, click the Show List button to see the list of your existing saved stage sets.
-
2
-
Double-click on a stage set icon in the browser to choose a stage set that you want to overwrite with the current one, or type a new name for the stage set in the File box.
-
3
-
Click the Save StageSet button.
-
Each of the stages is saved to its referenced wirefile as long
as the Wire Store option is checked for each stage in the
Stage Editor. If Wire Store is not checked for a stage, that
stage is not saved.
-
If a stage does not have a reference wirefile, the following
File Requestor is displayed. If you have not named the
stage, the File Requestor supplies a default name for the
wirefile.
To rename the wirefile:
-
1
-
Double-click on the name in the File box and type the new name.
-
2
-
Click the Save Wire button.
Notes:
- All files will be saved as wire files only (for example, IGES files cannot be saved as stages).
- If your referenced file is a data transfer file (for example, IGES) but does not have a suffix such as .iges or .igs, the system appends a .wire suffix before displaying it in the prompt asking for a name.
- If the referenced file has no write permissions, the stage will not be saved and you will not get prompted to save it elsewhere.
Tips:
- To create a rendered icon for the wirefile, click the Quick Render button in the File Browser. A small representation of the stage is displayed instead of the Store icon. This icon is the same as the icon that appears in the Stage Editor.
- Selecting File > Save stage set in the Stage Editor is the same as selecting File > Save stage set from the Alias main menu.
File > Save (selected) stage
Saves the stage as a wirefile.
If you create a new stage and there is no referenced wirefile, the File Requestor is displayed as follows:
|
|
|
If you have not named the stage, the File Requestor supplies a default name for the file. To rename the stage, double-click on the name in the File box and type the new name.
If there is a referenced file, the File Requestor is displayed as follows:
|
|
|
Select the Save Wire button to save the stage.
Notice that the icon in the Stage editor is updated to display the icon saved with the wirefile.
|
|
|
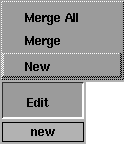
Edit Menu
Select the Edit button to display the Edit pop-up menu.
Merge All
-
- Use this option to merge all the stages in the Stage Editor into the working level stage.
Merge
-
- Use this option to merge the selected or highlighted stage into the working level stage.
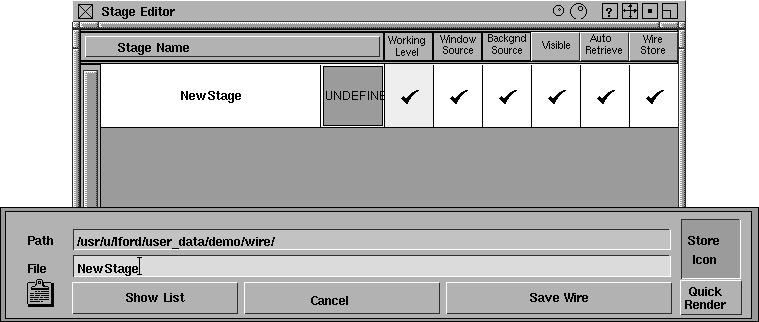
New
-
- Use this option to create a new, empty stage called NewStage
.
|
|
|
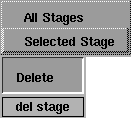
Delete Menu
Select the Delete button to display the Delete pop-up menu.
All Stages
-
- Use this option to delete all stages, including the root stage. When you delete all stages, you are also deleting all objects, windows, shaders, lights, cameras, and anything else contained in the stages.
|
|
Selecting Delete > All Stages
in the Stage Editor
is the
same as selecting Delete >
Del all from the Alias main
menu.
|
-
- When you select this option, a dialog box is displayed asking you to confirm whether you want to delete all of the stages and the objects they contain. Click YES if you want to delete the stages, or NO if you want to cancel the delete process and close the confirmation box.
-
- Because there must always be a stage in Alias, a new stage is automatically created when you delete all stages. The new stage is called Stage# and includes a sequential number indicating how many stages you have opened during your current Alias session.
Selected Stage
-
- Use this option to delete the highlighted stage (including all objects, windows, and so on that it contains).
-
- When you select this option, a dialog box is displayed asking you to confirm whether you want to delete the highlighted stage. Click OK if you want to delete the stage, or CANCEL if you want to cancel the delete process and close the confirmation box.
-
- Because there must always be a stage in Alias, a new stage is automatically created when you delete the last and only stage. The new stage is called Stage# and includes a sequential number indicating how many stages you have opened during your current Alias session.
Using the Stage Editor
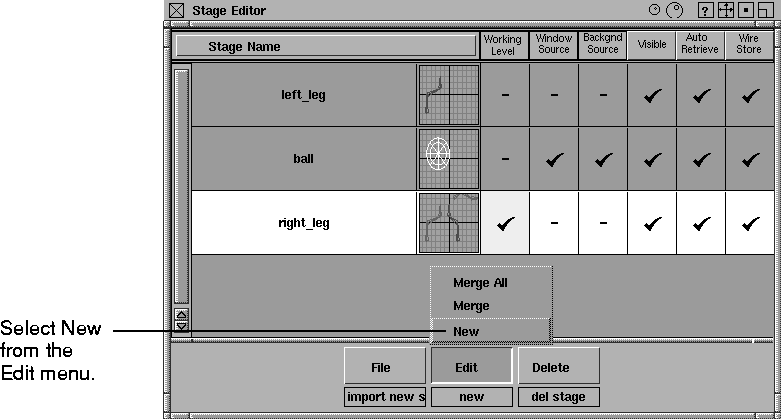
To create a new stage:
-
1
-
Select Edit > New in the Stage Editor.
|
|
|
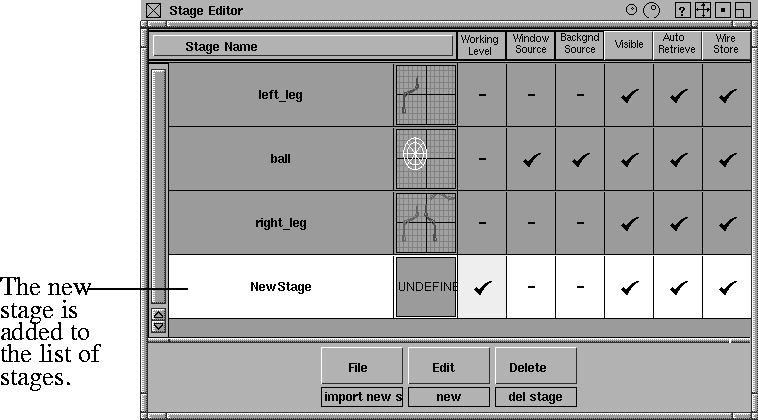
-
A new stage is displayed in the list as NewStage.
|
|
|
-
2
-
Double-click in the name field and type to rename the new stage. The new stage is the working level, and all objects you create are now placed in this stage.
To use a wirefile as a new stage
|
|
Alternatively, use File >
Retrieve Stage in the main
Alias menu.
|
To use a wirefile as a stage:
-
1
-
Select File > Open Stage in the Stage Editor. The following File Requestor is displayed:
|

|
|
-
2
-
Click the Show List button to display the File Lister and select the first stage wirefile.
-
3
-
Click the Retrieve New Stage button to load in the file. The name of the wirefile is used as the stage name.
-
4
-
Repeat the File > Open stage procedure until all the required stages are loaded. Stages are listed in the order in which they are created.
To create stages:
-
1
-
Create a wirefile that includes some of the geometry for an object (for example, the body of a car).
-
2
-
Create another stage that includes a different set of the object's geometry (for example, the wheels of the car).
-
3
-
Create a third stage that includes an alternate set of the object's geometry (for example, an alternate set of wheels).
-
4
-
Create a fourth stage that includes an environment background and camera view (for example, use the Ramp texture as a background with a blue to white ramp).
-
5
-
Select File > Save stage set to make a set of all the stages. You will be prompted for file names for each of the new stages you have created. The next time you need them, you can select Open stage set
and all the wirefiles associated with the stage set are retrieved.
To render with stages
-
1
-
A Ramp texture was used to create a gradient backdrop texture. Before you can QuickRender this, you must select Render > Quick render-
 and toggle Background ON. and toggle Background ON.
|
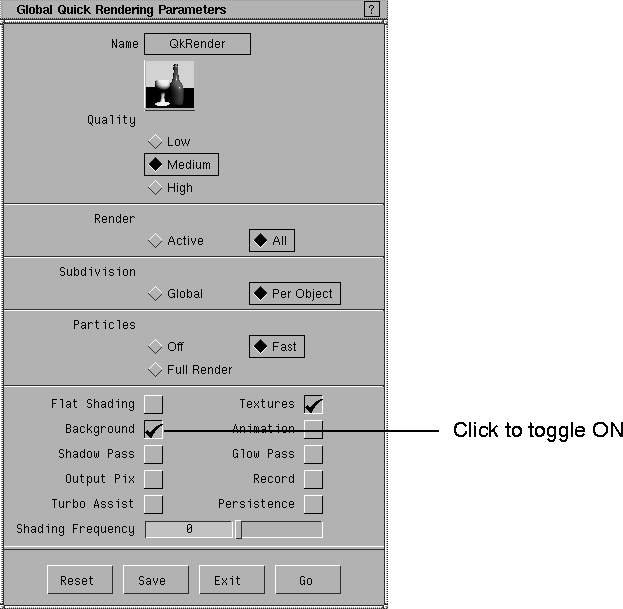
|
|
-
2
-
Click Go and all the visible stages are rendered together.
-
3
-
In the Stage Editor, toggle Visibility OFF for the second stage, and Visibility ON for the third stage, to see the alternate wheels.
-
4
-
Produce another Quick Render.
>
|
Note:
|
If you want to save the information that you have created in
a stage, save it using File > Save, Save as, or Save stage set
from the Alias menu bar, or File > Save stage set and Save
(selected) stage in the Stage Editor
.
|
Hints and Tips
- Lights from all visible stages illuminate the scene.
- Lights cannot be linked across stages.
- Image planes are associated with the window source stage and, as such, work across stages.
- When you render a scene composed of several stages, one SDL file is created for each stage. The SDL files are named according to the name of the stage set in the Stage Editor. Object names are prefixed with the stage name in the SDL file.
- Objects on inactive stages are displayed in a pale green color.
- Stages are not templates, but they may include templates.
- If you save a new stage that has no associated windows, the icon beside its name will not be displayed.
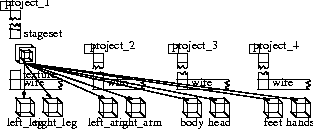
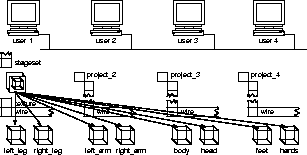
Referencing Stage Sets
The following diagrams show how you can use stage sets to reference files in different ways:
- files in the same project
- files in different projects
- files owned by different users on different machines
Referencing files in the same project
Referencing files in different projects
|
|
|
Referencing files owned by different users on different machines
|
|
|
|


