|
|
Textures
|
|
|
7
|
Textures
|
|
Textures are two-dimensional or three-dimensional patterns which you can assign, or map, to certain parameters of environments, shaders, and lights. You can also assign textures to certain parameters of other textures.
There are three basic types of textures:
- Surface textures (two-dimensional textures)
- Environment textures (three-dimensional textures)
- Solid textures (three-dimensional textures)
In This Section:
Texture Procedures Window
|
|
|
|
|
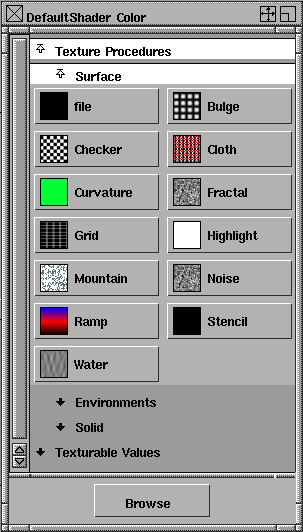
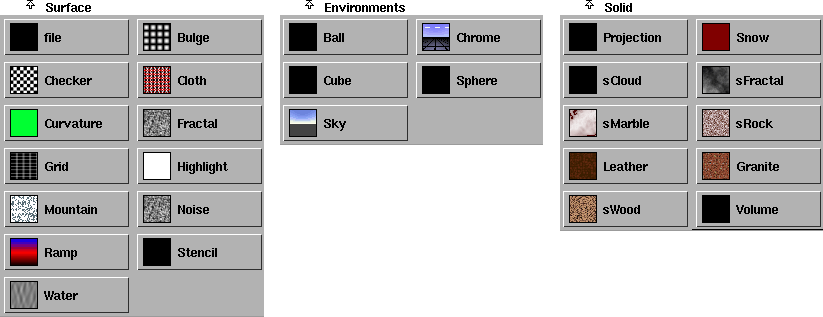
The Texture Procedures window contains a list of all textures (Surface, Environments, and Solid) and a list of all Texturable Values for the active environment/shader/texture/light.
To open the Texture Procedures window:
- In the Control Window, click on a parameter's Map button.
Texture Types
The Surface, Environments, and Solid sections of the Texture Procedures window list all textures that you can map to the parameter of an environment, shader, texture, or light.
|
|
|
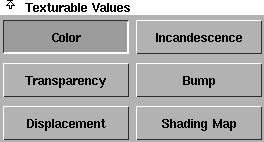
Texturable Values
The Texturable Values section of the Texture Procedures window contains a button for each parameter (of the active environment/shader/light/texture in the Multi-lister) that you can map a texture to. The button(s) that are depressed will have a texture mapped to them.
Texture Placement Objects
|
|
|
|
|
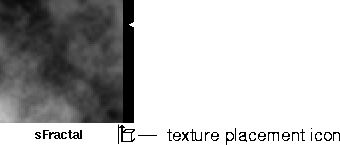
Every environment texture and solid texture in your scene has an associated Texture Placement Object. The Texture Placement Object determines the origin position and direction of the texture relative to the XYZ coordinate system and to the objects in your scene. By transforming the Texture Placement Object (using the standard Xform tools), you can control how the texture maps to the environment or to the surfaces in your scene.
By default, the Texture Placement Object for all textures is invisible. You can display a texture's Texture Placement Object in the modeling windows by clicking the texture placement icon in the bottom right corner of the texture's Multi-lister swatch.
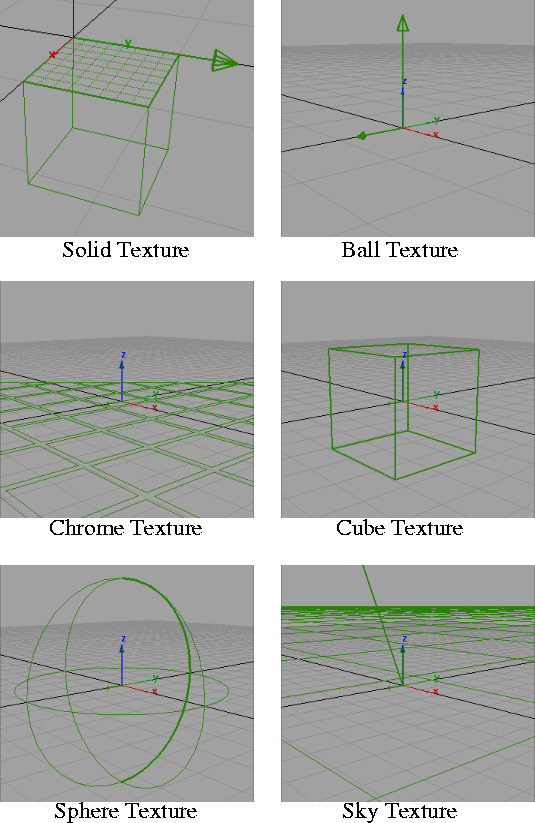
The Texture Placement Object for a solid texture appears in the modeling windows as a cube with one cross-hatched face, and an arrow pointing in one direction. By default, the Texture Placement Object for any solid texture is positioned at the origin with its arrow pointing in the positive Y direction.
The Texture Placement Object for a Projection texture is different for each Projection type. See Projection Texture on page 191.
The Texture Placement Object for an environment texture appears in the modeling windows as an icon with an arrow pointing in one direction. The type of icon is different for each type of environment texture. By default, the Texture Placement Object for any environment texture is positioned at the origin with its arrow pointing in either the positive Y direction (for Y-up scenes) or the positive Z direction (for Z-up scenes). For example, the Texture Placement Object for the Sky texture consists of a line between the sun and the origin, allowing you to easily see the sun's azimuth and elevation.
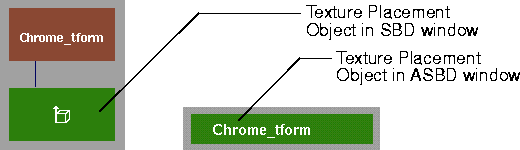
The Texture Placement Object also appears in the SBD and ASBD windows as a separate transformation node beneath the texture node.
The name of the Texture Placement Object is listed in the texture's Control Window with the 3D Placement parameters.

To position an environment texture or a solid texture:
-
1
-
Click the texture placement icon in the bottom right corner of the texture's Multi-lister swatch. The Texture Placement Object appears in the modeling window.
-
2
-
Select the Texture Placement Object in a modeling window.
-
3
-
Use the Xform tools (Move, Rotate, Scale, Non-p Scale) to change the Texture Placement Object's size, position, and orientation relative to the ground plane and/or the surfaces in your scene that the texture is mapped to.
-
The effect of the transformations is updated interactively
in the Multi-lister.
-
4
-
Click the texture placement icon in the bottom right corner of the texture's Multi-lister swatch. The Texture Placement Object disappears from the modeling windows.
To toggle the visibility of all displayed Texture Placement Objects:
- Select DisplayTgls > Object Toggles > Textures. This only toggles the visibility of Texture Placement Objects which you have previously displayed by clicking the Texture Placement Icon in the Multi-lister.
To open the Toggle Textures Options box:
- Select DisplayTgls > Object Toggles > Textures
 to display the Toggle Textures Options box. to display the Toggle Textures Options box.
Toggle Textures Options

Toggle Type
-
- Toggles the visibility of all displayed Texture Placement Objects in All Windows or just in the Current Window (that is, the active window). The default setting is All Windows.
Mapping a Texture
|
|
|
|
|
Texture mapping is the process of assigning a texture to a parameter. You can map a texture to any environment, shader, texture, or light parameter that has a Map button.
To map a texture to a parameter:
|
|
See Color Fields and Map
Buttons on page 37.
|
-
1
-
In the Control Window, click the Map button beside the parameter you want to apply a texture to. The Texture Procedures window appears.
|
|
See Texturable Values on
page 95.
|
-
If you want to apply the same texture to more than one
parameter, click on Texturable Values to open its section,
and then Shift-click on the parameters you want to apply a
texture to.
-
2
-
In either the Surface, Environments, or Solid section of the Texture Procedures window, click on the texture you want to map to the parameter.
|
|
See Reversing Direction and
Normals in the Modeling in
Alias book.
|
-
If the texture is inverted when you map it to a surface, use
Object Edit > Reverse Direction to reverse the direction of the
surface's UV parameterization.
-
The File, Stencil, Ball, Cube, Sphere, Projection, and Volume
textures are entirely black until you specify an image file
or a series of image files.
Texture Parameters
|
|
|
|
|
The Color Balance, Intensity, Blur, and Effects parameters are common to all textures.
Color Balance

The Color Balance parameters let you color correct a texture. These parameters are not available when the texture is mapped to certain single-channel parameters (for example, Reflectivity, Bump, Displacement). In these cases, the Color Balance parameters (Rgbmult and Rgboffset) are replaced by the Intensity parameters (Amult and Aoffset). See Intensity on page 101.
|
|
|
Rgbmult
-
- A scaling factor applied to all colors in the texture. That is, all colors in the texture are multiplied by the Rgbmult color. For example, you can color correct a texture that appears too green by setting the Rgbmult color to a shade of blue.The default color Value is 1 (white) (no effect).
|
|
|
Rgboffset
-
- An offset factor applied to all colors in the texture. That is, all colors in the texture have the Rgboffset color added to them. For example, you can brighten a texture that appears too dark by setting the Rgboffset color to a shade of grey. The default color Value is 0 (black) (no effect).
Intensity

The Intensity parameters let you correct the intensity of the texture. These parameters are only available when the texture is mapped to certain single-channel parameters (for example, Reflectivity, Bump, Displacement). In other cases, the Intensity parameters (Amult and Aoffset) are replaced by the Color Balance parameters (Rgbmult and Rgboffset). See Color Balance on page 101.
|
|
|
Amult
-
- A scaling factor applied to all values in the texture. That is, all values in the texture are multiplied by the Amult value. The slider range is 0 to 1. The default value is 1 (no effect).
|
|
|
Aoffset
-
- An offset factor applied to all values in the texture. That is, all values in the texture have the Aoffset value added to them. For example, if the Amult value is -1 and the Aoffset value is 1, the texture is inverted. The slider range is 0 to 1. The default value is 0 (no effect).
Blur

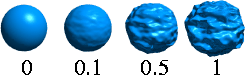
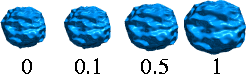
The Blur parameters control the sharpness of the texture. If the Blur parameter values are both 0, the texture is perfectly sharp. However, a small amount of blur is usually needed to reduce aliasing effects (see Aliasing on page 511).
|
|
|
Blurmult
-
- A scaling factor that controls the amount of texture blur in eye space. That is, the further an object is from the camera, the greater the blur effect.
-
- Increase the Blurmult value (for example, to 1) only to reduce aliasing effects caused by sharp textures (see Aliasing on page 511). If you want to actually smooth the texture, increase the Bluroffset value.
-
- Lower the Blurmult value (for example, to 0.1) if you are using the texture as a bump or displacement map. If the Blurmult value is high, the bump/displacement will appear smoother when the surface is further from the camera.
-
- The slider range is 0 (sharp texture, no blur) to 1 (good anti-aliasing). The default value is 1.
|
|
|
Bluroffset
-
- An offset factor that controls the amount of texture blur in texture space. That is, the amount of blur is the same no matter where the object is relative to the camera. The slider range is 0 (no blur) to 1 (completely blurred). The default value is 0.
Effects
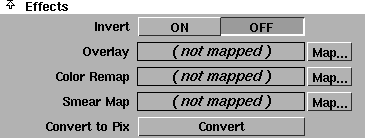
The Effects parameters let you create a variety of texture effects.
|
|
|
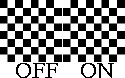
Invert
-
- Reverses all texture colors (for example, black becomes white, white becomes black). For example, you can change a bump or displacement map's raised regions to depressions and vice versa by setting Invert ON or OFF. The default setting is OFF.
|
|
|
Overlay
-
- Layers another texture on top of the original texture. The overlay texture completely replaces the original texture in the region of a surface where both textures exist.
-
- For example, you can place multiple image file decals onto a model using this parameter. You can also overlay another texture onto the overlaid texture, and another texture onto that one, and so on.
|
|
|
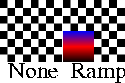
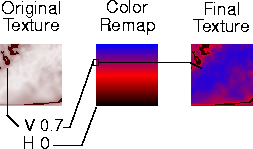
Color Remap
-
- Applies a color map to the texture. The U value of the Color Remap texture is mapped to the original texture's hue, and the V value is mapped to the original texture's intensity (the value defined by [R+G+B]/3). The Color Remap parameter acts similar to the Shading Map parameter (see Shading Map on page 79).
|
|
|
Smear Map
-
- Stretches the texture in the U and V directions. The intensity of the Smear Map texture determines the magnitude of the stretch, and the hue determines the direction (angle). For example, you can use Smear Map to create swirl and dissolve effects using an animated fractal noise texture.
Convert to Pix
-
- Converts any procedural surface texture to an image file texture. Because procedural textures take longer to render than image file textures, you would use Convert to Pix to convert procedural textures to image file textures, and reduce rendering time. You can also use Convert to Pix to reduce a texture that has several Overlay textures, into a single image file texture.
-
- If you click the Convert to Pix button, the following dialog box appears:
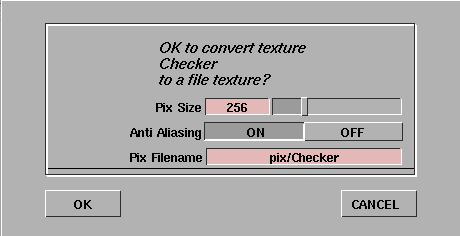
-
- You can edit the Pix Size value (the size of the image file) and the Pix Filename (the name of the image file), and you can turn Anti Aliasing ON or OFF.
-
- The Convert to Pix parameter is only available for surface textures.
Convert to Smear
-
- This parameter is only available for the Projection texture. See Convert to Smear on page 198.
|


