|
The Control Window is
sometimes referred to as the
Environment Editor, Shader
Editor, Texture Editor, or
Light Editor.
|
The Control Window is the interface you use to edit shaders, textures, lights, and the environment. You can also use the Control Window to access the Color Editor.
In This Section:
Control Window Overview
|
|
For more information on each type of Control Window see:
To open the Control Window for a shader, texture, light, or for the environment, do one of the following:
- Double-click the environment, shader, texture, or light swatch in the Multi-lister, or
- Click on the environment, shader, texture, or light swatch in the Multi-lister, and select Edit > Edit in the Multi-lister.
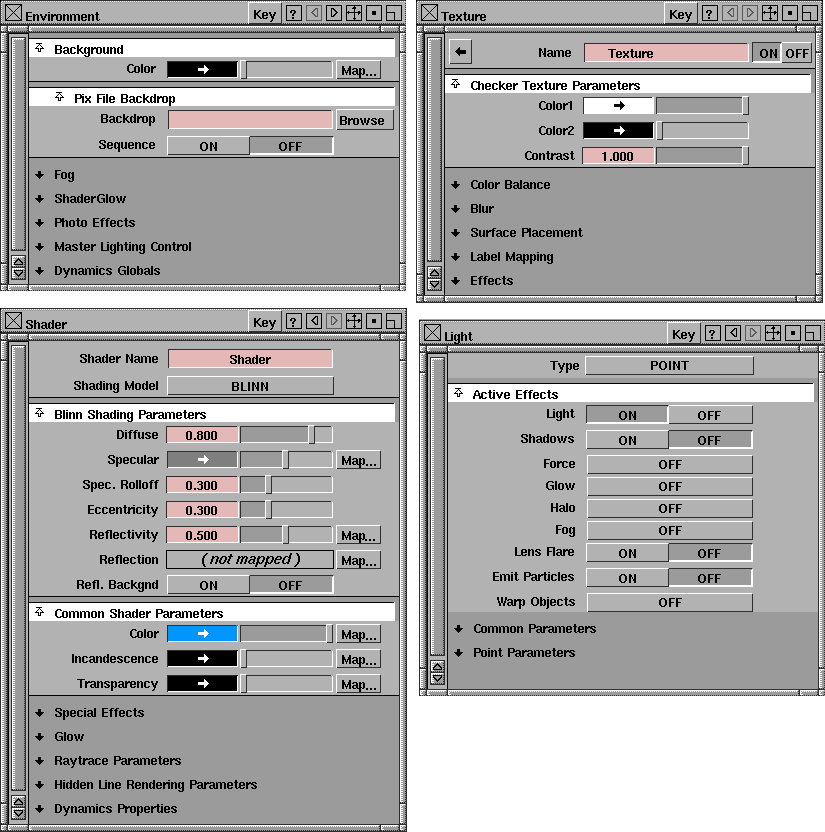
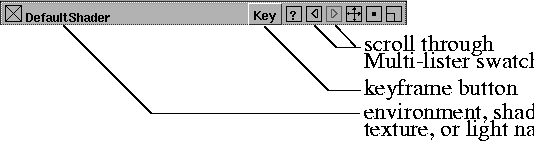
Title Bar
The title bar indicates the name of the active environment, shader, texture, or light in the Multi-lister. It also contains buttons or icons that let you set a keyframe for a parameter, or scroll through the Multi-lister swatches.
Parameters
Parameters control the appearance of shaders, textures, lights, and the environment. Each parameter has a name, which describes the parameter, and a field, which specifies (and allows you to change) the parameter's setting or value. The Control Window contains several different types of fields: name fields, file name fields, toggle fields, menu fields, numeric fields, and color fields.
Name Fields
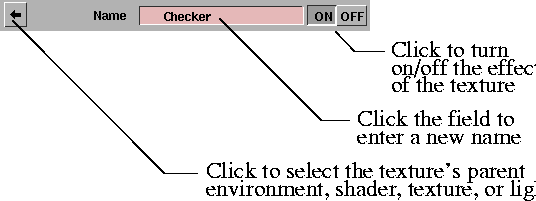
Name fields let you change a shader or texture name by clicking in the field and typing a new name. Textures also have an arrow button on the left side of the name field, and ON and OFF buttons on the right side of the name field. The arrow button lets you select the texture's parent swatch in the Multi-lister (that is, the environment, shader, texture, or light that the texture is mapped to). The ON and OFF buttons let you turn the effect of the texture on or off.
File Name Fields and Browse Buttons
File name fields let you specify a path and file name by clicking in the field and typing a file name. File name fields also have a Browse button on the right side of the field. You can click the Browse button to select a file using the File Requestor.

Toggle Fields
Toggle fields let you set a parameter ON or OFF.

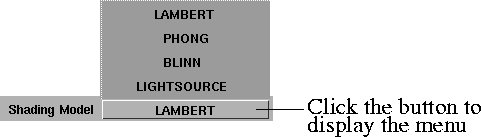
Menu Fields
Menu fields let you select from a list of menu options by clicking the mouse on a menu button, and then releasing the mouse on the desired option.
Numeric Fields
Numeric fields let you enter a number using either the keyboard or a slider beside the field. Each numeric field has a valid range (the range of values you can enter by typing in the field) and a slider range (the range of values you can enter using the slider). The slider range represents the recommended range of values for that parameter. The valid range is -· (negative infinity) to · (positive infinity) for all numeric fields unless otherwise stated.
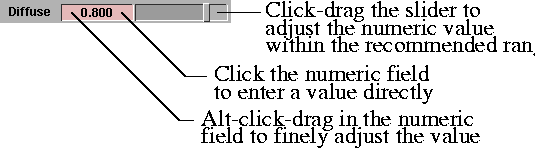
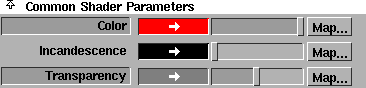
Some numeric fields also have a Map button (for example, Reflectivity).
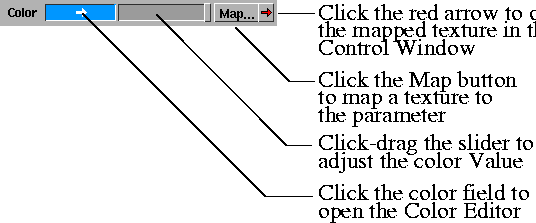
Color Fields and Map Buttons
Color fields let you specify the color value by using the slider, specify the color by clicking the color field and opening the Color Editor, or map a texture to the parameter by clicking the Map button. If you map a texture to a color field, a red arrow button will appear to the right of the Map button. By clicking this red arrow you can open the Control Window for that texture.
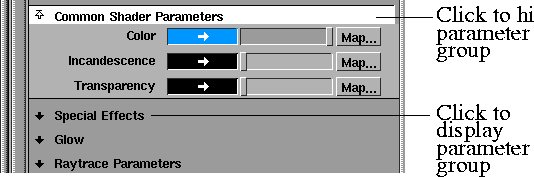
Parameter Groups
Parameters are organized in groups in the Control Window. You can display or hide a parameter group by clicking on the group name.
Copying Parameter Settings
|
|
You can copy parameter settings from one environment, shader, texture, or light to another.
To copy parameter settings from one environment, shader, texture, or light to another:
-
1
-
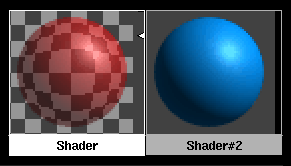
Open the Control Window for the shader you want to copy parameter settings from (for example, Shader).
-
2
-
Hold the Shift key and click the shader swatch for the shader you want to copy parameter settings to (for example, Shader#2).
-
3
-
In the Control Window, hold the Shift key and click on the names of the parameters you want to copy (for example, Color and Transparency). The parameter names become highlighted.
|
|
You can animate an environment, shader, texture, or light parameter by creating key frames for the parameter.
To create a keyframe for a parameter:
-
1
-
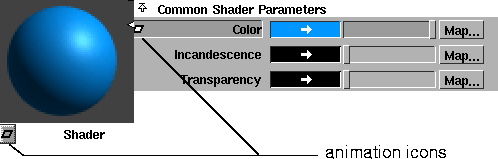
Hold the Shift key and click the name of the parameter you want to animate (for example, Color). The parameter name becomes highlighted.

-
2
-
Go to the frame of your animation that you want to create a parameter keyframe for.
-
3
-
Adjust the parameter setting or value for that frame.
-
4
-
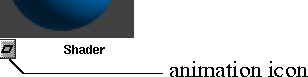
Click the Key button in the title bar of the Control Window. A white diamond (animation icon) appears in the Control Window beside the parameter name, and in the Multi-lister swatch. These icons indicate that a parameter is animated.
-
5
-
Shift-click the parameter name again to deselect it.
To play back an animated environment, shader, texture, or light in the Multi-lister:
- Click-hold the animation icon in the lower left corner of the environment, shader, texture, or light swatch in the Multi-lister.
|