|
|
16
|
Warps
|
|
This feature is available in Alias AutoStudio, and is a purchasable AdvancedAnimation option.
Warps can be thought of as forces that deform surfaces.
In This Section:
Warps Overview
|
|
|
|
| |
|
|
A warp is actually a light which has a warp component (that is, the light's Warp Objects parameter is set to TRIANGLE_RES or PIXEL_RES). Any light can exert a warp in addition to, or instead of, emitting light.
A warp deforms a surface by displacing it, somewhat like a displacement map. The strength and direction of this displacement is determined by the warp intensity (Warp Intens.), and the light Type (DIRECTIONAL, POINT, LINEAR, SPOT, AREA, VOLUME, AMBIENT).
Warps have several advantages over displacement maps. Some of the features of warps include:
- Warps produce the same displacement, regardless of surface parameterization, so the level of detail is identical for a warp applied to several surfaces.
- Warps interactively display the surface displacement in the modeling windows.
- Warps deform continuously across multiple surfaces.
- Warps deform all geometry types (faces, patches, and polygons), including any combination of geometry types.
- The direction of deformation is continuous in space, so seams between surfaces do not break apart. Surface continuity at blends and joins is preserved.
- Surfaces may be deformed in any direction. Spirals, twists, and swirls are possible.
- Warps do not require or produce any increase in the density of the surface data. File detail is possible without having to increase triangulation levels.
- Warped surfaces can be converted into polygonal equivalents.
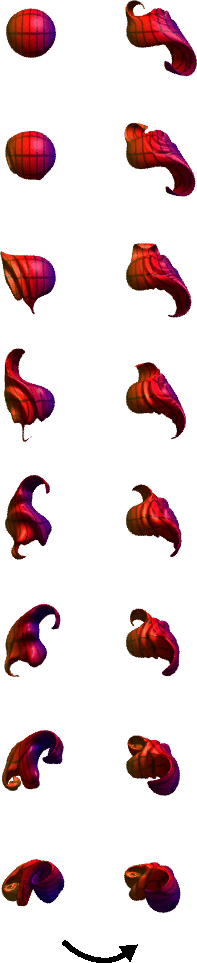
- Warp parameters can be animated. For example, you can simulate a crashing wave by simply using a sphere and an animated warp. Warp parameters can also be animated by expressions.
- Multiple warps can be easily combined.
- Unlike deformation methods that simply move triangles, warps have the option to apply a per pixel warping at render time. This allows high frequency detail, such as fine ripples and fractal noise, to be accurately rendered without requiring a large number of triangles.
Using Warps
You can use warps to put dents on surfaces, flow ripples through flags, or simulate bones, muscle and sinew underneath skin. Keep in mind that:
- The Warp tools are presets. You are not limited to these presets, and can create your own type of warp using a different Light Type, and/or by mapping a texture to the warp's Color parameter.
- A warp must be linked to a surface (in the same manner you would link a light to a surface).
- The amount of deformation given to a surface is unbounded, so, for example, a spherical volume warp (the Bulge preset) can push a surface well beyond the bounds of the warp.
- A directional light warp simply displaces the position of the object along the direction the light is pointing, as the intensity and direction of this kind of field is constant (unless it is textured).
- Warps with decay are more useful as the amount of push varies over space.
- Volume lights are generally the best for warping, because they provide the most control over decay direction (the Direction Vectors).
- You can texture a warp to create unusual deformations. (To texture a warp, map a texture to the light's Color parameter.) For example, the Ripple preset is a volume light with a water texture applied to its Color parameter. The Mangle preset uses a volume light with turbulence to push the surface in random directions.
- If you texture map a warp, the texture's U and V coordinates are based on the volume light's size.
- If you texture map a warp, the amplitude of the warp is based on the Warp Intens. value, the texture's Rgbmult value, and the light's Intensity value.
|
Objects palette >
Warp
|
Creating a Warp
|
|
|
|
|
You can create a warp using the Warp tools or by creating a light and then giving it a warp component.
|
|
Light#1 isn't used explicitly
as a name; the first warp
with a given name is
implicitly numbered 1.
|
By default, warps are named sequentially as you create them: Light, Light#2, and so on. To avoid confusion, however, name all your warps as you create them. If you let the system assign default names and later combine two or more files, all warps are renumbered to avoid duplicate names. It may then become difficult to distinguish warps by name.
To create a warp using the warp tools:
-
1
-
Select the surface(s) that you want to apply a warp to.
-
2
-
Select a tool from the Warps cascading menu, or click one of these icons:

-
3
-
If you do not have a surface selected, the system prompts:
-
Pick the surface(s) to be warped, then
press Go to create a new warp object.
-
Pick the surface or surfaces you want to warp, then click
the Go button.
-
4
-
A new warp is automatically created, sized to fit, and linked to the selected surfaces.
Note the following when using warps:
- The presets on the tool palette are a small subset of the full range of warps effects available. The warp is in fact a light, and any light field type can be used.
- To see the effect of a warp on a surface, drag the surface through the warp.
- Use the Xform tools (Move, Scale, Rotate, Non-p Scale) to customize the warp effect.
- The warp is not initially grouped to the selected objects, but should be grouped if you do not want the object to travel through the warp when it is transformed.
To create a warp from a light:
|
|
See Control Window on
page 33.
|
-
1
-
Double-click the light swatch in the Multi-lister to open the light's Control Window.
|
|
See Warp Objects on
page 319.
|
-
2
-
Set Warp Objects to PIXEL_RES or TRIANGLE_RES.
|
|
See Linking a Light on
page 229.
|
-
3
-
Link the warp to the surfaces you want to warp.
-
Unlike lights or forces, warps must be linked in order to
have an effect. When you create a warp using the Warp
tools, the warp is automatically linked to the selected
surfaces.
|
DisplayTgls >
Render Toggles >
Warps
|
Displaying Warped Surfaces
|
|
|
|
|
You can control whether warped surfaces are displayed in the modeling windows. If you toggle the display of warped surfaces off, then the unwarped surface will be displayed in the modeling windows.
To toggle the display of warped surface on or off:
- Select DisplayTgls > Render Toggles > Warps.
Converting a Warped Surface into a Polygonal Surface
|
|
|
|
|
You can convert a warped spline surface into a polygonal surface to help visualize object intersections during an animation, or to make sure the camera doesn't pass through a warped surface during a fly-by.
To convert a warped surface into a polygonal surface:
-
1
-
Select the warped surface.
|
|
See Creating Polygons from
NURBS on page 15 of the
Polygonal Modeling in Alias
book.
|
-
2
-
Select Create polygons from the Polygons menu, or click this icon.

-
The Spline Surface to Polygons window appears.
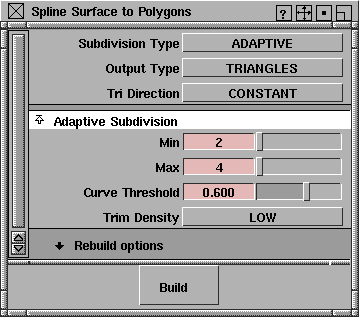
-
3
-
Set the parameters in the Spline Surface to Polygons window and click Build.
-
A polygonal version of the deformed surface is created.
Warp Parameters
|
|
|
|
| |
|
Double-click on a warp in
the multi-lister to set its
parameters.
|
Warps have all the same parameters that lights do (see Light Parameters on page 237). The main parameters for warps are Warp Objects (under Active Effects), and the Object Warping parameters.
|
|
|
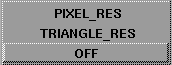
Warp Objects
-
- The method used to warp a surface. The default setting for lights is OFF. The default setting for warps is TRIANGLE_RES.
| OFF
| No warp is applied.
|
| TRIANGLE_RES
| Warp is applied to triangle vertices.
|
| PIXEL_RES
| Warp is applied to triangle vertices and then to each rendered pixel (like a bump map). This lets you see finer details than the triangle size. Using this option, you can create the look of a sharp edged fillet with only a few triangles. However, PIXEL_RES can sometimes take much longer to render than TRIANGLE_RES. Use PIXEL_RES only when you need fine detail or sharp edges.
|
Object Warping
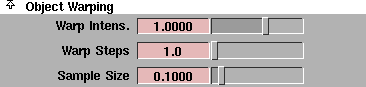
The Object Warping parameters become available when Warp Objects is set to either TRIANGLE_RES or PIXEL_RES. Parameter defaults are different for different warp presets.
Warp Intens.
-
- The strength of the warp which controls how much the surface is deformed. The slider range is -5 to 5. The default setting is 1.
-
- When adjusting the Warp Intens. value, scale the Sample Size value by the same factor to preserve the smoothness of the deformation.
Warp Steps
-
- The number of iterations used to calculate surface deformation. If the Warp Steps value is greater than 1, the warp can cause the surface to curl around itself. The slider range is 1 to 10. The default value is 1.
-
- Rendering time is directly proportional to the Warp Steps value. If the Warps Steps value is high (for example, 10), rendering may take a long time.
Sample Size
-
- The size of the sample (in world space units) used to calculate surface deformation. The slider range is 0.001 (sharply shaded surface deformation) to 10 (smoothly shaded surface deformation). The default value is 0.1.
-
- For razor sharp detail, set Warp Objects to PIXEL_RES and Sample Size to a very small value.
-
- If Warp Objects is set to TRIANGLE_RES, set the Sample Size value no smaller than the general size of the triangles rendered. This avoids cases where the triangle normals change too abruptly, making the triangle edges noticeable.
-
- When adjusting the Warp Intens. value, scale the Sample Size value by the same factor to preserve the smoothness of the deformation.
|


