|
|
15
|
Particles
|
|
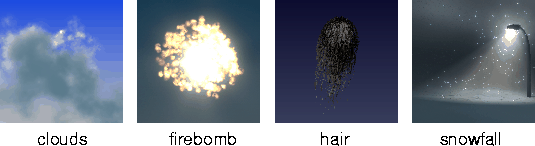
Particles are collections of small pieces of geometry that can be emitted from a surface or light and animated using dynamic forces. Particles can simulate many types of effects, including smoke, fire, explosions, water, rain, snow, sweat, grass, or hair.
In This Section:
|
DisplayTgls >
Render Toggles >
Particles
|
Using Particles
|
|
|
|
|
To create particles, you must create a particle emitter. You can then preview the particles created by this emitter by either playing back the animation or performing a dynamic simulation.
If your particles begin emitting before frame 1 of the animation, you may want to save the particle runup so that it does not need to be calculated each time you run the animation.
You can also control how particles are displayed in the modeling windows.
To create a particle emitter:
-
1
-
Create a surface or light to be used as a particle emitter.
|
|
See Emit Particles on page 82.
|
-
2
-
If the emitter is a surface, create a new shader, and set Emit Particles ON under Special Effects.
|
|
See Emit Particles on
page 243.
|
-
If the emitter is a light, set Emit Particles ON under Active
Effects.
To preview particles:
|
|
See Viewing Running
Animation and Running a
Dynamics Simulation in the
Animating in Alias book.
|
- Select Animation > Playback to preview the particles, or select Animation > Run dynamics to perform a dynamic simulation. Particles are emitted from the surface or light.
-
To speed up the display of particles in the modeling
windows:
- work with only one modeling window
|
|
See Particles/Sec on page 302.
|
- reduce the Particles/Sec value
|
|
See Time Random on
page 304.
|
-
To better visualize the motion of particles, set Time Random
OFF.
To save particle runup:
-
1
-
Use the time slider to go to the first frame of the animation.
-
2
-
Select File > Export > Particles.
-
The file lister is displayed.
-
3
-
Enter a name for the particle file and click Save Particles.
-
4
-
Open the particle emitter's Control Window.
|
|
See Use File on page 290.
|
-
5
-
In the Particle Emission section of the Control Window, set Use File to RUNUP.
-
The Filename field automatically contains the name of the
particle file, for example:
|
|
The file name should not
contain an extension number
(for example,
shadername.0)
|
-
/usr/username/demo/sdl/emitter.psys/shadername
-
Now when you play back the animation, the particle
runup is read from the particle file.
To toggle the display of particles on or off:
- Select DisplayTgls > Render Toggles > Particles.
To open the Toggle Particle Options box:
- Select DisplayTgls > Render Toggles > Particles
 . .
Toggle Particle Options
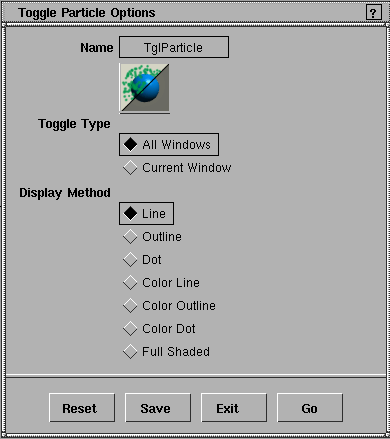
Toggle Type
-
- Toggles the display of particles in All Windows or just in the Current Window (that is, the active window). The default setting is All Windows.
Display Method
-
- Controls how particles are displayed in the modeling windows. The most commonly used settings are Line and Full Shaded. The default setting is Line.
|
Display Method
|
Particles are displayed as...
|
|---|
| Line
| Lines. A line represents the path of a particle across the timestep.
|
| Outline
| Circles. The size of a circle represents the size of the particle. Hair particles are displayed with additional lines to indicate hair width.
|
| Dot
| Filled circles and lines.
|
| Color Line
| Colored lines. A line represents the path of a particle across the timestep. The color of a line represents the color of the particle.
|
| Color Outline
| Colored circles. The size of a circle represents the size of the particle. The color of a circle represents the color of the particle.
|
| Color Dot
| Filled colored circles and lines.
|
| Full Shaded
| Fully shaded. Particles are actual size, and are displayed with actual levels of transparency.
|
-
- If your machine does not support full RGB double buffering, Full Shaded particles may appear faint or contain dots or banding. Use a dark background to minimize these effects, or use Quick render to preview particles (see Quick Render on page 362).
|
|
See Color on page 295.
|
-
- If particle Color intensity is greater than 1, the shaded preview will appear green. The final render, however, will be white.
Particle Parameters
|
|
|
|
|
Particle parameters control the generation, behavior, and appearance of particles emitted from a light or from surfaces which have the shader assigned to them.
To set particle parameters, double-click on the particle system in the Multi-lister.
Particle Emission
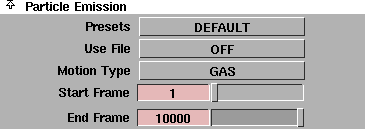
The Particle Emission parameters determine whether particles will be generated or read from an external file, the type of particles generated, and the type of motion they will have. These parameters are only available if Emit Particles is ON.
|
|
|
Presets
-
- Predefined particle effects. When you select a Preset, all Particle Emission parameters are automatically set. (If you want to keep any parameter settings you have made, save the shader or light before you select a Preset.) You can then adjust these parameters to customize the particle effect.
-
- When you select the following Presets, suggested environment Glow Threshold and turbulence Intensity values are displayed (see Threshold on page 59 and Intensity on page 66).
|
Preset
|
Suggested Values
|
|---|
| STEAM
| turbulence Intensity (0.4)
|
| SMOKE
| turbulence Intensity (1)
|
| CIGARETTE SMOKE
| turbulence Intensity (0.4)
|
| CAMP FIRE
| turbulence Intensity (0.4)
|
| TORCH
| Glow Threshold (0.5)
turbulence Intensity (1)
|
| CANDLE
| Glow Threshold (0.5)
turbulence Intensity (0.5)
|
| ROCKET THRUST
| Glow Threshold (0.1)
turbulence Intensity (1)
|
|
|
|
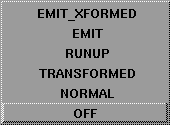
Use File
-
- Reads particles in from a series of files instead of generating them during the animation. These files may have been generated from a previous simulation and saved using Save Particles (see Save Particles of the Animating in Alias book) or File > Export > Particles (see To save particle runup: on page 286), or they may have been generated in another application and converted to an Alias particle file. The default setting is OFF.
-
- If Use File is set (that is, not OFF), the Filename parameter becomes available (see Filename below).
-
- The TRANSFORMED option is only available if the particle emitter is a volume light. The EMIT_XFORMED option is only available if the particle emitter is a volume light or a shader.
| OFF
| Particles are read from memory (or generated during the animation); particles are not read from particle files.
|
| NORMAL
| Particles are read from particle files; particles are not read from memory (or generated during the animation). Particles are emitted from the location of the emitter when the particle files were created.
|
| TRANSFORMED
| Particles are read from particle files; particles are not read from memory (or generated during the animation). Particles are emitted from the current location of the emitter. If the emitter is a surface, particles are only emitted from one surface having the particle emitting shader assigned to it.
|
| RUNUP
| Particles are read from particle files. If particle files do not exist for all frames between the runup start and the end frame, particles are generated between the last particle file and the end frame, using the last particle as a starting point. To use this option, the Filename must be a prefix only (for example, .../sdl/test.psys/Light, not Light.30).
|
| EMIT
| Particles are read from particle files and read from memory (or generated during the animation). That is, particles from the particle files are added to the particles in memory. All particles are emitted from the location of the emitter when the particle files were created.
|
| EMIT_XFORMED
| Particles are read from particle files and read from memory (or generated during the animation). That is, particles from the particle files are added to the particles in memory. Particles are emitted from the current location of the emitter. If the emitter is a surface, particles are only emitted from one surface having the particle emitting shader assigned to it.
|
Filename

-
- The full path to the particle files to be used during an animation. This parameter is only available if Use File is set (that is, not OFF).
-
- For example, if the particle emitter (a shader) is called Shader#1, and you typed test when prompted for a Save Particles file location, the particle files will be stored in ./user_data/<project>/sdl/test.psys/Shader#1.n, where n is the frame number for that particle file. To use a single particle file, enter the path, file name, and extension of the particle file (for example, .../sdl/test.psys/Shader#1.30) in the Filename field. To use a series of particle files, enter only the path and file name (for example, .../sdl/test.psys/Shader#1).
-
- See Particle File Format in the File Formats and Data Transfer online documentation for more information on particle files.
|
|
|
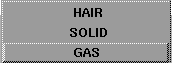
Motion Type
-
- Defines the type of motion particles have. The default setting is GAS.
| GAS
| Particles have no mass and no momentum. Particles follow the motion of the air and are only affected by turbulence and wind forces.
|
| SOLID
| Particles have mass and momentum. Particles are affected by all forces.
|
| HAIR
| Particles have mass and are affected by all forces.
|
-
- When Motion Type is HAIR, particles are linked to previously emitted particles to create a continuous strand. If the emitter is in motion, the oldest particles will lag behind because they do not actually move with the emitter. This lag can create a nice effect, like hair in water. If this lag effect is too great, either reduce the Hair Segments value or increase the Simulation substeps value (in the Render Globals window).
Start Frame
-
- The frame of the animation where particle emission begins. To "run up" the particle system and have particles in mid-motion when the animation begins, set the Start Frame value to a value lower than the animation Start frame (for example, use a negative Start Frame value). The slider range is 0 to 100. The default value is 1.
End Frame
-
- The frame of the animation where particle emission stops. The slider range is 0 to 100. The default value is 10000.
Render Parameters
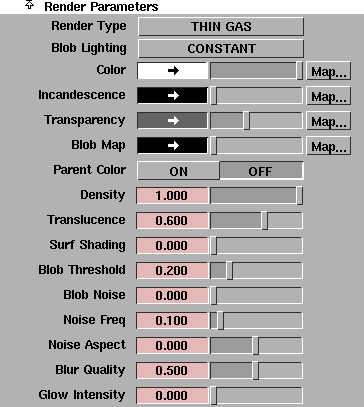
The Render Parameters control the appearance of rendered particles. You can interactively modify the Render Parameters when the animation is stopped (that is, the display in the modeling windows will be updated automatically).
|
|
|
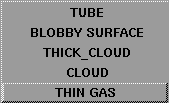
Render Type
-
- Controls the overall appearance of particles. The default setting is THIN GAS.
| THIN GAS
| The THIN GAS method is best suited for fairly transparent particle systems. This method is fast, as it uses the average density of the particles along a ray to calculate the particle systems contribution to a pixel.
|
| CLOUD
| For denser particle systems, the CLOUD method is more accurate (but slower). SELF SHADOWING works best with the CLOUD method, but will also work with other Blob Lighting options. This method calculates the contribution of the blobs in sorted order front to back, so that the structure of the individual blobs is more visible. CLOUD works well for hair.
|
| THICK_CLOUD
| THICK CLOUD adds the effect of self shadowing of a blob on it self, so that when the blobs are large and fairly opaque they will appear to have a diffuse shading effect. This works well for cumulous clouds, and can simulate a silver lining effect when backlit. THICK CLOUD will look the same as CLOUD if there is no self shadowing of the particles.
|
| BLOBBY SURFACE
| BLOBBY SURFACE renders the implicit surface created by the blobs.
|
| TUBE
| TUBE works best for rendering hair as this renders the particles as a tapered tube.
|
|
|
|
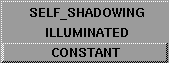
Blob Lighting
-
- The method used to calculate the lighting of particles. The default setting is CONSTANT.
| CONSTANT
| All particles are assigned the particle Color. Scene lighting is ignored.
|
| ILLUMINATED
| Light falling on a particle is averaged, and that value assigned to the entire particle. If the blobs are discrete, sudden changes in illumination may be noticeable.
|
| SELF_SHADOWING
| Light is calculated for each particle on a per-pixel basis. This is the slowest method.
|
|
|
If Motion Type is HAIR, and a
texture is mapped to Color,
the top of the texture maps
to the base of the hairs, and
the bottom of the texture
maps to the tips of the hairs.
|
Color
-
- The color of the particles. If a texture is mapped to this parameter, the U values of the texture are mapped to Color, and the V values are mapped to the particles' lifetime. For example, map a V RAMP texture to Color to control particle color over particle lifetime.
-
- If Parent Color is ON, the particles' actual color is determined by multiplying the emitter's Color by the particle's Color. To make the particles have the exact same color as the emitter, set Parent Color ON and particle Color to white.
|
|
If Motion Type is HAIR, and a
texture is mapped to
Incandescence, the top of
the texture maps to the base
of the hairs, and the bottom
of the texture maps to the
tips of the hairs.
|
Incandescence
-
- The color and brightness of light that particles appear to be emitting. If a texture is mapped to Incandescence, the U values of the texture are mapped to Incandescence, and the V values are mapped to the particles' lifetime. For example, map a V RAMP texture to Incandescence to control particle incandescence over particle lifetime.
|
|
If Motion Type is HAIR, and a
texture is mapped to
Transparency, the top of the
texture maps to the base of
the hairs, and the bottom of
the texture maps to the tips
of the hairs.
|
Transparency
-
- The color and level of transparency of the particles. If a texture is assigned to Transparency, the U values of the texture are mapped to Transparency, and the V values are mapped to the particles' lifetime. For example, map a V RAMP texture to Transparency to control particle transparency over particle lifetime.
-
- Actual particle transparency is also based on the particle Size and Density values. Smaller or less dense particles will appear more transparent.
-
- If Diffusion is ON, mapping a texture to Transparency will have no effect.
Blob Map
-
- Maps a texture to individual blobs (particles). Surface textures are mapped by projection from the eye point, so the texture moves with the blob and always faces the camera. Solid textures are mapped according to the solid texture placement object, so blobs appear to move through the texture. Assigning a color to Blob Map has no effect.
Parent Color
-
- Makes particles have the same color as the point on the emitter that they originated from. If Render Type is BLOBBY SURFACE, the blobs will have the same texture map as the emitter.
-
- If Parent Color is ON, the particles' actual color is determined by multiplying the emitter's Color by the particle's Color. To make the particles have the exact same color as the emitter, set Parent Color ON and particle Color to white.
Density
-
- The visual density of the particles. Particles with a low Density value appear transparent; particles with a high Density value appear opaque. The slider range is 0 (completely transparent) to 1 (particles have the transparency of the emitter). The default value is 1.
-
- Actual particle transparency is also based on the particle Size value and Transparency setting. Smaller particles will appear more transparent.
|
Tip:
|
SELF_SHADOWING is more noticeable when the Density
value is high. Motion blur and animated transparency look
better when the Density value is approximately 1/
Transparency.
|
Translucence
-
- The particles ability to transmit and diffuse light. The slider range is 0 to 1. The default value is 0.6.
Surf Shading (Surface Shading)
-
- Controls the level of shading on the surface of the particle system. It behaves somewhat differently depending on the Motion Type and Render Type selected. The slider range is 0 to 1. The default value is 0.
-
- If Render Type is BLOBBY SURFACE or Motion Type is HAIR, the Surf Shading value controls specular illumination. As the value approaches 1 the highlight becomes more intense and focused.
-
- If Render Type is THIN GAS or CLOUD and Motion Type is GAS or SOLID, the Surf Shading value controls the amount of diffuse illumination at the surface of the particle.
-
- The surface of the cloud for this shading is controlled using the Blob Threshold parameter. As the value approaches 1, the shading of a cloud becomes completely surface shaded, with no volume illumination of the particles.
-
- If this is non-zero, it uses the Blob Threshold to create a "virtual surface" which provides normals to be used in the shading calculation. Increasing the surface shading gives the blobs sharper edges, (for example, clouds have a large surface shading component). A value of 1 means diffuse surface illumination, a value of 0 means blob illumination.
-
- Because normals are provided, the rendering is slower when the Surf Shading value is non-zero.
Blob Threshold
-
- The density at which you threshold the surface for Surf Shading or BLOBBY SURFACE rendering. The slider range is 0 to 1. The default value is 0.2.
Blob Noise
-
- The strength of noise applied to particles to make individual blobs (particles) look less regular. This helps hide the fact that the underlying system may have a small number of large blobs. The slider range is 0 to 1. The default value is 0.
Noise Freq
-
- Controls how fine-grained the blob noise is (if the Blob Noise value is non-zero). Set the Noise Freq value according to the size of the particles (larger values for larger particles). The slider range is 0 to 1. The default value is 0.1.
Noise aspect
-
- Scales the blob noise along the path of the particle. A low Noise aspect value makes the noise long and stretched out. This is particularly useful when using blob noise to simulate sub-hairs within a hair strand. The slider range is -1 to 1. The default value is 0.
Blur Quality
-
- Generates blobs along the paths of the particles to simulate motion blur. If the Blur Quality value is high, the particles are small, and they travel a long way in one frame, then a lot of blobs will be created for each frame. In this case, rendering will be slow and a lot of memory will be used. The slider range is 0 to 1. The default value is 0.5.
Glow Intensity
-
- The brightness of particle glows (see Glow on page 240). The slider range is 0 to 1. The default value is 0.
Particle Properties
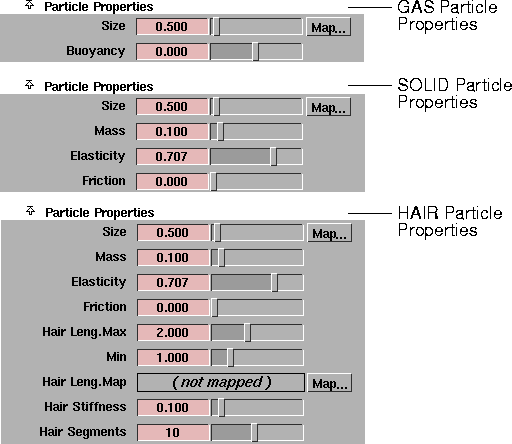
The Particle Properties define the physical properties of particles, which influence particle motion. These parameters vary by particle Motion Type. You can interactively modify the Particle Properties when the animation is stopped (that is, the display in the modeling windows will update automatically).
Size
-
- The (world space) size of a particle. If a texture is mapped to this parameter, the U values of the texture are mapped to Size, and the V values are mapped to the particles' lifetime. For example, map a V RAMP texture to Size to control particle size over particle lifetime, or to vary the thickness of hair along its length. As the Size value increases, so does particle overlap and rendering time. The valid range is 0 to ·. The slider range is 0 to 10. The default value is 0.5.
-
- If Diffusion is ON, mapping a texture to Size will have no effect.
-
- The Size and Mass values determine density and buoyancy for solid particles. A particle that is less dense than the environment medium will rise.
Buoyancy
-
- Controls whether particles rise or fall in the environment medium. This parameter is only available when Motion Type is GAS. The slider range is -1 (particles move downward) to 1 (particles move upward). The default value is 0.
Mass
-
- The mass (in kilograms) of an individual particle. This parameter is only available when Motion Type is SOLID or HAIR. The Mass value determines the acceleration caused by a magnet force (heavier particles are accelerated more than lighter particles). The slider range is 0 to 1. The default value is 0.1.
|
|
See Air Density on page 64.
|
-
- The Size and Mass values determine density and buoyancy for solid particles. A particle that is less dense than the environment medium will rise.
|
|
See Elasticity on page 88.
|
Elasticity
-
- Controls how much speed a particle loses when it collides with and bounces off of another object. This parameter is only available when Motion Type is SOLID or HAIR. The slider range is 0 (all speed is lost) to 1 (no speed is lost). The default value is 0.707.
|
|
See Friction on page 89 and
Wall Friction on page 65.
|
Friction
-
- Controls how much speed a particle loses when it rubs against another object. The Friction parameter is similar to the real-world coefficient of friction (see Wall Friction on page 65). This parameter is only available when Motion Type is SOLID or HAIR. The slider range is 0 (frictionless, no speed is lost) to 1 (all speed is lost). The default value is 0.
|
Tip:
|
Use a negative Friction value to prevent particles from
sticking to surfaces.
|
Hair Leng. Max, Min (Hair Length Maximum, Minimum)
-
- The maximum and minimum length of hairs. Individual hair length is randomized between the Hair Leng. Max and Min values. This parameter is only available if Motion Type is HAIR. The valid range is 0 to ·. The slider range is 0 to 5. The default value is 2 for Hair Leng.Max and 1 for Min.
-
- When Motion Type is HAIR, there are no LifeSpan min or max parameters under Generation parameters. The Hair Leng.Max and Min and Hair Segments values determine the lifespan of particles.
-
- You must be running the animation to interactively modify the Hair Leng.Max and Min values.
Hair Leng.Map (Hair Length Map)
-
- Scales the hair length across the surface. Where the texture is white, the hair will be its normal length (as determined by the Hair Leng.Max and Min values). Where the texture is 50% grey, the hair will be half its normal length. Where the texture is black, there will be no hair. This parameter is only available if Motion Type is HAIR.
-
- The length scaling is done by removing segments at the tips of the hair. The Hair Segments value must be high enough to scale the hair length to the range of lengths represented in the Hair Leng.Map texture.
Hair Stiffness
-
- The stiffness of the hair. As the Hair Stiffness value approaches 1, the hair responds less and less to forces. This parameter is only available if Motion Type is HAIR. The slider range is 0 to 1. The default value is 0.1.
-
- If the emitter moves, the hairs may lag behind or stretch in length. These time lag effects are not affected by the Hair Stiffness value. To eliminate time lag effects, make the Start and End frames (under Particle Emission) for the simulation greater than the Hair Segments value (and increase the Particles/Sec value under Generation).
Hair Segments
-
- The number of line segments along the longest strands of hair (the Hair Leng.Max value).
-
- If the emitter moves, the oldest particles will lag behind where the lag time (in frames) equals the value set in Hair Segments and the Start and End Frame values set under Particle Emission. This lag can create a nice effect (like hair in water), but if it is too large, either reduce the Hair Segments value, or increase the simulation's Start and End Frame values. If you increase the Start and End Frame values, you must also increase the number of Particles/Sec under Generation in order to generate the same number of hairs.
-
- This parameter is only available if Motion Type is HAIR. The valid range is 1 to ·. The slider range is 1 to 20. The default value is 10.
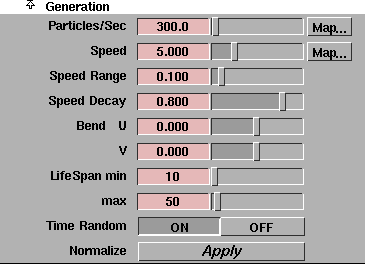
Generation
The Generation parameters determine how many particles are emitted, and when and where on the surface they are emitted. You must be running the animation to interactively modify Generation parameters (that is, the display in the modeling windows will update automatically).
Particles/Sec
-
- The number of particles emitted per second. The valid range is 0 to ·. The slider range is 0 to 10000. The default value is 300.
-
- The rate of particle emission is independent of the frame rate of the animation.
-
- If Time Random is OFF, the Particles/Sec value determines the number of emission points.

-
- When Motion Type is HAIR, the number of emission points is the number of hairs.
-
- Reduce the Particles/Sec value when changing parameters and previewing particles to help visualize particle motion and to speed up the display (especially for hair).
-
- To control the location of particle emission on a surface, map a texture to Particles/Sec. Where the texture is white, the rate of particle emission will be its normal value for that surface area. Where the texture is 50% grey, the rate of particle emission will be half its normal value for that surface area. Where the texture is black, there will be no particle emission. If you map a texture to Particles/Sec, however, the overall rate of particle emission will be lower than Particles/Sec value.
-
- To animate the location of particle emission on a surface, assign a 3D texture to Particles/Sec and animate the 3D texture placement object.
Speed
-
- The average speed of particles when they are emitted. The actual speed of an individual particle is randomized between Speed - Speed Range and Speed + Speed Range. The slider range is 0 to 20. The default value is 5.
-
- To control the speed of particles by the emission location, map a texture to Speed. Where the texture is white, particle speed will be its normal value. Where the texture is 50% grey, particle speed will be half its normal value. Where the texture is black, particle speed will be zero.
-
- If the Speed value is negative, particles will emit from the opposite side of the surface emitter.
Speed Range
-
- Randomizes particle emission speed about the average speed (the Speed value). The actual speed of an individual particle is randomized between Speed - Speed Range and Speed + Speed Range. If the Speed Range value is 0, all particles are emitted at the Speed value. The slider range is 0 to 1. The default value is 0.1.
-
- If the Speed Range value is greater than the Speed value, particles will emit from both sides of the emitter.
Speed Decay
-
- Defines when a particle loses its initial speed. This parameter is only available when Motion Type is GAS. The slider range is 0 (initial speed is lost immediately) to 1 (initial speed is never lost). The default value is 0.8.
U Bend, V Bend
-
- The direction of particle emission (relative to the emitter surface normal) in the U and V directions. These parameters are not available if the emitter is a light. The slider range is -1 (particles emitted tangent to surface in negative U and V directions) to 1 (particles emitted tangent to surface in positive U and V directions). The default value is 0 (particles emitted perpendicular to surface).
Lifespan Min, Lifespan Max
-
- The minimum and maximum lifespan of a particle (in frames). If the Lifespan Min and Lifespan Max values are different, then particle lifetimes are uniformly distributed between them. The valid range is 0 to ·. The slider range is 0 to 1000. The default value is 10 for Lifespan Min and 50 for Lifespan Max.
-
- The Lifespan Min and Lifespan Max parameters are not available when Motion Type is HAIR. The Hair Leng.Max and Min and Hair Segments values determine the lifespan of particles.
Time Random
-
- Randomizes the location of particle emission. If Time Random is OFF, particles are emitted from the same location(s) on the surface in every frame. If Time Random is ON, particles are emitted from different locations in every frame. The Time Random parameter is not available when Motion Type is HAIR. The default setting is ON.
|
Tip:
|
Set Time Random OFF to help visualize particle motion.
|
Normalize
-
- Makes the generation of particles on polysets uniform (based on the current frame) by taking the areas of polygons into consideration.
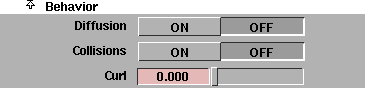
Behavior
The Behavior parameters determine if particles can collide with other objects, and what happens when they do. You must be running the animation to interactively modify the Behavior parameters.
Diffusion
-
- Makes particles automatically grow in size and become more transparent to simulate diffusion (for example, smoke or steam in air). When a particle becomes almost entirely transparent, it will die even if it has not reached the end of its lifespan. The default setting is OFF.
-
- The Diffusion parameter is only available when Motion Type is GAS. When Diffusion is ON, the Diffusion Rate parameter becomes available.
-
- Set Lifespan Min/Max high enough so the particles can diffuse naturally. If a particle has not diffused by the last second of its life, it will diffuse over this last second.
-
- If there are no forces or turbulence acting on the particles, the only diffusion is this forced diffusion at the end of the particle's lifespan. If the air turbulence is rough and strong, particles diffuse rapidly and die young. If the turbulence is smooth, particles live much longer and form long tendrils.
-
- Smoke with greater detail is possible using diffusion because particles only grow in size when they are forced to spread apart due to force effects. For example, if you created cigarette smoke with a turbulent volume light force above the stream of smoke, the particles would not diffuse (and die) until they hit the turbulent force. Another advantage to using diffusion is that it tends to avoid lone blobs: when a clump of particles separate, the particles will grow (becoming more transparent) so that the blobs stay overlapping.
-
- When using diffusion, the start size of a particle is the Size value, and the size across the particle life is determined by the local differential in forces acting on the particle. The texture map on particle Size is ignored when Diffusion is ON.
-
- The transparency of the particle is based on a combination of the Transparency setting (which may still be mapped), and the transparency due to growth in size of the particle. The default Transparency setting (RGB 100,100,100) should generally provide good results; however, if particles seem to pop out slightly at the end of their life, you may want to increase the Transparency setting (and possibly increase the Density value).
-
- The Density value will affect how large the particles can grow. If the density is high, particles can grow to many times the start size before dying.
-
- The Transparency value does not affect particle growth, so that a very low Density value combined with a very low Transparency setting can result in particles that die before they have become fully transparent.
Diffusion Rate

-
- Controls the speed at which particles grow in size when Diffusion is ON. The slider range is 0 to 2. The default value is 1 (good for most situations).
-
- If particles are emitted in tight clusters, overlapping one another, use a low Diffusion Rate value (less than 1). If particles are emitted so that they barely overlap, use a higher Diffusion Rate (more than 1). At a Diffusion Rate of 2, two particles that just touch at the edges are guaranteed to stay in contact until they die, however in a turbulent field it is more likely that the overlap will increase.
-
- Particles will always completely diffuse over the last second of their lifespan, regardless of the Diffusion Rate value. Therefore, it is generally better to give the particles long Lifespan Min/Max values (1000 or more) so that the particles die due to diffusion by forces and turbulence.
|
|
See Collision Walls on
page 64, and Collision Types
in the Animating in Alias
book.
|
Collisions
-
- Makes particles able to collide with collision walls that are ON and any simulation objects that have particle collisions ON. When Collisions is ON, the Hit Method parameter becomes available. The default setting is OFF.
|
|
|
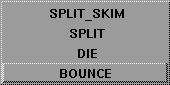
Hit Method

-
- Defines what particles do when they collide with an object. The Hit Method parameter is only available when Collisions is ON. If Hit Method is SPLIT, the Split Vel. Min parameter becomes available.
| BOUNCE
| Particles bounce off the surface, based on the Elasticity value of the particles and of the surface's shader.
|
| DIE
| Particles disappear from the frame after they collide.
|
| SPLIT
| Particles split into several new particles. Each new particle inherits the parent particle's age and lifetime. Particles must be moving fast enough (more than the Split Vel. Min value) in order to split, otherwise they will just bounce.
|
| SPLIT_SKIM
| Similar to SPLIT, but any particles that would have penetrated the surface after splitting bounce off almost tangent to the surface (3 degrees off) instead.
|
Split Vel. Min

-
- The speed a particle must be moving when it collides with an object in order to split. The Split Vel. Min parameter is only available when Hit Method is SPLIT.
Curl
-
- Determines the amount particles twist about their direction of motion. This is especially useful with hair. The slider range is 0 (no curl) to 1 (tight curl). The default value is 0.
|
Tip:
|
To create more curls in hair, increase the Hair Segments
value.
|
Child Particles

The Child Particles parameters determine if, when, and how a particle spontaneously splits into several particles. You must be running the animation to interactively modify the Child Particles parameters.
Split Time
-
- The fraction of a particle's lifetime at which it splits into several particles. Particles can split spontaneously (once per particle) as well as split by collision. The slider range is 0 (particle birth) to 1 (particle death). The default value is 0.
Num Children (Number of Children)
-
- The number of child particles that a splitting particle will generate. The slider range is 0 to 10. The default value is 2.
Branch Angle
-
- The angle (in degrees) that child particles will move relative to the parent particle's original direction (after any collision). A large Branch angle value may result in the child particles penetrating the object that the parent particle collided with. The slider range is 0 to 180. The default value is 45.
Randomization
-
- Randomizes the direction of child particles by rotating the Branch angle around the parent particle's direction. The slider range is 0 to 1. The default value is 0.
Particle Rendering Parameters
The Particle Rendering Parameters in the Render Globals window control whether particles are rendered and the accuracy of the particle simulation. See Particle Rendering Parameters on page 418.
Volume Light Parameters
If the emitter is a volume light, some Volume Parameters will also control the behavior of the particles. See Decay on page 271 and Direction Vectors on page 274.
|


