|
|
Advanced Animation
|
|
|
9
|
Dynamics and Particle Systems
|
|
In This Section:
|
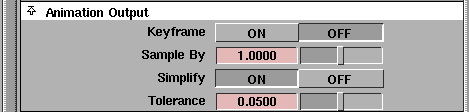
Animation > Run
dynamics
|
Running a Dynamics Simulation
|
|
|
|
|
This feature is available in Alias PowerAnimator and AutoStudio, and is a purchasable PowerAnimator and Advanced Animation for Studio option
Run dynamics animates objects by running a dynamics simulation on them. A dynamic simulation will simulate physical properties of the object and environment, such as gravity, wind and air density.
How to Use
-
1
-
Select the objects on which you would like to run a dynamics simulation.
-
2
-
In the Tool Palette, select Anim > View frame to set the frame at which you would like the dynamics simulation to begin.
-
3
-
Select Animation > Run dynamics -
 to open the Run Dynamics control window.
-
4
-
Turn the Animation Output Keyframe option ON.
-
5
-
Click the Run button at the bottom of the window and watch the dynamics simulation as it progresses.
-
6
-
At the point when you want to end the simulation, click the Pause
button (the Run button is re-labeled Pause
during a simulation run).
-
7
-
Select Animation > Playback to preview the animated objects you just set the keyframes for.
Run Dynamics Options
Select Animation > Run dynamics - to open the Run Dynamics control window.
|
|
For information about
properties of dynamics
objects and particle systems,
see the Dynamics and
Particles section for the
Multi-lister
in
the
Rendering
in Alias Book.
|
Use this window to change simulation options (for example, to define which objects participate in the simulation), set object collision types, create dynamics animations, and save particle files.
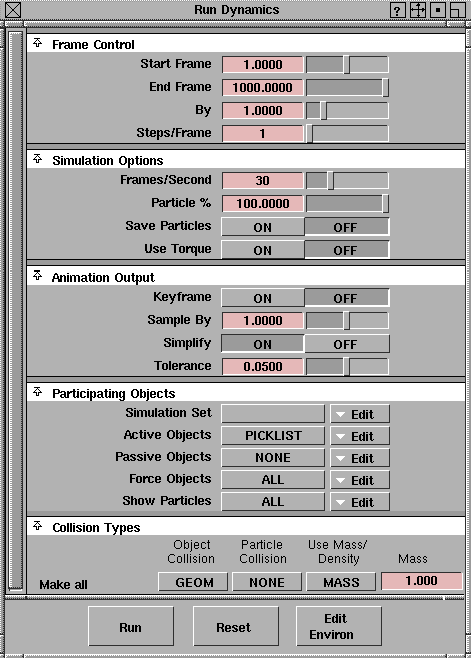
Frame Control
|
|
See Simulation Options,
Frames/Second for
information about the
difference between frames
and world time.
|
Start Frame
-
- Specifies the starting frame number for a simulation. This value is specified in frames, not world time.
End Frame
-
- Specifies the frame at which the dynamics simulation will end. You can pause a simulation at any time by pressing Esc, clicking in the modeling window, or clicking the Run button again.
By
-
- By
should normally be set to 1; however, larger values perform a quicker preview of a simulation (for example, if you have a large model with only a small part of it in the simulation). Larger values may be useful when you are trying to establish a rough feel for the various dynamic parameters.
Steps/Frame
-
- Controls the time resolution at which a simulation is processed. The larger this number is, the more steps that are used to compute each frame. The more Steps/Frame there are, the more accurate the simulation will be, but it will take longer to calculate each frame.
-
- You may want to increase this value in order to achieve more accurate collision detection and response. Typically this value should be set to 1. Increase it only if you are getting collision errors (settings above 10 are unlikely to result in any better collision detection).
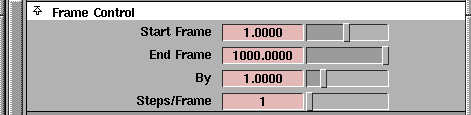
Simulation Options
|
|
Typically for film animation,
this value would be set to 24
frames per second, and for
video animation it would be
set to 30 frames per second.
|
Frames/Second
-
- Establishes the relationship between real world time and the frames being used for an animation. Using this value, all the simulation calculations are performed in real world time (or seconds) and then converted to frames.
-
- The calculation of simulations in real world time allows the simulation to be as physically realistic as possible, without being affected by the animation's frame rate.
Particle %
-
- Lets you control how many particles are emitted during a simulation preview versus the actual number of particles emitted when images are rendered. A lower setting would allow a simulation to be displayed much quicker; however, at the cost of a coarser display. This setting is used for the simulation preview only and does not affect the final rendering of the particles.
Caution! If the particle simulation is run with Save Particles ON, and particles are saved to a file, this setting will reduce the number of particles rendered for those specific particle systems.
|
|
As of Version 9.0, you can
save particles from playback
as well. See Changing and
Optimizing Animation
Playback Options on page 81
|
Save Particles
-
- Specifies whether or not particle systems should be saved to a particle file for rendering. This can reduce rendering time, since the renderer can just use the particle files instead of re-running the particle simulation.
-
- You may also want to save particles if you are trying to develop a specific particle appearance by running a simulation. When the appearance of a particle system is what you want, you can save that particular set of particles to a file.
-
- When Save Particles is turned ON, every time you run a simulation you will be prompted for a name to be used in the location to save the particle output file for each particle-emitting shader or light. When the simulation is run, one particle file will be created per frame for each particle emitter. The path setting for a specific particle system can be viewed and altered in the shader or light that emitted these particles (see Multi-lister > File in the Rendering Book).
>
|
Note:
|
Every time a simulation is run with Save Particles turned
ON, all particle systems participating in the simulation will
overwrite any previously saved particle files.
|
|
|
For more information on
torque, see Notes on Torque
on page 349.
|
Use Torque
-
- When this option is ON, angular velocity is computed by sampling the torque supplied by each force in the system and air drag. The sample set includes the object's center of mass and a small set of representative points near the vicinity of the object.
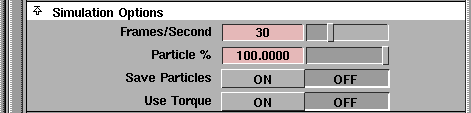
Animation Output
These options let you control the creation of keyframes for each of the participating active objects.
Creating a dynamic simulation is a two-step process.
- Set the proper dynamic parameters for all of the participating objects.
- Once you are satisfied with the appearance of a simulation, the final simulation must be saved as a sequence of keyframes.
Keyframe
-
- Turning Keyframe creation ON instructs the simulation to create keyframes for each of the participating active objects. When a keyframe is generated in such a way, any previous keyframes in the simulation interval that may have been generated for an object are deleted.
Sample By
-
- The Sample By value specifies how often a keyframe should be created by the simulation system. It will also determine how often a keyframe will be set in the objects being animated with the dynamics simulation.
-
- A higher setting results in fewer keyframes being created; however, the resulting animation would be less faithful to the calculated simulation. Ideally this setting and the By setting in the Frame Control section should be the same.
-
- The lower the
Sample By value is, the more accurate the keyframe animation will be. For example, if a ball hits the ground at frame 19 and Sample By is set at 2 keyframes, then the ball will appear to skim the ground without actually hitting it.
-
- If you have a very low Sample By value, collisions will appear more accurate but the resulting animation curves could be very dense with keyframes. (To get around this, turn on the Simplify option to minimize the number of keyframes created in your dynamics simulation animation.)
Simplify
-
- When Simplify is turned on, the resulting animation curves are simplified, meaning an attempt is made to reduce the number of keyframes while preserving the general shape of the curve.
-
- This results in reduced memory requirements, but does affect the accuracy of an animated simulation. The most noticeable effect will be objects that appear to have less accurate collisions.
Tolerance
-
- If Simplify curves is turned ON, the Tolerance value specifies how closely the simplified curve should match the original animation curve. A higher setting results in fewer keyframes; however, the resulting animation could be very different from the original animation curve.
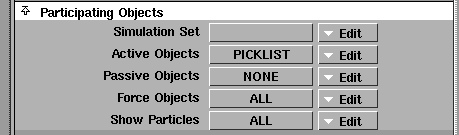
Participating Objects
The Participating Objects
options allow you to specify which objects will participate in a particular simulation.
To facilitate the creation of many different simulations within a scene, participating objects may be collected into sets, which can then be combined together into one simulation.
The following groups of objects can be combined together in a simulation: Active, Passive, Force, and Particle objects. When a set is created for one of these groups, the set will have a special extension added to its name according to which group type it is assembling:
- Passive Objects
= .Passive
- Show Particles
= .Particle
|
|
See Creating Sets on page 412
for more details on sets.
|
Warning! If you change the name of a set, make sure that the extension remains part of the new name; otherwise, the set will not be recognized as a dynamics set.
>
|
Note:
|
Objects which have inadvertently been defined as both
Active and Passive within a specific simulation will act as
Active Objects.
|
Each simulation grouping in the Participating Objects section has two separate menus:
|
|
|
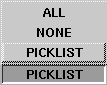
The left-hand menus (Grouping menus)
-
- Let you specify which objects are chosen as part of their respective grouping. In addition to entries for each of the sets that can be picked for each grouping, the menus contain the following:
- ALL
- all objects in the scene will participate for this grouping.
- NONE
- this grouping will have no participating objects.
- PICKLIST
- the objects that are currently picked in the modeler will be used as the participating objects for this grouping.
|
|
|
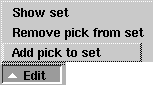
The right-hand menus (Edit menus)
-
- The Edit menus let you perform specific set-related actions on the current set that is picked for a grouping.
-
- This is a convenient feature, since all of the set creation and manipulation operations (Edit > New set
and Windows > Sets > Edit set) can be used as well.
- Show set - shows all the objects that are in the selected set. This is a quick and convenient way of opening the set editor for this particular set.
- Remove pick from set
- removes all objects that are picked in the modeler from the currently selected set for this grouping.
- Add pick to set - adds all objects that are picked in the modeler into the currently selected set for this grouping (or creates a new set if no set is currently selected).
Notes
- If you want to create your own sets using Edit > New set, make sure the Members option is set to Multiple
in the New Set Options
window (Edit > New set -) so that the sets you create are Multiple
sets.
- The participating objects' sets use a specific naming convention that is used to collect specific sets together.
Simulation Set
-
- The Simulation Set menus provide a means of conveniently picking and saving sets for each of the other four groupings (Active Objects, Passive Objects, Force Objects, and Show Particles). The left menu contains a list of possible sets that can be picked. When you pick a particular set, each of the other four groupings are altered to either select that set, if applicable, or select NONE. You will have to define the participating objects within each grouping for a particular simulation.
-
- If you were to first define the selection for each group, you would be able to combine all four settings into a single Simulation Set, which could then be used the next time you wanted to run this simulation.
-
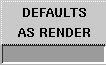
- The menu to the right of the Simulation Set heading contains the following:
|
|
|
- AS RENDER
- sets each one of the groupings to their render settings (Active Objects: NONE, Passive Objects:
ALL, Force Objects: ALL, and Show Particles: ALL).
- DEFAULTS - sets each one of the groupings to their default settings (Active Objects: PICKLIST, Passive Objects: NONE, Force Objects: AS RENDER, and Show Particles: AS RENDER).
-
The Simulation Set
Edit
menu contains the following:
|
|

|
- Create new sets - creates new sets for each of the four groupings according to their current settings.
Active Objects
-
- Active Objects are objects that will have a dynamics simulation (that is, force and collision response) calculated. Active Objects collide with other Active Objects, as well as with any specified Passive Objects. Active Objects are also the objects that have keyframes created for them if the Keyframe creation Animation Output option is turned ON.
-
- Active Objects can be given an initial velocity (both linear and angular) by setting keyframes in time that immediately precede the start of the simulation. Otherwise their initial velocities are zero.
Passive Objects
-
- Passive objects are objects that active objects and particles
can collide with, but do not themselves respond to collisions or forces. Passive objects can be animated (for example, from a previous simulation, or by using any of the other animation tools).
Force Objects
-
- Force Objects specifies which forces should be applied to objects in a simulation (in addition to the Environment forces). Only forces that are selected into a simulation are used within that simulation.
|
|
See the section on the Multi-
lister's Edit Menu in
Rendering in Alias for a more
detailed description of how
to manipulate light links and
exclusive lights.
|
-
- Forces are represented as lights, and can use the linking and other exclusive features of lights as part of their definition. Objects that have forces (lights) linked to them are only affected by those forces (as long as the forces are selected into the simulation). Forces which are defined as being exclusive only (such as lights) affect the objects they are linked to.
>
|
Note:
|
If the forces which are linked to Active Objects are not
selected into the simulation, the Active Object will have no
forces (other than the Environment ones) acting upon it.
|
Show Particles
-
- Show Particles is primarily used to preview a particle system before its final rendering. Particle systems may be generated either by lights or by shaders attached to objects. To select a particle system generated by a shader, select the object(s) that the shader is attached to.
-
- If the
Save Particles option is turned ON in Simulation Options, Particle Rendering Files are produced. This gives you greater control over the rendering of particles than is possible with the renderer (specifically which forces affect the particles, and how particles collide with objects in the scene).
>
|
Note:
|
Since lights cannot be linked to other lights, particle systems
emitted from lights will be affected by selected global lights
only.
|
Collision Types
The Collision Types options define how collision detection is carried out for objects, as well as the physical mass for dynamic simulation purposes. You can set this information for an object by picking it in the modeler, and then changing the desired parameter.
>
|
Note:
|
Since collision detection is performed at the leaf DAG level
(and object mass is calculated from leaf level geometry),
only leaf level nodes below picked items will show up in the
list area.
|
You can set the object-to-object collision detection method, and the particle-to-object collision detection method for each object, as well as define its mass calculation method.
Make All
-
- The Make All buttons can be used to quickly set each parameter for all the objects listed. Click the buttons underneath each of the three headings to display their menus.

-
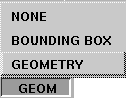
- Object Collision - collision detection for picked objects may be set to any one of the following options in the menu:
|
|
|
- GEOMETRY - only available for surface leaf nodes. Specifies that the actual geometry should be used for detecting and responding to collisions. While this is the most accurate collision detection method, it is also the slowest.
- BOUNDING BOX
- available for all leaf nodes. Specifies that an axis-aligned bounding box should be used for detecting collisions.
- NONE - collision detection is turned off for the picked objects.
-
- Particle Collision - detection of collisions between particles and the picked objects may be set to any one of the following:
- GEOMETRY - only available for surface leaf nodes. Specifies that the actual geometry should be used for detecting and responding to collisions with particles. While this is the most accurate collision detection method, it is also the slowest.
- BOUNDING BOX
- available for all leaf nodes. Specifies that an axis-aligned bounding box should be used for detecting collisions with particles.
- NONE - particle collision detection is turned off for the picked objects.
>
|
Note:
|
Particle collision must be turned on for those lights or
objects emitting particles in order for collision detection
with other objects to be enabled.
|
|
|
|
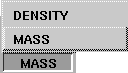
-
- Use Mass / Density - physical mass of a geometry leaf node can be calculated either using the density of an object (which is set in the shader attached to the object) multiplied by its volume, or by the specific number (which is in kilograms) entered in the Mass
field.
- MASS
- uses the actual mass of the object. Enter this value in the Mass
field at the right.
- DENSITY
- calculates the mass of the object based upon its volume, and the density set in the object's shader.
Warning! An object's volume is calculated from an axis-aligned bounding box. The size of this bounding box can vary if the object is rotating, which would also cause the mass to vary.
Run Dynamics Control Window Buttons

Run
-
- Clicking the Run button will start (or continue) a simulation at the Current Frame. Pressing the Esc key, clicking in the modeling window, or clicking Run again while a simulation is running will stop the simulation. The simulation will be performed on dynamics and particle objects as specified in the Participating Objects section of the Run Dynamics control window.
Reset
-
- Clicking the Reset button will reset the initial positions and velocities of all the participating objects, as well as set the Current Frame back to the Start Frame. It will also clear any particles that existed when the last simulation was interrupted.
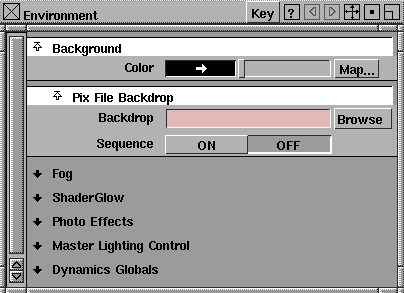
Edit Environ
-
- Edit Environ is a convenient button that opens the Environment control window within the Multi-lister.
|
|
See the section on the Multi-
lister's Edit Menu in
Rendering in Alias for more
information.
|
-
- This is the same as clicking the Environment shader in the Multi-lister and selecting Edit from the Edit button menu.
Notes on Torque
|
|
|
|
|
|
|
Torque is the force applied to
an object to start it spinning.
|
Dynamics (Animation > Run dynamics) produces a great variety of motion. For example, a collision can start an object spinning; the spin on the object helps determine how it acts in a collision; and the dimensions of an object determine how it will spin.
With the added complexities of motion resulting from the computations required to conserve rotational inertia, you may run into situations that require some tweaking. The following tips will help you with this tweaking:
- Dynamics uses tessellated geometry.
-
In dynamics, all collision detection is done on polygonal
objects. When you're animating a NURBS object, (whether
it's a simple primitive or a complex model), it is tessellated
when a collision is detected.
-
As a result of this tessellation, you may end up with
behavior that is mathematically correct for the tessellated
object, but incorrect for the original object. For example an
object may get stuck or settle into a position that is
obviously unstable; it may rotate excessively; or its motion
might simply not match what you would expect.
-
By default, the object is tessellated into quadrangles
(quads) according to the Render Globals (Render > Globals)
or individual Render Stats settings (Windows > Render stats).
The default settings are not appropriate for all geometry.
-
For cubes (objects with flat rectangular faces), a (1,1)
subdivision is recommended so that each entire face is one
polygon. For smoother objects, increasing the minimum
subdivisions will make the tessellation more accurate.
And what if it still doesn't work? You might want to create substitute geometry explicitly. For example, turning the object into triangles instead of the default quads will give you collisions that are more accurate, but slower. Or if you want less accurate but faster collisions, create simple geometry that wraps the object, perform a run dynamic on that object, and then copy the animation back onto the real object.
-
The rotate pivot point becomes the object's centre of mass
when dynamics is running. For "normal" dynamics
behavior, this pivot point should be roughly placed within
the object.
-
When objects are grouped, the pivot defaults to the origin.
If it is left at the origin, collision behavior will be wild (like
a balloon connected to an invisible rod with a weight on
its other end).
-
Even if the pivot is inside the object, behavior will vary
depending on where it is placed. This feature is useful for
representing objects with varying density. For example, if
you take a cone and place the pivot at its tip, the result is a
badminton birdie.
-
Dynamics is an iterative process - there is no exact
mathematical formula that gives the state of an object at a
given time. Instead, the motion of an objects is simulated
from the given start frame and one or more simulation
steps are performed for every frame.
-
During each step, the objects move a (relatively) short
distance, and then their motion is recalculated based on
forces and collisions.
-
Increasing the steps-per-frame increases the number of
iterations and makes the simulation more accurate (and
slower). For example, it could be increased over a small
number of frames to get the simulation past a sticky point.
>
|
Note:
|
Don't increase steps-per-frame any more than is necessary.
Increasing steps-per-frame decreases the collision checking
tolerance, so objects can get closer to each other-sometimes
leading to even more sticking. Increasing the steps-per-
frame to a very large value can also lead to a round off error
and decreased accuracy.
|
- Specify the mass properties of the objects.
-
Real objects have mass. You can specify the mass of an
object directly, or you can specify the density of the object
in the shader (in which case you use the bounding box
volume of the object to calculate the mass).
-
The mass distribution inside the object is mathematically
represented by its inertia tensor, which also happens to
define the object's principal axes. Use the object's local
axes as its principal axes, and use the bounding box in the
space of these local axes for calculating the moments of
inertia.
|
|
Lighter objects usually are
better behaved in Alias
dynamics.
|
-
The more massive an object is, the more momentum and
energy it has. When it collides, as long as the total
momentum is conserved (or ignored, in collisions with
floor, walls and passive objects), the energy may switch
between rotation and motion. The more massive the
object, or the more asymmetrical the object, the bigger the
changes may appear.
- Adjust the material properties of the objects (or the environment).
-
Increasing air density will slow down objects and
eliminate some wild behavior (as long as air density is
greater than 0, increasing the drag coefficient will have the
same effect). It is sometimes useful to let the dynamics run
slowly in thin air and then timewarp the dynamics
afterward to get the speed you want.
|
|
To get a ball to bounce and
then roll, it may be useful to
animate the elasticity once
the ball is rolling along with
very small bounces.
|
-
Elasticity determines how much energy objects will lose
on collision. The elasticity used is the product of the
elasticities of the materials of the pair of colliding objects.
So, a net elasticity of 0 will stop the objects altogether, 1
will keep them moving, and anything greater than 1 will
speed them up on each collision.
- Use forces to direct the motion of the objects.
-
This could be a familiar scenario: a box lands on its edge
and stays stuck there.
-
You could blast the box by creating a force, linking it to the
object, and keyframing its intensity on for just one frame
- just enough to overcome gravity and float the object
free.
-
You can also direct an object's motion using small bursts
of force (or carefully placed force volume lights, or other
types of force lights with a high decay value).
-
The following descriptions explain how to use these
forces:
- Gravity = acceleration
Affects the speed of the object independent of its mass.
- Magnet = a true force
Light objects will be moved a lot more than heavy objects. Remember high school physics: F = ma
(force = mass times acceleration).
- Wind = air speed
The motion of objects will tend to move towards the air speed. How much they move depends on the air density and drag coefficient values.
- Drag = air density
Increase the air density locally to drag objects more. (This will only increase air density, not decrease it.)
- Damp = an absolute damping force
Damping decreases the speed towards 0.
- Change something slightly.
-
If your object has become stuck for seemingly no good
reason, small changes to almost any of the relevant
parameters may stop it from getting into that state. Some
of these changes include: initial position, orientation,
velocity, rotation, and material properties.
- Reduce the number of interacting objects.
-
With collisions, the amount of time to run a simulation
increases proportionally to the square of the number of
objects. Likewise, the opportunities for objects to get stuck
or fall into an undesirable dynamic state increase
proportionally to the square of the number of objects.
-
If your simulation has a large number of objects of varying
masses, do them in "batches." Run the heaviest objects
first, keyframe them, turn them into passive objects, run
the next lightest batch, and so on.
-
If you want an object to just sit there until something hits
it, only make it part of the active simulation the frame
before it gets hit.
-
What if an object gets stuck on its corner and just won't fall
over? You'd really like to pull it out of contact so that it's
free to move again. How can you do this?
-
If you're not keyframing, its easy: pause the simulation,
move the object, run the simulation again, and it
continues.
-
If you are keyframing and you want to tweak the motion,
pause the simulation, viewframe back to the frame where
you want to make the change, move the last keyframes (or
move/rotate the object and reset the keyframe), change
the start frame of the simulation to the current frame,
select Reset
, and then run the simulation from there.
-
If you get funny glitches in the motion (because you
ended up with fixed tangents whenever you stopped and
restarted), turn the automatic simplify off and then
explicitly simplify the safe parts of the simulation using
the action window after you have finished keyframing the
entire simulation.
- Make a static case dynamic.
-
What if you've built an unbalanced stack of objects that
you want to knock over, but it just sits there?
-
There are two ways to deal with this: give the objects some
room to move, or make sure that they already have initial
velocity (or angular velocity) at the start frame.
Things to look out for
- Objects with sharp corners and edges.
- Objects with concavity, which are prone to stick. Such objects are good candidates for the substitute geometry trick described in the first point at the beginning of this section.
- Long skinny or thin flat objects spinning about more than one of their local axes. For objects that start off motionless, but are put in contact with one another, they must collide sufficiently hard to get knocked out of collision in the same timestep.
|


