Using Marking Menus | |||||
|
| |||||
Marking menus are radial menus that you can display near your mouse pointer. They are similar to hotkeys in that they provide a quick way to select frequently used commands. With practice, you can select functions up to ten times faster by using marking menus than by selecting items from a linear menu. How Marking Menus WorkTo display a marking menu:
Tips:
Notes:
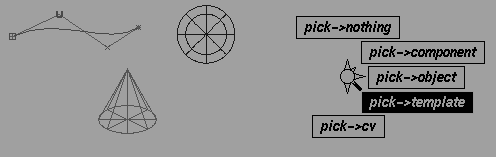
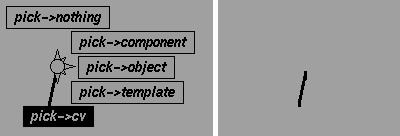
Quick PicksSelecting from a marking menu is much faster than selecting an item from a linear menu. It works exactly the same, except you make a quick flick with the mouse in the direction of the desired menu item. You don't even have to wait to see the marking menu to select an item. The idea behind marking menus is that if you frequently use the commands in the menu, you will quickly memorize their positions. Once you have an item's position memorized, you can select it almost instantaneously with a short flick of a mark. Even if you forget the position of an item, you can quickly check it by displaying the marking menu. For example, in the following, if you select CV the first time you display the marking menu, the next time you use the Shift-Ctrl keys, you just have to drag in the general direction of CV. You'll notice that rather than displaying the menu, an "ink trail" or "mark" is left behind the cursor.
The direction of the mark corresponds to the desired menu item. The "rubber band" line that appears when the menu is displayed represents the type of mark needed to select a particular item. Example of Picking using the Marking Menu | |||||
| |||||
In the above example, Pick > Template is selected. When you let go of the Shift-Ctrl key combination, you can click on the templated object to make it active. Using Option Boxes and Control Windows | |||||
|
| |||||
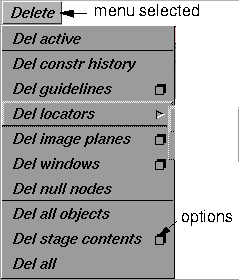
In some cases, a menu item includes a small box ( | |||||
|
|
To access the option box or control window associated with the menu item, drag the cursor to the right to select the A Quicker Way to Open an Option Box or Control WindowIf you started by using the left mouse button, then decide you want to open the option box or control window, you can keep holding the left mouse button, hold the Shift key, then release the mouse button. | ||||
|
|
Also, if an icon contains a small box at the top left, this indicates that there is an associated option box or control window. Double-click one of these icons in either the shelf or the palette to open its associated option box or control window. What's in an Option Box or Control Window?Option boxes and control windows may contain radio buttons, popup menus, toggles, sliders, fields, and buttons that give you the flexibility to work in a variety of ways.
Title Bar
Popup menus
Entering ValuesIn some cases, an option box or control window may also include one or more slider bars that you use to adjust parameter values. The current parameter value is always displayed in a value field at one end of the slider scale. Click to place the text cursor within a string. You can also double-click to select the number and type in a new value, or click and drag to select part of the string to replace. Press Esc to clear the active edit field. In a window where there are multiple fields, you can cut a value from one slider and paste it to another. The Alias implementation of Cut and Paste is through the X Windows, and as such, allows the user to cut and paste between Alias and the desktop or any application which supports Cut & Paste through X Windows. For example you can select a value (by double-clicking) from the xcalc application and paste it into a numeric field in Alias. Using Special KeysYou can also use the following special keys when typing in Alias text entry fields:
Dragging Slider Bars | ||||

| |||||
Toggles | |||||
|
|
The toggles in option boxes and control windows are used to toggle specific functions on or off. See the information on the specific functions to find out what their toggles do. Standard Option Box ButtonsOption boxes always contain at least two of four standard operations: Save, Exit, Reset, and Go. These buttons are located at the bottom of the option box.
Save
Exit
Reset
Go
How to Use Control WindowsA control window differs from an option box because it remains on the screen, so you can change option settings after the operation is performed. | ||||
|
See NURBS Modeling for a description of all the Swept options and parameters. |
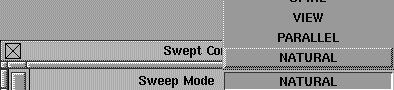
For example, when using Surfaces > Swept surfaces > Swept, the resulting surface depends on the options that were set to create the surface. The Swept Control window interaction provides you with a tool to quickly see how the various option settings affect the resulting surface without having to re-select anything. Control Window ButtonsAt the bottom of some Control windows is a Recalc button and a Next button. The Recalc button recalculates the surface you are building with a surface construction tool based on the parameters set in the Control window. The Next button disassociates the Control window from the surface just built. This lets you set the parameters for the next surface you build. Menus in Control WindowsClick and hold the mouse to the right of the parameter heading to access menus in Control windows.
From these menus, you can choose a variety of options. Depending on the option chosen, the control window may expand to display additional parameters, or may compress to just show the parameters available to the selected option. Using Modeling Windows | ||||
|
| |||||
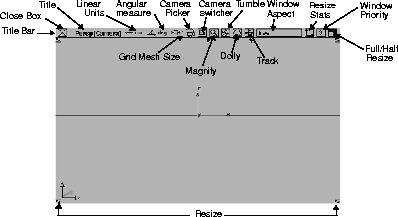
The Main Alias WindowAlthough you can view all four windows at once, you can only work in one at a time. However, all windows are updated interactively while you work so all windows are current at any given time. To select a window (or make it active), move the cursor anywhere within the window and click any mouse button. A white outline appears around the window to indicate that it is the current window. This diagram shows the standard perspective window. | |||||
| |||||
When you are creating a scene, it is helpful to have the four standard application windows open to judge the relative position of items.
Moving WindowsTo move a modeling window, place the cursor anywhere in the title bar at the top of the window, being careful not to select any of the icons, then drag the window to its new location. Resizing WindowsTo change the size of a modeling window, move the cursor to one of the size boxes located in the four corners of any modeling window. Drag the size box, and a red outline showing the new window size follows your mouse movement. When the mouse button is released, the window is resized to the new dimensions. Enlarging WindowsYou may want to enlarge one window to examine its view in greater detail. To enlarge any modeling window to full screen size, click directly on the Full/Half Resize icon in the upper right corner of the title bar. To return the window to its previous size and location, click the enlarge box again. Closing WindowsYou may want to close some windows to shorten the time required to manipulate complex scenes. To remove a modeling window from the screen, click the Close box in the upper left corner of the title bar. Hiding Windows QuicklyAs you work, you may open so many windows that your model becomes obscured. Closing each window individually, then finding the menus to reopen each of the windows, can be tedious. To close all windows except the orthographic and perspective views, the SBD, and some statistic windows, hold the Ctrl key and press the spacebar. To reopen them later, hold the Ctrl key and press the spacebar again. Customizing Alias Modeling WindowsThe appearance of borders is set in the interface:
See also Palette/Shelves Layout Options on page 505 for more details. Modeling Window Control IconsYou can move, resize, enlarge, and close any modeling window using window control icons. The icons on the title bar of any window let you perform certain operations without having to select an item from the menu bar. For example, you can manipulate the camera by tracking and dollying in or out without having to select the Cameras > World Move camera > Track or Dolly functions from the Cameras Tool Palette section. | |||||
|
|
Camera Picker
| ||||
|
|
Camera Switcher
| ||||
|
|
Magnify
| ||||
|
|
Tumble
| ||||
|
|
Dolly
| ||||
|
|
Track
| ||||
|
|
Linear Units
| ||||
|
|
Angular units
| ||||
|
|
Grid Mesh Size
| ||||
|
|
Window Aspect
| ||||
|
|
Resize
Using the Perspective Window Camera SwitcherAn alternative to using Cameras > Previous is to use the camera switcher icon in the title bar of the perspective window. | ||||

| |||||
When you click on the icon, a pull-down menu appears containing a list of all the perspective cameras that are available. The camera that the window is currently using is highlighted. If you select another camera from the list, the window's view changes so that it is now using the view of the selected camera. The perspective window title bar shows the name of the camera the perspective window is currently using: Persp[Camera]. When the camera is switched, the title bar updates to display the name of the new camera being used. >
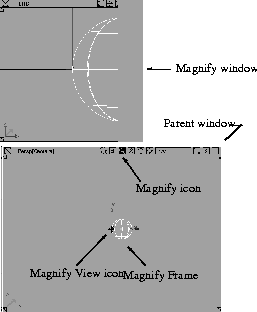
Using the Magnify IconThe Magnify icon provides a magnified view of an area within a window. This helps you do detailed work on an object while retaining the current window as is. When you click the Magnify icon, the MagnifyView icon appears at the center of the current window surrounded by the MagnifyFrame, and a MagnifyWindow is displayed. Position the MagnifyView icon within the parent window to a region that you want to magnify and the view changes in the Magnify window. The MagnifyFrame represents the subregion of the parent window displayed in the Magnify window.
Notes:
Using the Tumble, Dolly and Track IconsSelect the appropriate icon and hold the mouse button down to retain the button's active status. As long as the icon remains active, any movement of the mouse manipulates the view according to the icon selected. Each mouse button provides specific movement control: Left
Middle
Right
Using the Window Aspect icon | |||||
|
|
The window aspect icon contains text that indicates the current image resolution to which the window is locked. By default, the window aspect icon is free , which means that the window can be resized freely in both horizontal and vertical directions. If the window aspect icon indicates a specific resolution, for example, 645 X 486, the window can be resized to any multiple of this resolution, such as 323 X 243. To change the current image resolution ratio, click the window aspect icon to display a menu. free
free:(default)
fixed(current)
(render res):m x n
Using the Resize Stats Icon | ||||
|
|
When you click the Resize Stats icon, the Window Info stats window is displayed.
This window shows the current window resolution and position in pixels. Both the position and size of the window can be changed by clicking on the appropriate parameter fields and typing new parameter values.
Positioning
Resolution
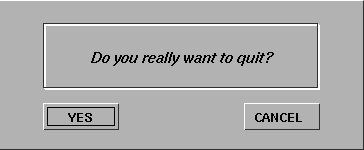
Confirmation BoxesVarious operations require you to confirm that you really want to do the operation before proceeding. Confirmation boxes contain selections such as YES, NO, CANCEL, or OK, and you must select one before you can do anything else. For example, if you select File > Exit, this confirmation box is displayed:
You can respond in one of three ways:
Using Alias with Digitizing Tablets | ||||
|
| |||||
You can draw curves, point by point, in two dimensions from paper-based diagrams, photographs, or sketches placed on the surface of a digitizing tablet. The result is polyline or spline curves lying on a plane. Interactive support for digitizing tablets uses two distinct modes of operation-Screen Mode and Digitizing Mode . Screen Mode is used when you are interacting with menus, windows, and so on, but switches temporarily to Digitizing Mode when you trace data from the tablet. Each mode maps a specific region on the tablet to screen or world coordinates. Using Screen ModeScreen Mode mimics the behavior of the mouse. If you use a tablet for drawing (without a paper original), geometry input can be done in Screen Mode without entering Digitizing Mode.
To switch from mouse to digitizer input, select Preferences > Interface > Interface options- Tips
Using Digitizing ModeWhen in digitizing mode, you look at the tablet, not the screen, and can use the entire drawing surface of the tablet without inadvertently selecting menu buttons or window controls. When you enter digitizing mode, the cursor is turned off and all tablet input is used for point drawing until you press the Enter key on the keyboard, which causes the system to revert to regular Screen Mode. If you have not set up a mapping from tablet coordinates to world coordinates, then the full range of the tablet maps into the initial size of the selected orthographic modeling window. Points and curves in Digitizing Mode are drawn in the current window. If the current window is a perspective view, the following error message is displayed: Cannot digitize in Perspective window To exit the digitize function and switch back to mouse input, press F1 while in digitizing mode. See also
Quick Tips | |||||
|
| |||||
GeneralCtrl-<SPACEBAR> will temporarily close all control windows for items in the Multi-lister, as well as the Multi-lister itself. Press Ctrl-<SPACEBAR> again to toggle the control windows open. | |||||
|
For more information, see Windows > Multi-lister in Rendering in Alias. |
For the multi-listerTo open the control window for an item in the multi-lister: Double-click on the item in the Multi-lister to open the control window for that item (this is the same as invoking Edit > Edit in the Multi-lister ). To open the color control window: To open the color control window of an item in the Multi-lister, hold the Alt key and click on the item in the Multi-lister . The color control window is opened and you can edit the color of your item.
To select items in the multi-lister When you have opened the control window of an item in the Multi-lister, you can open the control window of the next (or previous) item in the Multi-lister by clicking the left (or right) arrow button in the title bar of the control window. This de-selects the current item in the Multi-lister and selects the next (or previous) item. | ||||

| |||||
Selecting multiple items in the Multi-listerYou can select multiple items in the Multi-lister by holding the Shift key and selecting other items besides the currently selected one. The primary selected item in the lister has a white border around its name, while the secondary selected item(s) have a gray border around their name. The primary selected item is currently editable in the editor. Multiple selection in the Multi-lister is useful for performing operations such as Delete, Copy, or Save as on multiple items at the same time. Selecting and deselecting item parametersTo select and deselect the parameters of Multi-lister items, Shift-click on the parameter names in the associated editor. For example, select a primary shader in the lister, then use the Shift key to select secondary shaders in the lister. In the shader editor, select the color parameter by holding down the Shift key and clicking on Color. In the Multi-lister, select Edit > Copy parameters. The color of the primary selected shader is copied to the color of all the secondary selected shaders in the multi-lister. Note that Edit > Copy parameters will also copy any animation that is on the selected parameters. Keeping the texture menu openNormally, when you select a texture map for a shader or another texture in the texture editor, the newly created texture map becomes selected in the lister and the texture menu closes. If you hold down the Shift key before selecting the texture, the texture menu stays open, and the current shader or texture onto which you are placing the texture map remains selected. This enables you to choose another texture map if you're not satisfied with your first choice. Defining the size of a specular highlightIf you have a Lambert shader, you can click on the shader ball and drag your mouse to define a specular highlight. This automatically changes your shader to a Blinn shader. If you have a Blinn or Phong shader, you can click and drag on the specular highlight to define its size. Playing back an animationIf an item in the Multi-lister is animated, it has a slanted box in the bottom left corner of the item. If you click on this parallelogram with the left mouse button, the animation is played on the shader, texture, environment, or light item. To play back the animation in reverse, click down on the parallelogram with the middle or right mouse button. >
For the File BrowserChanging the path or filenameWhen you invoke File > Save or File > Open, or any other operation that opens the file lister, a default path and/or filename is often displayed. If you want to change the path or filename, click in the prompt area and press the Esc key. This clears the field of whatever name was there before, and you can type a completely new name without using the backspace to clear the old name. The File Browser now supports expansion of environment variables. The variable will be expanded if you type "/ " or press Enter. The File Browser also supports a form of File completion in its prompt line. If you have a partial path typed in and you can't quite remember the spelling, you can press the Tab key and the system will expand the string to the first match it finds in the directory. Press the Tab key again to cue the system to select the next match. For Fast RenderChanging from a positional to a velocity control | |||||
|
For more information on Render > Fast render, see Rendering in Alias. |
In the fast render window, if you hold the Shift key before using any of the viewing icons, control is changed from a positional to a velocity control. For Improving Drawing SpeedIf you have a very large scene, Alias may seem slow to respond. Large scenes take longer to redraw, and the more things there are to draw, the slower each interaction will be. Here are some tips for reducing the amount of time it takes to redraw the Alias window.
| ||||
| Copyright © 1998, Alias|Wavefront, a division of Silicon Graphics Limited. All rights reserved. | Please send questions or comments regarding the documentation to: [email protected] |
 )on the right, as shown in the diagram on the side. This box indicates that additional options are available for this particular function, and that an option box or control window will be displayed if you select the box.