|
|
Preferences >
Interface > Marking
menus
|
Editing Marking Menus
|
|
|
|
|
Lets you edit a marking menu shelf.
How to Use
To display a marking menu:
-
1
-
Press and hold the Shift and Ctrl keys simultaneously.
-
2
-
Click and hold a mouse button anywhere in a window.
-
3
-
To select a command, drag the mouse in the direction of the command. As you drag, a rubber band line is drawn from the center of the menu to the cursor.
|
Tip:
|
When setting up marking menus, use Ctrl-double click on
icons to shorten (or abbreviate) the name of the function.
This allows for narrower marking menus.
|
Customizing Marking Menus
You can customize marking menus to use your own personal set of commands. To do this, you have to edit the Marking Menu shelf. Select Preferences > Interface > Marking menus to view the default Marking Menu shelf.
|
|
|
|
The Marking Menus shelf works much the same as the regular shelf; however, you are specifying that the items in a Marking Menu shelf folder will be used as the items for a marking menu.
- To change the items used in a marking menu, simply modify the contents of one of the folders by dragging and dropping the appropriate tools.
- To delete an individual tool, click and drag the tool with the middle mouse button into the trash can.
- To delete a folder, click on the folder tab with the middle mouse button and drag it into the trash can.
Assigning Mouse Buttons
|
|
|
|
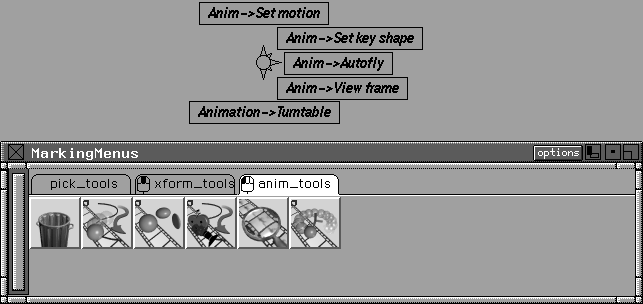
Folders can be assigned to mouse buttons. In the example above, the pick tools
folder is assigned to the right mouse button, and the xform tools
folder is assigned to the middle mouse button. The mouse icon in the corner of the folder tab indicates which mouse button the items are assigned to, and the mouse button is highlighted on the icon.
>
|
Note:
|
You can have any number of folders, but just three can be
assigned to mouse buttons at any one time.
|
You can also change the folder assigned to a button. For example, suppose you want to use a group of animation tools with the left mouse button. You can do this without having to modify the pick tools folder.
-
1
-
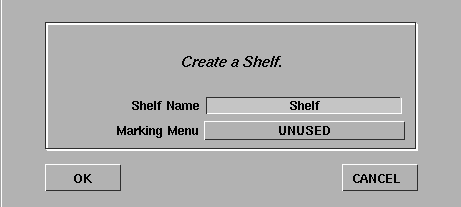
Create a new folder by selecting New shelf from the options menu. The following window is displayed:
-
2
-
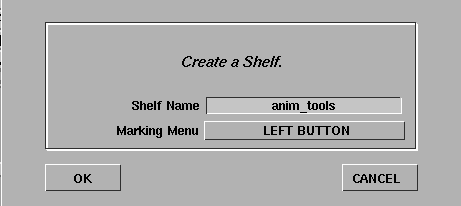
Name the shelf anim_tools
, select LEFT BUTTON from the Marking Menu
popup menu, then click OK.
-
A new folder called anim_tools
is created and the mouse
icon shows it is assigned to the left mouse button (also
note that the pick tools
folder is no longer assigned to the
left mouse button).
-
3
-
Fill the anim_tools
folder by dragging and dropping some tools.
-
Now when you Shift-Ctrl with the left mouse button,
these new marking menu items are displayed.
|
|
|
You can change the mouse assignment back to the pick tools folder by double-clicking the pick
tools tab to display the dialog box and changing the Marking
Menu option from UNUSED to LEFT BUTTON.
A single folder of commands can be associated with all three mouse buttons. For example, to display the pick tools
menu when any one of the mouse buttons are pressed, double-click the pick tools
tab, select ALL BUTTONS from the Marking Menu menu and click OK. Notice that the button assignment for other folders have disappeared.
The name of an existing folder can also be changed by double-clicking its tab and changing the name in the dialog box.
Overflow Behavior
If you have more than eight items in a particular folder, the extra tools are listed below the marking menu.
|
|
|
|
|
Tip:
|
See Using Marking Menus on page 34 for basic marking
menu uses.
|
Notes:
- The marking menu settings are automatically saved in the $HOME/.Alias/Prefs.2/shelves.scm
file when you exit Alias.
- It is possible for a non-standard definition of X-window mouse operations to disable marking menus. The Shift-Ctrl-mouse click, which initiates the marking menus, is an X-windows feature used by Alias. This feature is defined as a button operation, in the
.4Dwmrc
file, located in a user's $HOME directory.
-
Alias loads a version of this file as one uses the Alias
setupacct script to create or update a user account. If
this file is not used, it is possible for the Shift-Ctrl-mouse
click to be defined as some other X-windows operation. To
correct this situation, the user, not root, should copy the
default .4Dwmrc file from /usr/aw/alias/etc/acct/
skel to $HOME.
|


