|
|
DisplayTgls > Object
Toggles > Camera
|
Changing the Display of Cameras
|
|
|
|
|
Toggles display of the camera and all or part of the camera frustum.
Camera changes the display of the perspective camera in all orthographic windows or the active orthographic window.
How to Use
Select DisplayTgls > Object Toggles > Camera- to display the Toggle Camera Options window. to display the Toggle Camera Options window.
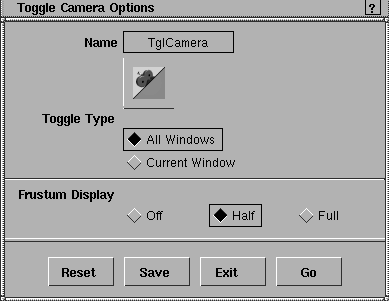
All Windows
-
- Click to toggle the display of the perspective cameras in the orthographic windows on and off.
-
- Toggling the camera on displays every component of the camera: icons, vectors, and optionally a complete frustum, including the far clipping plane.
-
- If you can't see the cameras, click in the window you want the camera displayed in, dolly out using the dolly icon on the title bar, click and drag until the camera is visible.
-
- The icons are displayed in the active color only if the component of the camera they represent is active. For example, the forward vector is displayed in the active color if either the eye or viewpoint is active.
>
|
Note:
|
If you change the view in the perspective window, the
cameras move in all other windows simultaneously.
|
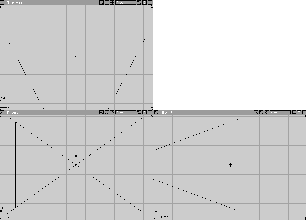
-
The following shows what the cameras look like in the
orthographic windows when the Toggle Type is All Windows
and the Frustum Display is set to Full.
|
|
|
Current Window
-
- To toggle the cameras in only one window, click in the desired window to make it active, then select Camera- to display the option box and set Toggle Type to Current Window.
Off
-
- The camera frustum is not displayed.
Half
-
- The frustum is displayed without the far clipping plane or the edges that join the far clipping plane to the rest of the frustum.
Full
-
- The far clipping plane is displayed (see the previous diagram).
The camera frustum is a truncated pyramid that encloses the visible volume of space. Any object or part of an object within the frustum is potentially visible (a surface may be hidden by another surface). The truncated pyramid is defined by three rectangles.
The following is an illustration of the camera frustum.
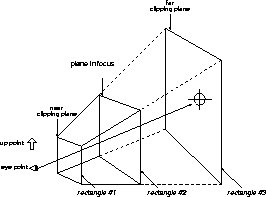 The first rectangle (closest to the eye point) represents the near clipping plane. The first rectangle (closest to the eye point) represents the near clipping plane.
|
|
Changing the Film Back
Properties or Lens
Properties
in the Camera
Editor (Windows > Edit >
Cameras) lets you further
modify the viewing
frustrum. For more
information about the
Camera Editor, see the
Rendering in Alias manual.
|
- The second rectangle represents the plane in focus in the viewing frustum. This rectangle appears at the focal distance from the eye point. It always appears between the near and far clipping planes.
- The third rectangle represents the camera's far clipping plane. You have to dolly out in an orthographic window to see where this plane is. (For information on setting the position of clipping planes, see Adjusting the Clipping Planes on page 500).
|
|
To set the camera to its
default view, select Cameras
> Reset view.
|
- The shape of the rectangles is the same as that of the camera's film back.
- The position of the rectangles in relation to the viewing direction reflects the film back offset of the camera.
- The angle of the frustum (pyramid) is the angle of view of the camera.
- The icon will always represent the current camera settings.
|


