|
To overlay a grid and an outline of a television screen or a customized overlay onto the perspective view. This ensures that any action that takes place, or objects you create, will appear when you display the model on a television screen.
How to Use
-
1
-
Select Layouts > Perspective.To see the cut-in on the screen, a perspective window must be open.
-
2
-
Select DisplayTgls > Window Toggles > Cut-in-
 . The Toggle Cut-In Options window appears. . The Toggle Cut-In Options window appears.
Toggle Cut-In Options
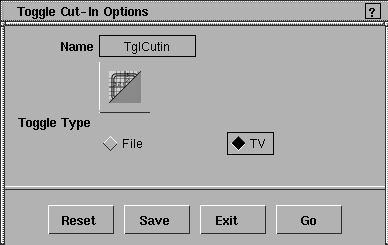
File Toggle Type
Cut-in information is read from a file called cutin.dat
in the user_name/user_data/demo/misc_data directory that you have created.
This file contains drawing commands that are used by the system to draw a customized overlay.
To toggle a television reference grid on or off in the perspective window. A reference grid appears or disappears in the perspective windows.
This grid can be used for both NTSC and PAL formats, since they have the same aspect ratio. The innermost rectangle is the safe area for television monitors. The default is TV.
>
|
Note:
|
The following message is displayed when there is no
cutin.dat file.
|
-
No cutin.dat file in misc_data directory.
Showing default TV cut-in instead.
TV Commands for the cutin.dat File
The cutin.dat file contains a list of commands that specify what the overlay will look like in the perspective window. The list of commands that follow can be entered, one per line, in the cutin.dat file.
>
|
Note:
|
f1, f2, f3, and f4 represent floating point numbers and i1 and
i2 represent integers.
|
window f1 f2 f3 f4 f5 f6
-
- (f3, f4) and (f5, f6) define the lower left and upper right corner of an area to draw in within the perspective window. The default is (0.0, 0.0) and (1.0, 1.0), which specifies that the whole perspective window should be used. The window boundaries should be specified within the range 0.0 to 1.0.
-
- (f1, f2) defines the aspect ratio of the window, where f1:f2 is the proportion of the X:Y, or horizontal versus vertical ratio of the window. If the aspect ratio defined by this command is not the same as the aspect ratio of the perspective window, then the subsequent drawing commands may not cover the entire window. The default aspect ratio is (4, 3). The aspect ratio numbers must be positive.
-
- For example, if the command window 4.0 3.0 0.0 0.0 0.5 0.5 is followed by the command line 0.0 0.0 1.0 1.0, a line is drawn from the bottom left corner to the middle of the perspective window.
line f1 f2 f3 f4
-
- A line is drawn from the point (f1, f2) to the point (f3, f4), relative to the last window command. The values f1, f2, f3, and f4 must be between 0.0 and 1.0.
moveto f1 f2
-
- The drawing position will be moved to (f1,f2), a point in the perspective window relative to the last window command. The values of f1 and f2 must be between 0.0 and 1.0. If this command is followed by a lineto command, the starting position of the line will be (f1,f2).
lineto f1 f2
-
- A line is drawn from the current drawing position to (f1,f2), a point in the perspective window relative to the last window command. The values f1 and f2 must be between 0.0 and 1.0. The current drawing position can be set using the moveto, lineto, or line command.
box f1 f2 f3 f4
-
- A box is drawn, defined by the lower left corner (f1, f2) and the upper right corner (f3, f4) points, relative to the last window command. The values f1, f2, f3, and f4 must be between 0.0 and 1.0.
text f1 f2 string
-
- The text string is printed starting at the point (f1, f2), relative to the last window command. The values f1 and f2 must be between 0.0 and 1.0. For example, the command text 0.2 0.5 TV screen prints the words TV screen in the perspective window.
arc f1 f2 f3 arctype i1 i2
-
- An arc is drawn, whose center is at (f1, f2), relative to the last window command, and radius is f3. The arc is swept from i1 to i2 tenths of degrees in a counter-clockwise direction, where 0 degrees is in the positive horizontal direction. The value specifies the arc command that the radius should be measured according to the X-axis units, the Y-axis units, or an average of the two.
-
- The value can be XAXIS, YAXIS, or AVERAGE. This must be specified since the window is usually not square, thus a unit in the X (horizontal) direction is not the same size as a unit in the Y (vertical) direction. For example, arc 0.5 0.5 .25 AVERAGE 0 1800 draws a semicircle in the middle of the window, where the half circle is above the horizontal axis.
gridstep i1 i2
-
- A grid is drawn so that the current window has i1 vertical grid lines across, and i2 grid lines down. The grid lines are evenly spaced, and they are drawn in the window defined by the last window command. i1 and i2 can be any value larger than 0. For example, gridstep 10 10.
gridsize f1 f2
-
- A grid is drawn in the current window with the grid lines spaced by f1 units in the horizontal direction and f2 units in the vertical direction, relative to the last window command. The values f1 and f2 must be between 0.0 and 1.0.
color shade
-
- The color command specifies what shade of grey all subsequent lines are to be drawn in. The choices are: color DARK or color LIGHT (the default is DARK).
#
-
- This is the comment symbol. You may want to add comment lines explaining what you are drawing. A comment line is completely ignored when reading the cutin.dat file.
-
- To make a comment line, type a #, and everything that follows the # is ignored by the system. The # can be at the beginning of a line, or it can follow any command except the text command. For example:
-
# this is a one-line comment.
-
line 0.0 0.0 .5 .5 # this is also a
comment.
-
- If your cutin.dat file contains any errors after it has been created, the system reports the errors when you try to use
Cut-in with the FILE option selected. The errlog file reports the line numbers in the cutin.dat file where errors are found. These lines are then ignored.
Example
The following is an example of a cutin.dat file that produces this image on screen:
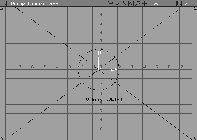
Create the file called cutin.dat with your favorite text editor, such as jot, vi, EMACS, or whatever text editor you have on your system. This file should be placed in the misc_data directory of your current project. Type the following lines of text in the cutin.dat file.
# create grid

color LIGHT

gridstep 15 16

#

# create boxes and lines in darker grey

color DARK

#

# create window box

window 4.0 3.0 0.0 0.0 1.0 1.0

#

# create line from lower left to upper right corner

line 0.0 0.0 1.0 1.0

#

# create line from upper left to lower right corner

line 0.0 1.0 1.0 0.0

#

# create smaller box

box 0.25 0.25 0.75 0.75

#

#write text

text 0.42 0.28 TV Grid WBLT-4

#

# create circle by using two arcs

moveto 0.5 0.5

arc 0.5 0.5 0.125 AVERAGE 0 1800

arc 0.5 0.5 0.125 AVERAGE 1800 3600
|


