Design By Renee
FirstSteps2Alottafun Lesson Nine
Please Note***These pages will be
graphic intense, they will take a while to fully download. Use your refresh button to
reload the page to check for updates on this page. ...Renee
Lesson Nine is a Bounce Single Object Script. Which means that we will have a background with a single bouncing image that moves over the background. We are going to be making and using a Mask in this lesson so that you will have an idea of how to use masks in psp. We will be making a cutout design from the mask for the background. We will also be making a bouncing transparent image. Transparent images are very popular in stationery so in this lesson and lesson ten you will be getting more experience with making them! Now don't get discouraged, practice makes perfect!!
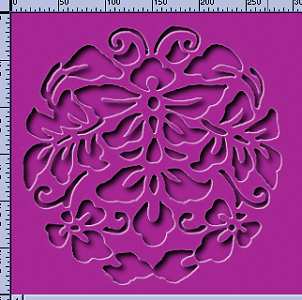
Please Right click on this graphic, click Save
Picture As/name it
in window/make sure it is listed as a jpg and save to our c:/firststeps folder.

I collect Masks and somewhere sometime ago I saved this mask. I am unaware
who the artist is.
I named it Butterfly-Ornamental
Please Right click on this graphic, click Save
Picture As/name it
in window/make sure it is listed as a .bmp and save to the Textures folder
in PSP
C:/Program files/Paintshop Pro/Textures
Note*** You Must Save This As A .bmp
Or It Will Not Work!!!

FINEGRAIN-BKG.bmp
I am also putting a HeavyGrain.bmp
here for you to try also:
Note*** You Must Save This As A .bmp
Or It Will Not Work!!!

HeavyGrain.bmp
Depending on how your computer saves images, you may have better effects
with the HeavyGrain.bmp
Please open psp and click File/Browse
and open butterfly-ornamental.jpg in psp. We are going to make a
mask from the image. Don't faint, it's not that hard!
You will need to choose two coordinated colors for this lesson.
I am going to be using #FF7FE8 and #A31D8F
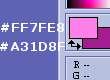
***Please Note, if you can only get greyscale
colors, click Colors/Increase Color Depth/16 Million
Ok, with that done, click Windows/Duplicate and close the original image.
Now on the top tool bar click Masks/New/From Image
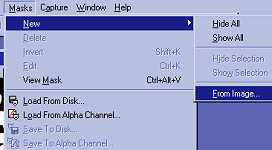
And use these settings:
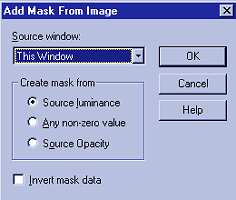
Click ok. It will look odd, as all the black is removed.

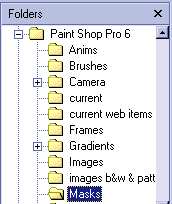
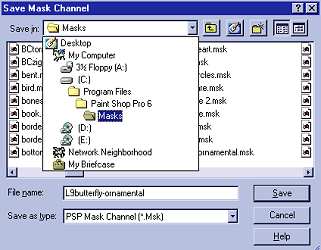
Now on the top tool bar, click Masks/Save To Disk and save to your
Masks folder in psp. There should be a Mask folder there already.
Give it a name and click save, then close the image. We won't need it now
as the one we need is now saved as a .msk in the Masks folder. If
your prompted to save changes to image click no.
Now click your New Image icon and use these settings:
1024w x 300h WHITE
And flood fill the darker background color into the window. Since we are
going to be making a cutout, they work best on either a solid bkg or a
fine grain looking bkg. We will give our bkg a fine grain look.
Choose your flood fill tool, and in the tool options window, locate the FINEGRAIN-BKG.bmp
or whatever you named it: and flood fill over the white new image.. you
may need to flood fill twice to get a rich color:

Now the mask! Click your New Image icon again and use these settings:
300w x 300h WHITE
Then click your flood fill tool and flood fill your lighter color into the
window. Use the same FINEGRAINBKG.bmp and flood fill the same as you
did on the 1024x300 window.
Now on your top tool bar click Masks/Load From Disk and this
should open the psp mask folder, locate the butterfly-ornamental mask and
click open.
This is what you should see:

Now right click on it, and click copy:
Go to the darker bkg window, and right click on it, and click
Paste As New
Selection:
Watching the ruler on the top and sides, guide the butterfly to where it
is at the 150 x 150 coordinates (watch the little
lines so they are on the 150 marks, both height and width. I have
them highlighted light green.) and click to position and paste the
image. You will then see the "marching ants".
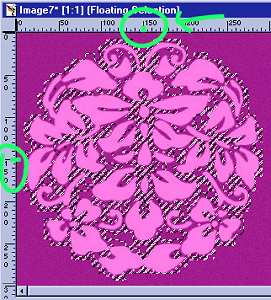
I know, it looks weird, but we are not done yet!
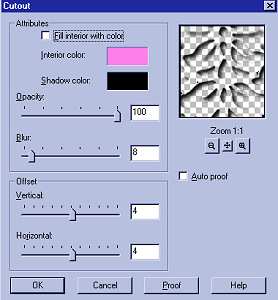
Now on the top tool bar, click Image/Effects/CUTOUT and use these
settings:
Fill interior with NOT checked:
Interior color does not matter, we won't be using it.
Shadow color Black:
Now click Image/Effects/DROP SHADOW And use these settings:
Color White:
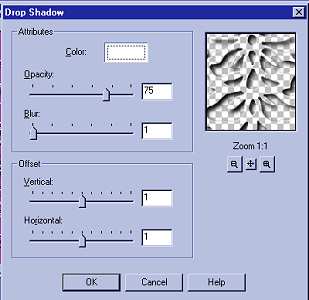
Please be sure you did the steps in correct order, CUTOUT first, then DROP
SHADOW and changed your settings for each step.
Click Selections/None and click Layers/Merge All: and this is what
you should see:
Now is the time to add your "sig tag" and save to your
stationery folder.
c:/Program Files/Common files/Microsoft Shared/Stationery/yourbkg.jpg
Now to make out bouncing image!
Click on our light colored butterfly mask and click Windows/Duplicate :
And close your mask image. If prompted to save, say no.
The bouncing gif's need to be under a 75x75 size so they bounce without
jerking, too big of an image makes the bounce slower and creates pixel
breaks. (Slight jerking movements)
Now, click Image/Resize and use 75x75 in the height and width
Click Image/Sharpen/Sharpen one time.
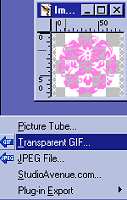
Click File/Export/Transparent Gif
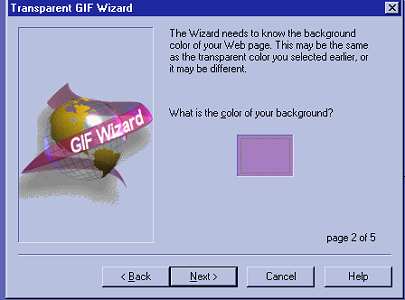
And click Wizard in the bottom left corner:
Screen captures are from Lesson two, the steps are the same:

In the Transparent gif saver window, click on the Use Wizard at the bottom left
hand corner.

Put a dot in front of "use existing transparent areas"
***Note our second color choice is in preview window***
Then click next....

It is asking what color is your background because it will fill in the
transparent areas with the color you choose. I am going to leave it as this color choice,
you can click on the square or on your graphic to choose a color. Click Next
Put a dot in front of
"NO CHOOSE THE BEST COLORS"
ALWAYS USE THIS ON ALL TRANSPARENT IMAGES!!!
Click Next

Just leave the settings as they are in page four and click next.

Again leave settings where they are
and click finish.

Give your transparent bouncing image a name
and save to your stationery folder:
c:/Program Files/Common files/Microsoft Shared/Stationery/bouncingimage.jpg
Here is a sneak peek at what they will look like together!

Well, we are halfway there! If you are ready, let's get these entered into
the script!
Part Two The Script
Please Sign my Guest
Book!
I Would Love To Know You Were Here!

Proud Member Of

All Backgrounds And Images Created In

Site Designed And Maintained With
![]()
Backgrounds
and Site Design
Created By
Design By Renee
RD
Copyright 1999-2000-2001 Renee Davis
![]()
Welcome
Home Lesson
Index Lesson
One
Lesson One-Part Two Lesson Two
Lesson Two-Part Two Lesson
Three Lesson Three Part-Two
Lesson Four Lesson
Four Part-Two Lesson
Five Lesson
Five Part-Two Lesson Six
Lesson Six Part-Two
Lesson Seven Lesson
Seven Part-Two Lesson Eight Lesson
Eight Part-Two
Lesson
Nine Lesson Nine Part-Two
Lesson Ten Lesson
Ten Part-Two
PSP View
Links