Design By Renee
FirstSteps2Alottafun Lesson Five
Please Note***These pages will be
graphic intense, they will take a while to fully download. Use your refresh button to
reload the page to check for updates on this page. ...Renee
In lesson
five you will
learn how to make a transparent gif from a filled font, and a background that the
transparent font gif will scroll over. The script is a top border
horizontal scroll over a fixed
background.
So if you are ready, let's get started!
Please right click on each image and save to your firststeps folder

Open Paintshop Pro and click File Browse.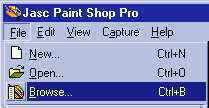 And browse to your firststeps folder and double click on each image to
open them in PSP.
And browse to your firststeps folder and double click on each image to
open them in PSP.
Click on the new image icon ![]() and place your settings at 1024px width x 300px height.
and place your settings at 1024px width x 300px height.
Background color Transparent

We are going to flood fill our transparent window with the sixballons.jpg
image.
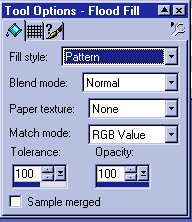
Click your flood fill tool ![]() and in the tool options window set it to pattern.
and in the tool options window set it to pattern.
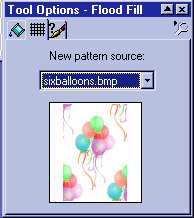
Now click the middle tab that looks like a grid pattern and open the drop
down window and locate the sixballons.jpg image
Note*** Mine says bmp, please
ignore that, use your sixballons.jpg.
Now click on the 1024x300 transparent window and flood fill it with our
balloon pattern.

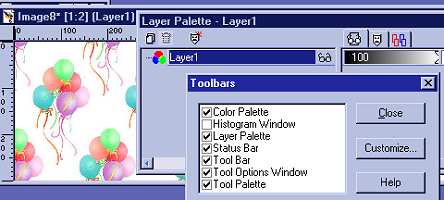
Ok..now we are going to "mute" the bkg using the layer palette!
Don't pass out, it's not that bad!!!
So please click View/Tool Bars and put a check in front of Layer Palette,
click close.
Now open up your L5rainbowfill.jpg We need to pick a color from it to
color over the balloon bkg. I am going to choose a nice yellow color #FFFF4F
And first to the layer palate, open it and click the new page icon that is
on the tool palette, I have it circled in pink.

After you clicked it a new window pops up, type yellow color in the Name
section.
Now click ok. You will note now your layer palette has two layers on it.
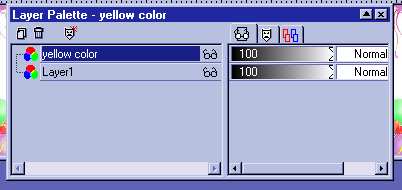
Now making sure that the yellow color layer is active, (its darker blue
here), And your setting on your flood fill tool options are normal,
flood fill the balloon background with your yellow color.
It should cover the balloons completely. Now look on the palette, to the
left of yellow color line and you see the black to white sliding scale?.
It has the 100 in it. Those little things on the right of the scale are
handles, grab them with your cursor by holding down your left click and
slide it to the left. You will see the number 100 change to a less
percentage. We want to see the balloons but still see them softly muted.

I have left mine at 65%, I can see the balloons and yet my text will show
up because the bkg is muted. Now close your layer palette we are done with
that.
Now Click Layers, then Merge, then Flatten all. Now save this bkg to your
stationery folder
c:/program files/common files/microsoft shared/stationery
give it a name.jpg I named mine yellowballoonbkg.jpg so I know what it is
and its a bkg image.
Now we are ready to work with our font!!!
Ok click on new page icon ![]() and use these measurements 1024px width by 100px height,
transparent.
and use these measurements 1024px width by 100px height,
transparent.
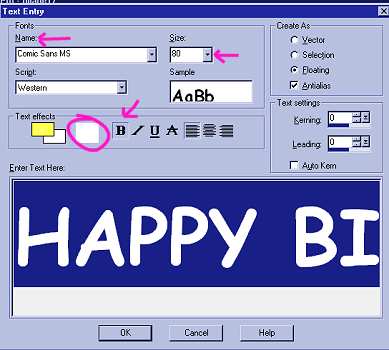
When you work with fonts in designs like this you need to look for wide
but not too wide fonts so that the shapes can be altered to look round or
3D by beveling. Ok, now click your Text tool Icon ![]() and click inside your 1024x100 transparent window. Your Text Editor open
and use these settings,
and click inside your 1024x100 transparent window. Your Text Editor open
and use these settings,
Name (font) Comic Sans MS Size, type in 80
Choose white as the color for the text.
Now click in the typing area and In capitals type
HAPPY BIRTHDAY
then click ok.
Click on your mover tool ![]() and
center the Font in the window. You will notice the "marching
ants" around the letters.
and
center the Font in the window. You will notice the "marching
ants" around the letters.

Now click on your flood fill tool ![]() and in the tool options window, choose patter, and
click the middle tab that looks like a grid pattern. Use the drop down
window and choose the lL5 rainbowfill.jpg. Now click with the flood fill
tool on each letter, till all are colored.
and in the tool options window, choose patter, and
click the middle tab that looks like a grid pattern. Use the drop down
window and choose the lL5 rainbowfill.jpg. Now click with the flood fill
tool on each letter, till all are colored.

Now we need to bevel our font. So click Image then effects, inner bevel
And use these settings.
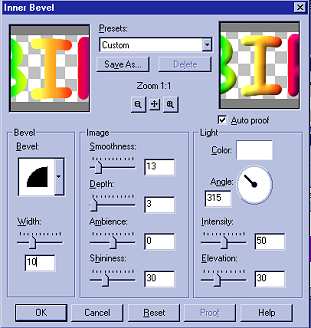
Now this is what we have so far!

Click Selections/None to remove the marching ants.
Now we need to save it as a transparent gif
So click file/export/transparent gif
***Note picture is from Lesson
two, ignore that please.
![]()
In the Transparent gif saver window, click on the Use Wizard at the bottom left
hand corner.

Put a dot in front of "use existing transparent areas"
***Note our second color choice is in preview window***
Then click next....

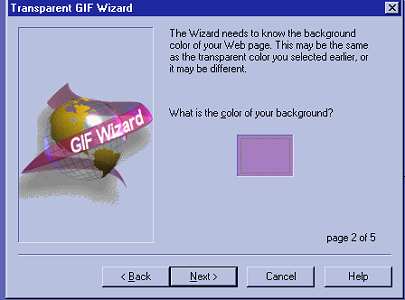
It is asking what color is your background because it will fill in the
transparent areas with the color you choose. I am going to choose the yellow
I used for my muted background #FFFF4F you can click on the square or on your graphic to choose a color. Click Next
Yellow should be in
the square, I am using a previous screen capture to save space on my web.
Put a dot in front of
"NO CHOOSE THE BEST COLORS"
ALWAYS USE THIS ON ALL TRANSPARENT IMAGES!!!
Click Next

Just leave the settings as they are in page four and click next.

Again leave settings where they are
and click finish.

Now save your font gif with a name, mine is happybdaybanner.gif to the
stationery folder:
c:/program files/common files/microsoft shared/stationery
And we are done with part one of Lesson Five..
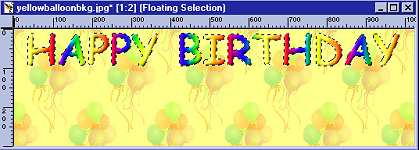
Here's a
sneak preview of what the stat is going to look like, remember, the Happy
Birthday Scrolls across the top...
I hope you like it and it gives you some new ideas to work with. So if your
ready, we will go on to Lesson Five Part Two,
Please Sign my Guest
Book!
I Would Love To Know You Were Here!

Proud Member Of

All Backgrounds And Images Created In

Site Designed And Maintained With
![]()
Backgrounds
and Site Design
Created By
Design By Renee
RD
Copyright 1999-2000-2001 Renee Davis
![]()
Welcome
Home Lesson
Index Lesson
One
Lesson One-Part Two Lesson Two
Lesson Two-Part Two Lesson
Three Lesson Three Part-Two
Lesson Four Lesson
Four Part-Two Lesson
Five Lesson
Five Part-Two Lesson Six
Lesson Six Part-Two
Lesson Seven Lesson
Seven Part-Two Lesson Eight Lesson
Eight Part-Two
Lesson
Nine Lesson Nine Part-Two
Lesson Ten Lesson
Ten Part-Two
PSP View
Links