Design By Renee
FirstSteps2Alottafun Lesson One
Please Note***These pages will be
graphic intense, they will take a while to fully download. Use your refresh button to
reload the page to check for updates on this page. ...Renee
In lesson one you will learn how to make a simple graphic
on a background. You will then apply the background to a basic scroll stationery. So if
your ready, let's get started!!
For a look at the Paintshop Pro worktable and a reference for the tutorial please
click here
These lessons are only about the very basic functions in PSP to give you ideas of
your own and for you to gain experience in following tutorials (known from now on as
tut's).
Please Right click on this graphic, click save picture as/name it in window/make sure it is listed as a jpg and save to our c:/firststeps folder.

Graphic title: Bowood
Artist: Marty Bell
http://www.martybell.com/gallery.html
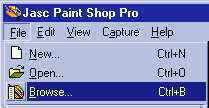
Please open Paintshop Pro (from now on, aka PSP), click file/Browse
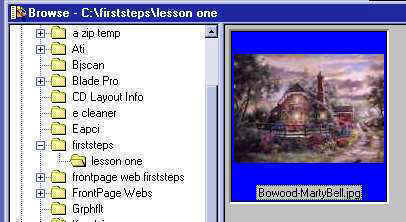
Go to your firststeps folder and double-click on the above graphic in the browse
window that opens up.
This will open the graphic on your PSP worktop. I prefer to work with PSP rulers on
my graphics. So if you will please click view/rulers this will attach a ruler
to your graphic.

You will also need your tool options window open (I leave mine open
all the time)
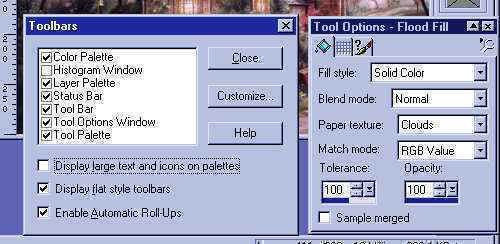
Please click view/toolbars and put a checkmark in the following boxes, then click
close.
I keep my tool options window down in my lower right corner, but you are free to
place yours wherever you feel comfortable with it.
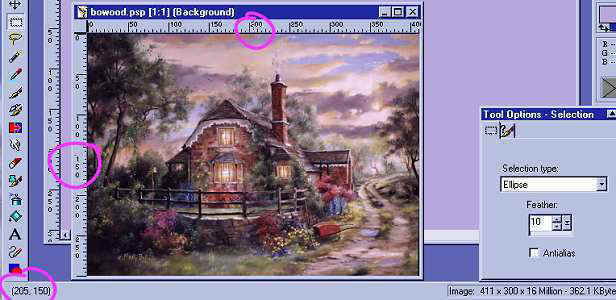
Now we have our graphic open with rulers on and our tool options window open. We will
be working with a standard stationery size of 1024 pixels wide by 300px height. I have
sized the graphic at 300px height and 411 px width. You can check the size of the graphic
by looking at the size that is on the very lower right corner of your PSP worktop. It
shows 411px width by 300px height with 16 million colors and the kb amount. (that
will change)

We are going to make our background now that we will be placing our
graphic on. So please click file/new or the new-image icon.
![]()
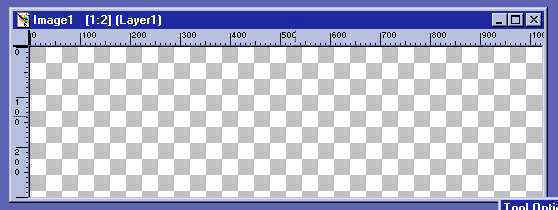
It will open the New-Image window. Enter 1024 in the width and 300 in the
height. Open the drop down window beside background color and for now choose transparent.
Do not change any other setting. Click ok.

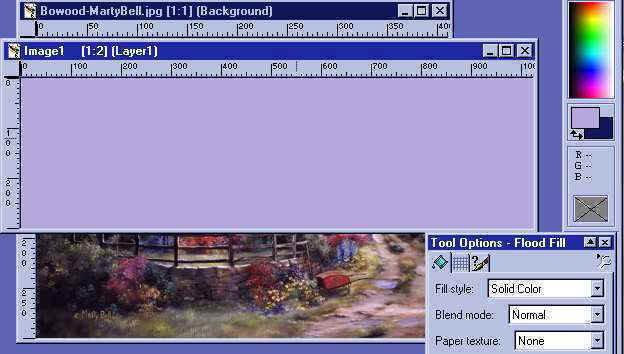
You should now see your background image window open.
A dark blue border across the top means that window is the active window. If it is
grayed out it is not the active window. Leave your new image window open and click on the
top of the graphic we are using. It will come forward and become the active window. You
should have all three windows open and your graphic forward as the active
window and the new-image behind with the top showing a dark blue meaning not-active.
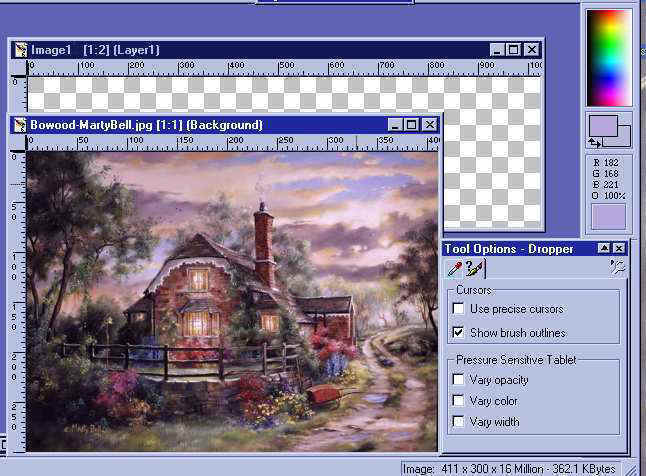
Now we need to decide what color we want our background to be. Click on your
dropper(aka color picker)![]() and slide it around on the graphic. You will see the colors it is going over in
the color view window on the right border. I have used a pink arrow to point to the
correct window to look at.
and slide it around on the graphic. You will see the colors it is going over in
the color view window on the right border. I have used a pink arrow to point to the
correct window to look at.
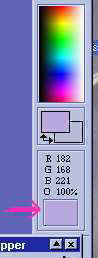
Once you see the color you would like for your background, left-click and it will
move up to the foreground color window. I have used a pink arrow to point to the
foreground color window.
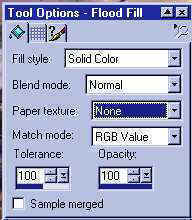
Now we need to click on our new image window to make it the active window and bring
it forward. Go to your tools bar and choose your flood fill tool.![]() Your tool options
window now has Flood Fill on the top bar. Make your settings to match those that I have.
You will learn what and how on the settings in future lessons.
Your tool options
window now has Flood Fill on the top bar. Make your settings to match those that I have.
You will learn what and how on the settings in future lessons.
Now making sure our new image window is active left click anywhere on the transparent
section, and it should now be flood filled with the color you chose..
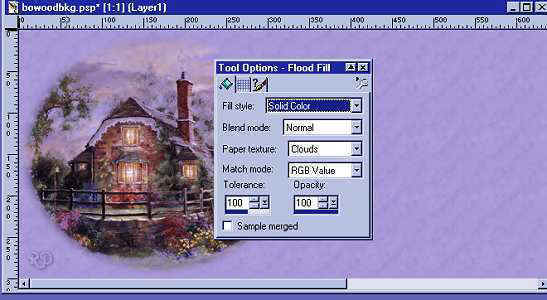
Now I did one more thing so that my background did not look so
plain. (You will be using textures in future lessons) I used my dropper and clicked on my
light purple foreground color to open the HTML color window, and I used my dropper to pick
a color a few shades darker than my background. Clicked ok. Then I clicked my flood fill
tool and I chose the paper texture clouds. I then flood filled my whole
background four times. It was just enough to add color making it seem like a texture, but
not enough to take away from the graphic.
(I placed the graphic in
for an example.)
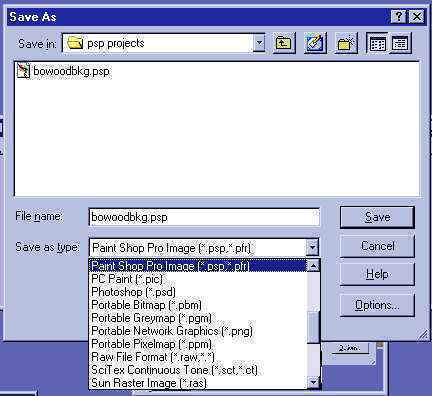
Now we are to a point we should save what we have done so far. leaving the flood
filled image active, click file/save as bowoodbkg (bkg meaning background),
open your path to your PSP program folder, and open the folder we created and named psp
projects, and then save your background image as a psp format, open the drop down
window and find paintshop pro image, highlight and click to bring it to the save window.
Your image should now read bowoodbkg.psp
click save and the window closes. Now it is saved for "just in case".
It is a great practice to save your work as you go along. When you are saving it in
psp format you can go back and open it and continue to work on it. Many of us have learned
the hard way when we have lost a project we were working on by not saving it and for many
reasons, an error, or electricity flickers off we lost our work. Sometimes you cannot go
back and duplicate the image you had worked so hard on. So please, get in the habit of
saving your work as you go along
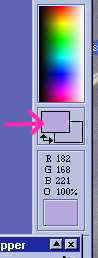
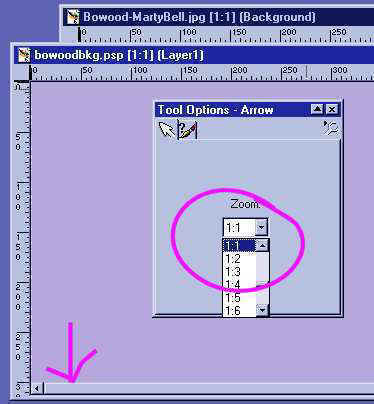
Ok, now before we start working with the graphic, please click your
arrow![]() on the
tool bar and look at your tool options window, it has now Zoom and numbers, leaving your
bkg active open it to read 1:1. You will notice you bkg opened to full size.
Make
sure the lower scroll bar(see pink arrow)is all the way to the left.
on the
tool bar and look at your tool options window, it has now Zoom and numbers, leaving your
bkg active open it to read 1:1. You will notice you bkg opened to full size.
Make
sure the lower scroll bar(see pink arrow)is all the way to the left.
Now click on your graphic to make it active and bring it forward. Click your tool
options window Zoom again and make it the setting as the bkg 1:1. This will just give you
a better idea of the dimensions you are working with. When you become familiar with all
the settings you can leave it at 1:2. Now with your graphic as the active window, go to
the top toolbar and click windows/duplicate. This gives you an exact duplicate of the
graphic. Close your original graphic, and make it a habit to NEVER
work on the original, always work on the duplicate. Now making your duplicate
active, click file save, open your psp projects folder and save it as
bowood.psp. You
should now have two images in your psp projects folder, bowoodbkg.psp and
bowood.psp.
Most graphics on a stationery are not much wider than 300px's. If they are very much
wider than that it looks way too big in the preview windows and the text is bunched up.
Keeping that in mind since our graphic is 411px's wide we would need to either reduce the
height or crop off some of the width. Well here is where you are going to learn to
"Feather" your graphic. Please choose your selections tool![]() Your tool
options window changes to Selections. Set it just as I have in this illustration. We are
going to use the ellipse function. Set it to feather at 10px. Here is where you will use
your ruler and the size co-ordinations that are on the very bottom left corner of your psp
worktop. Our graphic is 411px wide by 300px height we need to place our
selection tool in the center of these co-ordinates. So watching our ruler you will see a
line move that is where the center of your selection tool is. Now looking at the
co-ordinates at the bottom left corner, find the exact co-ordinates I have in the graphic,
they are on the 205px width and the 150px height co-ordinates.
Your tool
options window changes to Selections. Set it just as I have in this illustration. We are
going to use the ellipse function. Set it to feather at 10px. Here is where you will use
your ruler and the size co-ordinations that are on the very bottom left corner of your psp
worktop. Our graphic is 411px wide by 300px height we need to place our
selection tool in the center of these co-ordinates. So watching our ruler you will see a
line move that is where the center of your selection tool is. Now looking at the
co-ordinates at the bottom left corner, find the exact co-ordinates I have in the graphic,
they are on the 205px width and the 150px height co-ordinates.
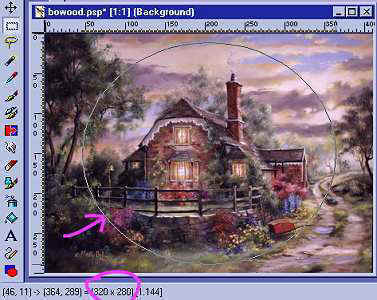
Now left click and hold the click and slide your pointer to the right. You will see
an ellipse forming. Slide until you are at the 320px wide co-ordinate and now slide down
until you are at the 280px co-ordinate. When you have it exactly on 320px x 280px lift off
the click. The ellipse should still remain and will look just like this illustration. Now
the reason for the not going all the way to the edge is because we "feathered"
the edge and the feather will be 10px.
Now go to edit and click copy. Using a keyboard shortcut, press Ctrl V , you should
now have the ellipse open in a new window like this.
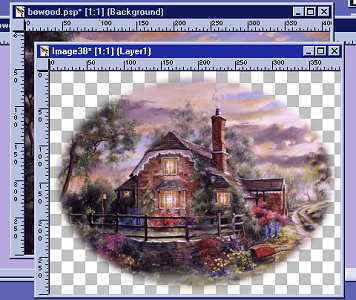
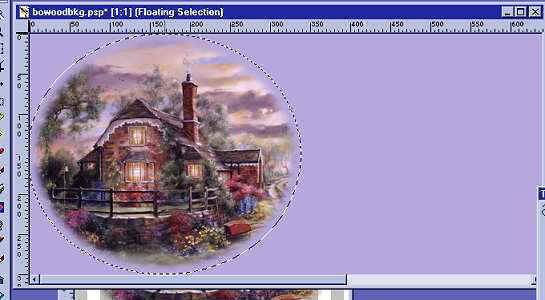
You can now minimize your bowood graphic. Click on your mover tool ![]() Make sure your new
image is active click edit copy, click on the background to make it the active window and
click edit, paste. You should now have the ellipse on your bkg. Use the mover tool to set
your graphic in place. Watch your rulers and you will see a line that you can use to guide
your setting. Once you have it where you want it click it and it will have marching ants
around it, They are little black lines that move around a graphic and are referred to as
"marching ants". Now we can look to see where our width is. Make a note that
your margin should be about 325px.
Make sure your new
image is active click edit copy, click on the background to make it the active window and
click edit, paste. You should now have the ellipse on your bkg. Use the mover tool to set
your graphic in place. Watch your rulers and you will see a line that you can use to guide
your setting. Once you have it where you want it click it and it will have marching ants
around it, They are little black lines that move around a graphic and are referred to as
"marching ants". Now we can look to see where our width is. Make a note that
your margin should be about 325px.
Also before we finish here, take your dropper and go over to your
color palette and click on the foreground color. This bring up a window that you can get
the HTML color numbers that you will need for the script. Click on your foreground and
make a note of the number. Mine is #B6A8DD

Now, if you are happy where your graphic is, and you have your bkg color number. It's
time to sign your work. Go to the top toolbar and click selections /none. This will remove
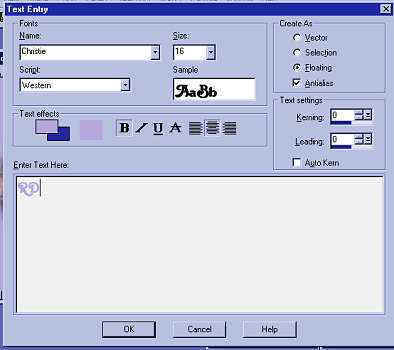
the marching ants. Now click the text icon ![]() and click once on your active window, and the text window
opens up. Choose how you want to sign your stationery. Choose the text and the color. I am
using the purple I had for my background. Just click on which color you want in the preview
windows. I am using the font Christie, the color of my background, and a size 16.
Please set you settings to match these, floating and antialias. Now when you have what you
would like for your stationery click ok.
and click once on your active window, and the text window
opens up. Choose how you want to sign your stationery. Choose the text and the color. I am
using the purple I had for my background. Just click on which color you want in the preview
windows. I am using the font Christie, the color of my background, and a size 16.
Please set you settings to match these, floating and antialias. Now when you have what you
would like for your stationery click ok.
Your signature will then be on your active window. But lets do a drop shadow for some
depth.
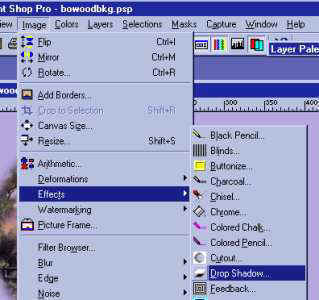
You will see the marching ants around your signature. Go to the top tool bar and
click image/effects/drop shadow.
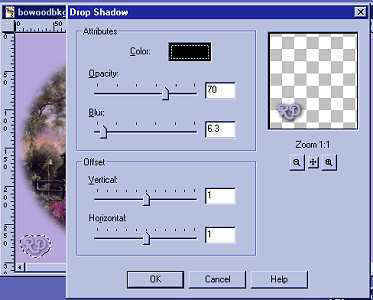
The drop shadow window opens and I have used these settings for my initials, but you
are free to play around with the settings and find your preference.
Use your mover tool to move your signature to where you want it. When you are
satisfied with the overall look then click selections/none, to remove the marching ants
from your "sig tag".
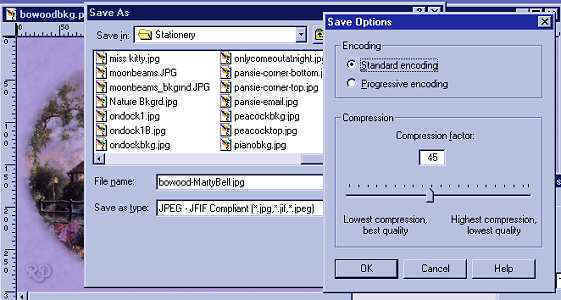
Now that I am satisfied with the results I need to save it. But we are also going to
set the file compression so that our jpg's are compressed to a smaller file, but not
losing any of the quality. We only have to do this option once, PSP will remember it. So
click SAVE AS, put a name in for your graphic, mine will be bowood-MartyBell.jpg and click
Options in the save window.
Place your setting to this and you will not lose any quality on your work, but will
still have a smaller file.
Click ok, when you have the setting done. Now I save mine to my stationery folder and
that would be a good place for you to place yours also, as all the scripts we are going to
work with, have that same path. So in the top drop down window, open to your
stationery path.
c:\program files\common files\microsoft shared\stationery\bowood-MartyBell.jpg
click save when you are done.
Here is the finished stationery.
Click Here For Finished Example
This will take a moment to load, as I have placed it as a txt version, This way you can
click on View/Source so that you can see the actual stationery changes that I made. You
can see the names and sizes and colors. Use your "back" button to return to this
page.

Did I say finished? Actually we are only half done. We still need to place our
graphic in a script and finish our Stationery creation. So if you are ready to proceed,
let's go to the second half of lesson one, the script!
Part Two The Script
Please Sign my Guest
Book!
I Would Love To Know You Were Here!

Proud Member Of

All Backgrounds And Images Created In

Site Designed And Maintained With
![]()
Backgrounds
and Site Design
Created By
Design By Renee
RD
Copyright 1999-2000-2001 Renee Davis
![]()
Welcome
Home Lesson
Index Lesson
One
Lesson One-Part Two Lesson Two
Lesson Two-Part Two Lesson
Three Lesson Three Part-Two
Lesson Four Lesson
Four Part-Two
Lesson
Five Lesson
Five Part-Two Lesson Six
Lesson Six Part-Two
Lesson Seven Lesson
Seven Part-Two Lesson Eight Lesson
Eight Part-Two
Lesson Nine Lesson Nine Part-Two
Lesson Ten Lesson
Ten Part-Two
PSP View
Links