Design By Renee
FirstSteps2Alottafun Lesson Six
Please Note***These pages will be
graphic intense, they will take a while to fully download. Use your refresh button to
reload the page to check for updates on this page. ...Renee
Lesson Six is a double horizontal scroll. We will be making a graphic with borders to scroll across the top and bottom of a fixed background.
Please Right click on this graphic, click Save
Picture As/name it
in window/make sure it is listed as a jpg and save to our c:/firststeps folder.

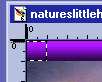
Graphic Title: Natures Little
Helper
Artist: Jim Warren
http://www.jimwarren.com
By now you should be familiar with some of the steps. I will be using less screen captures. If you get lost, refer to a previous lesson.
Please open the graphic now in PSP. Click
Windows, then click Duplicate, and close your original graphic. Make it a
habit to never work on an original.
We are going to make our background first. It will be a simple bkg because
we will be concentrating on the graphic for the scrolling border!
Click New Image and have your window settings at 1024 width x270 height,
transparent. Choose a background color from the image. I am using #FFCE57.
Flood fill your transparent window.
Now go to your toolbar and click Image/Noise and use these settings.

Now go to your toolbar and click Image/Blur and click once on Blur. Makes
a simple bkg that can work with many stats!

Very simple, but will look great behind the scrolls! Now click File/Save ,
give it a name and save it as a .jpg to your stationery folder.
c:/program files/common files/microsoft shared/stationery/natureshelperbkg.jpg
Ok, now on to the border!!
Select the Eyedropper ![]() and choose
a color from the image. Right click on the color so it is in the
background window. This is going to be for the top and bottom "frame" of our
graphic.
and choose
a color from the image. Right click on the color so it is in the
background window. This is going to be for the top and bottom "frame" of our
graphic.

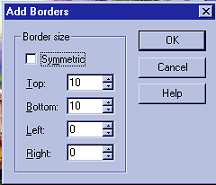
Now, go to your toolbar and click Image/Add Borders, use these settings.
Now select your Magic Wand ![]() and hold down the shift key, you will see a + sign by the magic wand, keep
holding the shift key and click on the top border, and then the bottom border. Now both borders
should have the "marching ants" moving around them.
and hold down the shift key, you will see a + sign by the magic wand, keep
holding the shift key and click on the top border, and then the bottom border. Now both borders
should have the "marching ants" moving around them.

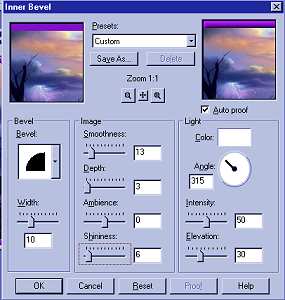
Now go to your toolbar and click Image/Effects/Inner bevel
and you can use these settings or one you prefer.
Now click Selections/None.
Now so that our borders match up seamless, select your Zoom Tool ![]() and left click once on your graphic so it zooms out larger. Use your
scroll bar to scroll up to the top so that you can see the top left corner
of your graphic.
and left click once on your graphic so it zooms out larger. Use your
scroll bar to scroll up to the top so that you can see the top left corner
of your graphic.
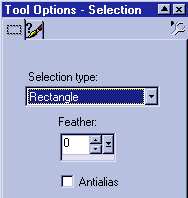
Now select your Selections Tool ![]() and in the Tool Options window, use these settings.
and in the Tool Options window, use these settings.
We are going to copy and paste a small
piece of the border on the ends so our borders will be seamless. Watching
your co-ordinate numbers at the bottom right of your worktable, place the
selection tool at 30, 0

Now move your selection tool down and to the right, until it reads 30 x 10
You should now see "marching ants" around this small
selection.
Now select your mover tool ![]() .
.
Now go to your toolbar and click Edit/Copy. And again click Edit/Paste as
new selection. This little section will be attached to your mover tool. Go up to the top
left corner and matching up the width position, move the small piece to
the left, going out past the edge, so that you can only see about one half of the
small piece of border, and click to make it stay.
Use your scroll bar and now scroll over to where you can see the top right
corner. Click the blue bar on your graphic and right click then Paste/As
New Selection again and place this piece in
the corner just like you did the left side.

Now do the same thing for the bottom left and right corners.


Now click selections/none. And all four corners will be seamless.
Now to make our scrolling border.
The graphic is now sized at 380 width x 270 height.. We are going to put
two graphics together to create the scrolling border. So click your new
image icon ![]() and use these
measurements for the window. 760width(380x2)and 270 height, transparent.
and use these
measurements for the window. 760width(380x2)and 270 height, transparent.
Now click on your mover tool and click
once on your graphic to make it active. Click Edit/Copy then
clicking on the new transparent window, click Edit/Paste. Using your mover
tool, move the graphic so that the borders line up exactly to the left
side of your window. The marching ants will be just visible on the top,
the left, and the bottom.

Now click Edit/Copy and Edit/Paste/As New Selection again, this time click
Image/Mirror so that the image flips. Now using your mover tool, move this
image to where it just has the marching ants around all sides.

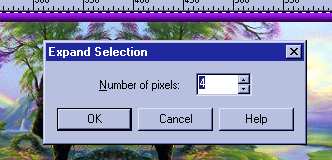
Pay close attention to all borders so that they line up seamless. When you
have it positioned, click on it. Then click Selections/Select All , click
Selections again, click Modify, click Expand, type in 4px and click
ok.
This just gives a little better blend on the borders, it wont increase the
size.
Then click Selections/None.
Now is the time to sign your graphic!
Now click Layers/Merge/Flatten All.
Now click Image/Resize and enter 200 in the height. The width will change
automatically.
Click Image/Sharpen one time, so that it is not fuzzy.
Now click File/Save and save your image to your stationery folder as a
.jpg :
c:/program files/common files/microsoft shared/stationery/natureshelper.jpg
Now here is a sneak peek at what it looks like so far!

And the scroll will be on the bottom too! Now its time to do the script!!
I hope you are enjoying these tuts so far! So if you are ready, lets get
to the script!!
Part Two The Script
Please Sign my Guest
Book!
I Would Love To Know You Were Here!

Proud Member Of

All Backgrounds And Images Created In

Site Designed And Maintained With
![]()
Backgrounds
and Site Design
Created By
Design By Renee
RD
Copyright 1999-2000-2001 Renee Davis
![]()
Welcome
Home Lesson
Index Lesson
One
Lesson One-Part Two Lesson Two
Lesson Two-Part Two Lesson
Three Lesson Three Part-Two
Lesson Four Lesson
Four Part-Two Lesson
Five Lesson
Five Part-Two Lesson Six
Lesson Six Part-Two
Lesson Seven Lesson
Seven Part-Two Lesson Eight Lesson
Eight Part-Two
Lesson
Nine Lesson Nine Part-Two
Lesson Ten Lesson
Ten Part-Two
PSP View
Links