Design By Renee
FirstSteps2Alottafun Lesson Eight
Please Note***These pages will be
graphic intense, they will take a while to fully download. Use your refresh button to
reload the page to check for updates on this page. ...Renee
Lesson Eight is a Multi-Image Transition Scroll. Which means that we will have 3 images that will fade from the first image to the second, then to the third, then it begins again. These images will be a scrolling left border over a fixed background.
Please Right click on these graphics, click Save
Picture As/name it
in window/make sure they are listed as a jpg and save to our c:/firststeps folder.
***Note, Each image is walking down the same path.
Each view, just closer to home.
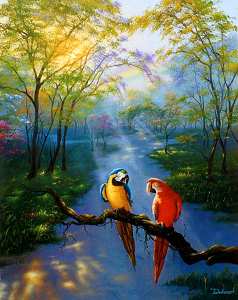

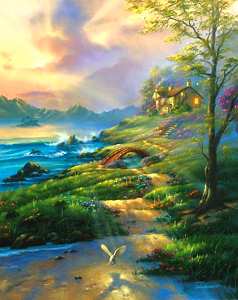
Colors Of The
Rainbow:
Happy
Trails:
Evening Comfort:
Artist: Jim Warren
http://www.jimwarren.com
By now you should be familiar with some of the steps. I will be using less screen captures. If you get lost, refer to a previous lesson.
I am going to be using two colors, the
foreground is color #FFCD45, a nice gold color which will be the frame for
the graphics. And the background color, #006000, a rich dark green, which
will be for the seamless bkg we will be making.
![]()
We will make our seamless tile for the bkg
first. So please click your new image icon, and use these settings: 150
Height x 150 Width Transparent. Select your flood fill
tool, and flood fill the transparent window with the dark green
color.
Now click Image/Noise/Add and use these settings:

Now, bear with me.. You wont see the patterns until we make the full
background!!
Now click Image/Effects/Feedback , and use these settings:
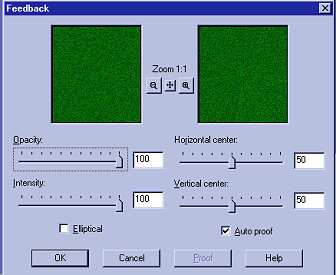
You see a subtle change, but we are not done yet. We still need to make
our seamless tile.
So please click your new image icon again, and use these settings:
300 Height x 300 Width Transparent
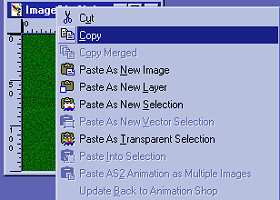
Now click on the green feedback window, and right click to open a menu,
select copy:
Now click on the 300x300 window, and right click paste, as new selection:

Now using your cursor, move this tile up to the top left corner of the
window, so that it fits perfectly in the corner. Use your mover tool if
you need to. The "marching ants" will tell you its even on two
sides.
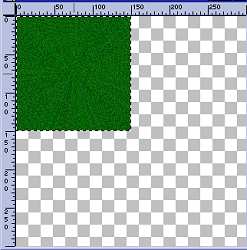
Now, right click your menu again, and select paste, as new selection: You
now have a second tile. Move this tile up to the top right corner so that
it matches up perfectly with all three sides. Then click Image/Mirror:
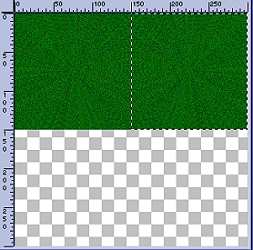
Now right click your menu again, and select paste, as new selection. You
now have the third tile. Move this tile down to the bottom left corner so
that it matches up perfectly with all three sides. Then click Image/Flip:
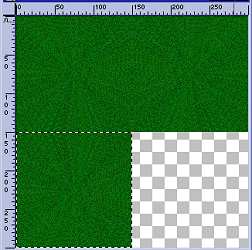
Now again, right click your menu, and select paste, as new selection. You
now have the fourth tile. Move this to the bottom right corner so that it
matches up with all four sides.
Then click Image/Flip and then click Image/ Mirror ..

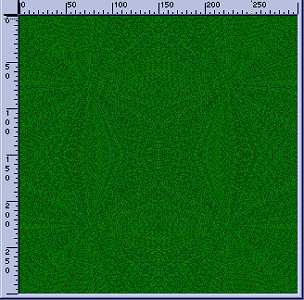
Now click Selections/Select All then Selections/Modify/Expand and
use 4 in the settings. this gives our sides a better blend. Now click
Selections/None. Do you see the pattern now?
Now we need to make the bkg. Click New Image, and use these settings:
Width 1024 x Height 300 Transparent
Select your flood fill tool and in the tool option window choose pattern.
Click the middle tab (looks like a grid) and select your tile we just
made, and flood fill the tile into the transparent window. Now click
layers/Merge/Flatten All. You can see the pattern much better now. Click
File/Save, give it a name and save to your stationery folder:
C:/Program files/Common Files/Microsoft Shared/Stationery/your image
bkg.jpg
Hope you like the bkg. The possibilities are endless using the features in
PSP!
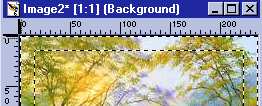
Now open the three graphics, and choose one for the first image.
Click Windows/Duplicate because we never work
on the original image. Close your original.
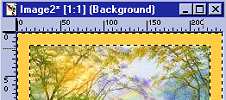
Click Selections/Select All so you have the "marching ants" all
around your image. Then click Selections again and click
Modify/Contract and use 15 in the settings.
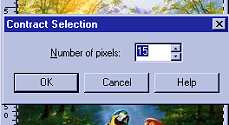
You will see the "marching ants" move into your image 15px from
the edge.
Now click Selections/Invert
You will see double lines of "marching ants" one 15px in and one
on the edge.
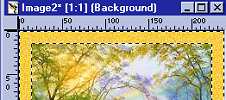
We are going to turn this into the frame! Make sure your foreground color
is the gold we are using, and select your Airbrush Tool![]() and use these settings in the tool options window:
and use these settings in the tool options window:

Now, Airbrush your foreground color all around the inverted section,
covering it completely. This will just Airbrush what is inside the two
"marching ants" lines.
Now click Image/Noise/Add and use the same settings that we
used on the bkg tile. They should still be set that way.
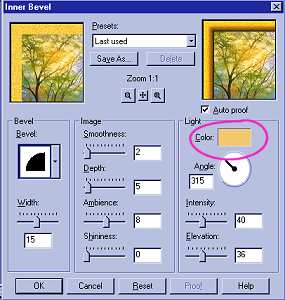
Now we need to bevel it. So click image/Effects/Inner Bevel and use these
settings: Note that I changed the color square to the same gold color
instead of white. We want to keep the dark gold color and a white bevel
lightened it too much. You can click on the color square to change the
bevel color. Just don't forget to change it back to white for other uses.
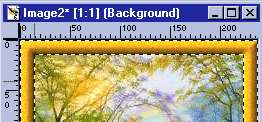
Here is the frame:
Ok, we are going to use a "shortcut" to place this frame on the
other two images so you won't have to do these steps for each one! While
the "marching ants" are showing it's active and selected, right
click on the image and click copy.
Next open your other two images and duplicate them, and close the
original. Right click on your second image, and click paste, AS NEW
LAYER.. we do this because it puts the frame on there perfectly. And now
click Layers/Merge/Flatten All. Image two is done. do this same step to
the third Image.
Now back to the first image click Selections/Select None and all three are
framed!
Now is the time to put in your "sig tag"
Now click File/Save for each image. It will help if you number them also
so you know in what order they should be.
c:/program files/common files/microsoft shared/stationery/your images 1,
2, & 3.jpg
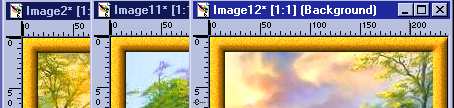
Here is a sneak peek at the image and bkg:

I hope you have enjoy this lesson. and that it gave you some ideas to work
with!
So if your ready, let's get to the script!
Part Two The Script
Please Sign my Guest
Book!
I Would Love To Know You Were Here!

Proud Member Of

All Backgrounds And Images Created In

Site Designed And Maintained With
![]()
Backgrounds
and Site Design
Created By
Design By Renee
RD
Copyright 1999-2000-2001 Renee Davis
![]()
Welcome
Home Lesson
Index Lesson
One
Lesson One-Part Two Lesson Two
Lesson Two-Part Two Lesson
Three Lesson Three Part-Two
Lesson Four Lesson
Four Part-Two Lesson
Five Lesson
Five Part-Two Lesson Six
Lesson Six Part-Two
Lesson Seven Lesson
Seven Part-Two Lesson Eight Lesson
Eight Part-Two
Lesson
Nine Lesson Nine Part-Two
Lesson Ten Lesson
Ten Part-Two
PSP View
Links