Design By Renee
FirstSteps2Alottafun Lesson Ten
Please Note***These pages will be
graphic intense, they will take a while to fully download. Use your refresh button to
reload the page to check for updates on this page. ...Renee
Well, here you are! You made it to
Lesson Ten!!
I would like to Thank You for all your hard work and making it this far!
Now there is nothing you can't do as far a stationery design and
scripting!
Thank you for choosing my site to help you learn. I hope it has gave you a
good start and I wish you well on your continued journey into more
advanced stationery design and scripting. You can now officially say
"I'm a stationery designer"! So if you are ready, let's get to
the lesson!
Lesson Ten is a Bounce Multi-Object Script. Which means that we will have a background with a ten bouncing images that move over the background. I have had several requests to do another cutout design, so we will be using a HeavyGrain bkg and cutout images. We will also be making ten bouncing transparent images. We are going to be using ding-fonts in this lesson. I have included 2 (five each) zip files of 10 assorted ding-fonts for you to download. Nothing fancy, but will give you some flexibility and will help you to know what to search for on the net when looking for these type fonts.
Fonts for L10 Part 1 5
Fonts Click
Here To Download Font Zip File
Fonts for L10 Part 2 5
Fonts Click
Here To Download Font Zip File
Create a temporary font folder on your C: drive.
Download and unzip the fonts to this folder. Next click
Start/Settings/Control Panel and double click on your Fonts icon.
When loaded, click File/Install New Font.
When the install window pops up, open the path to your font folder you
created on C: Your fonts will be read, click Select All, and OK... Now you
have the following fonts installed on your computer:
Big Top
Butterflips
Dividers 2
Dividers 3
Playing Cards
Quilter's Delight
Running In Circles
SC By The Sea
Separates
Whirlygigs
Please Right click on this graphic, click Save
Picture As/name it
in window/make sure it is listed as a .bmp and save to the Textures folder
in PSP
C:/Program files/Paintshop Pro/Textures
Note*** You Must Save This As A .bmp
Or It Will Not Work!!!

HeavyGrain.bmp
Whew! Ok now we are really ready to start!!
I am going to be using the ding-font
Big Top
and my colors will be: foreground #FF89EA : background #A31D8F
There will be a lot of steps in this tutorial, just go one step at a time.
Click your new image icon and use
these settings: 1024 width x 300 height White
Select your flood fill tool, Solid color, Paper, HeavyGrain.bmp
and flood fill the lighter color into your window. You may need to click
twice to get a rich color.
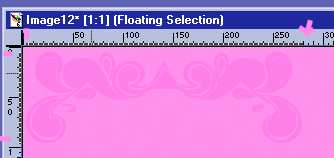
Choose your Text tool, ![]() Click in the transparent window, and find the Font Dividers 2 and
Click in the transparent window, and find the Font Dividers 2 and
using your lighter color, size 90, and small case E : click ok

Now watching the dark slider bars, position the ding like so:
Click to position it in place. We are going to do this to the bottom side
also, so keep in mind your approximate coordinates.
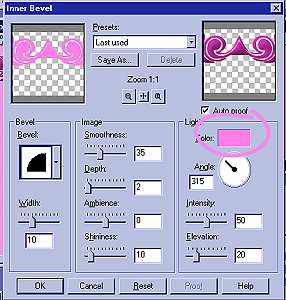
Now click Effects/Inner Bevel and these are the settings I used: This
gives it a darker bevel and its soft and round looking also.
Now do the same thing again, placing the ding at the bottom of the window,
positioning the ding at about the same coordinates you did the top
ding. Now after you position the ding at the bottom click
Effects/Flip
Then apply your inner bevel again. Click Selections/None

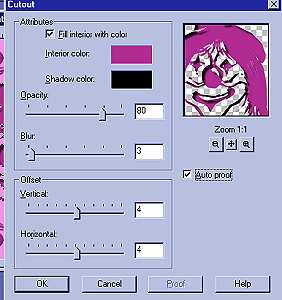
Ok, I am going to make a cutout clown face from the Big Top ding font in
the center.
I am using Capital T and the size is 150:

Position the clown approximately in the center of your two beveled dings,
and click Images/Effects/Cutout and use these settings: Use your darker
color for the fill:
Now click Image/Effects/Drop Shadow and use these settings: color White:
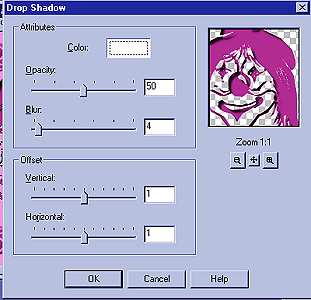
Click Selections/None
Now is the time to add your sig tag and save the background to your
stationery folder:
c:/program files/common files/microsoft shared/stationery/your stat
bkg.jpg
This is what it should look like:

Now its time to make our transparent gifs!!!
I am using the Big Top Ding Font, Size 62 and the Letters that correspond
to the images I want to use are:
Capital Letters: B D H I J N Q T U W
Click new Image Icon with these setting 75 width x 75
height Transparent
Make 10 of them! Note***You will need to make
one that it 75 width x 85 height for the letter H or you will cut off his
balloon! You can do this, don't panic now!! Putting each
letter/image in its own window.
Are you still with me? I hope so!!
Now it's those 10 little transparent gif's we need to make from our 75 x
75 windows!! You cannot put a drop shadow on transparent images, it gives
them a gray/white halo effect, but you can while they have the "marching
ants" around them give them an inner bevel to give them depth and an appearance
of a "drop shadow". So click Image/Effects/Inner bevel.
This is the settings I used: I changed the color to
#FF89EA, the same as the ding-fonts to get
the darker bevel that gives it the depth.

Follow the steps in previous lessons on File/Export/Transparent Gif
and click the Wizard button at the bottom left of the gif maker..
and do it to each of the 10 images. Give them a numeric order as you name
them, clown 1, clown 2 etc.. all the way through # 10.. and save these
gif's to your stationery folder as well.
Click Here For A Sneak Peek At Finished Stationery
Well, if you made it through all this!
Congratulations! We only have the Script to do now..
You should be able to do gif's blindfolded by now!! I know when I first
did this lesson, I felt I had become an expert at gif's when I was done!!
I hope you learned some more things
with this lesson. And I do thank you for making it this far! You have
every reason to be proud of your accomplishments! So if your ready to get
these images into the script, let's do it!!!
Part Two The Last Script
Please Sign my Guest
Book!
I Would Love To Know You Were Here!

Proud Member Of

All Backgrounds And Images Created In

Site Designed And Maintained With
![]()
Backgrounds
and Site Design
Created By
Design By Renee
RD
Copyright 1999-2000-2001 Renee Davis
![]()
Welcome
Home Lesson
Index Lesson
One
Lesson One-Part Two Lesson Two
Lesson Two-Part Two Lesson
Three Lesson Three Part-Two
Lesson Four Lesson
Four Part-Two Lesson
Five Lesson
Five Part-Two Lesson Six
Lesson Six Part-Two
Lesson Seven Lesson
Seven Part-Two Lesson Eight Lesson
Eight Part-Two
Lesson
Nine Lesson Nine Part-Two
Lesson Ten Lesson
Ten Part-Two
PSP View
Links