|
|
13
|
Curve Networks
|
|
In This Section:
|
Surfaces >
Curve Networks

|
Introduction to Curve Networks
|
|
|
|
|
Purpose
Curve networks let you build surfaces very quickly from a network of intersecting curves.
Overview
Curve networks are powerful and easy-to-use tools for creating surfaces.
Curve networks provide a level of abstraction from the actual surface creation tools, allowing you to concentrate on the construction curves:
-
1
-
Build a mesh of good, intersecting curves to describe a surface (see page 435).
-
2
-
Choose the New network tool and pick all the curves.
-
3
-
Alias interpolates between the curves to create surfaces automatically.
- You can continue to reshape, add or delete the construction curves, and the curve network surface will update.
The curve network figures out how to build a surface to match your curves and maintain the continuity you request across boundary curves.
Terminology
|
|
|
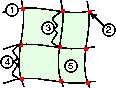
Refer to the diagram at left for illustrations of the following terms used with curve networks:
-
1
-
Curve: one of the curves in the network.
-
2
-
Intersection: where two curves in the network cross at the exact same point in space. In the interface this is also called a vertex.
-
3
-
Curve segment: a section of a curve defined by intersections (vertices) at both ends. Many of the curve network tools work on curve segments, including the continuity tools. In the interface, and sometimes in this chapter, this is called an edge.
-
4
-
Region: closed area of a curve network bounded by either three or four curve segments (edges).
-
5
-
Curve network surfaces: the surfaces are distinct from the curve network itself. In fact, the surface can be pulled away from the network by sculpt curves.
-
6
-
Curve network: all the curves defining the surfaces. Alias will not build surfaces until all the curves in the network are valid.
Valid and Invalid Topology
Alias creates one surface for each valid region of the curve network.
|
|
|
All curve network surfaces are grouped under a single node in the SBD window.
Under certain conditions, you may be able to create a single surface from the resulting curve network surfaces, by using the Combine surfaces tool. (See Combining Several Surfaces into One on page 308.)
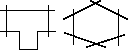
The following types of closed regions are valid:
|
|

|
- Four sided regions are fitted with standard NURBS surfaces.
|
|

|
- Three sided regions are fitted with trimmed surfaces.
|
|

|
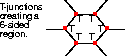
- Regions with T-junctions that can be "collapsed" into three- or four-sided regions are treated the same as regular three- or four-sided regions.
The following regions are not valid:
|
|
|
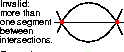
- Regions with more than four sides.
|
|

|
- Regions with only two sides.
|
|
|
- Regions with T-junctions that cannot be "collapsed" into three or four sided regions.
Other rules:
|
|
|
- There can only be one curve segment between any two intersections.
How To
To show the curve network toolbox:
|
|

|
-
1
-
Click the Curve networks icon, or choose Curve networks... from the Surfaces palette menu.
|
|
|
-
2
-
The Curve Networks window appears, with a new palette of curve network tools. You can use these tools exactly like the tools in the standard tool palettes.
-
3
-
To close the Curve Networks window, click the Curve networks tool again, or click the window's close box.
General Tips and Notes
- Curve networks do have a performance penalty. Do not use curve networks for surfaces that can be constructed just as easily with the normal surface creation tools.
- Use more curves in areas with detail, and fewer in areas with little variation.
- To design very complex shapes, create the network with a few defining curves, then add more curves and view the incremental effect on the network.
-
This lets you monitor continuity and topology
requirements and identify problem curves quickly, which
is more difficult when you add all the curves at once.
- Try to construct the network from curves that all have the same degree and the same kind of parameterization.
- Curve networks produce best results when every surface region is four-sided. This means a maximum of four surface regions meeting at any intersection.
- If you must have triangular regions, keep them as simple as possible. Use simple curves with little variation.
- Avoid T-intersections by adding more curves to the network, or extending existing curves.
Options
|
|

|
Double-click the Curve networks icon, or choose Curve networks-- from the Surfaces palette menu to display the option window. from the Surfaces palette menu to display the option window.
|
|
See Changing the Continuity
Along Curves on page 440.
|
Default Continuity
-
- The default level of continuity between the different surfaces in the curve network. The curves in a new network, and any curves you add later will initially maintain this level of continuity.
Rebuild Edge
-
- Automatically rebuild all the vertical and all the horizontal curves of the curve network to match parameters.
-
- The rebuild occurs before any edit points are inserted to achieve continuity.
|
CrvNet Tools >
New network

|
Creating a New Network
|
|
|
|
|
Purpose
Create a new curve network from a mesh of curves.
How To
To create good curves for a curve network:
- The enclosed area of the network should have only three or four sides.
- Try to ensure the curves have smooth curvature. Use the Curve curvature measurement tool to check the curvature of the intersecting curves (see page 376).
- The New network tool will let you create a curve network from invalid curves (for example, curves that do not intersect), but the surfaces themselves will not build until you edit the curves to create a valid network.
-
Use the Analyze network tool to look for the problem that
prevented the surfaces from building. See page 452.
To create a new curve network surface:
-
1
-
Click the New network icon, or choose New network from the CrvNet Tools palette menu.
-
2
-
Pick all the curves you want to define the new surface.
- It doesn't matter in what order you pick the curves.
- Use the normal pick procedures, including dragging out pick boxes.
-
3
-
Click Go to create the curve network surfaces.
Tips and Notes
- Remember the restrictions on the topology of regions listed on page 432.
- You can use any kind of curve (free curves, isoparms, curves on surface, trim edges), of any parameterization and degree, rational or non-rational.
- Remember that you do not need to describe the entire model with a single curve network. Try using several curve networks for different parts of the model.
See Also
|
CrvNet Tools >
Pick network,
Toggle auto-update,
Build network
|
Basic Curve Network Procedures
|
|
|
|
|
Purpose
- Pick existing curve networks.
- Toggle whether to automatically update the curve network surfaces whenever a curve changes.
- Explicitly rebuild the curve network surfaces.
- Remove construction history from a curve network.
How To
To pick a curve network:
|
|

|
-
1
-
Click the Pick network icon, or choose Pick network from the CrvNet Tools palette menu.
-
2
-
Use the normal picking procedure (as with the regular Pick tool) to pick one curve network to be the current network.
-
You must click on a curve from the network, not a surface.
-
All curve network tools will affect this network from now
on.
To turn Auto-update on or off:
|
|

|
-
1
-
Click the Toggle auto-update icon, or choose Toggle auto-update from the CrvNet Tools palette menu.
-
2
-
The prompt line displays the current state of the auto-update toggle. It is ON by default.
To force a rebuild of the curve network surface:
|
|

|
Click the Build network icon, or choose Build network from the CrvNet Tools palette menu.
To remove history from a curve network:
Curve network surfaces are always created with construction history.
Once you have finished modifying the curve network and the surfaces are to your satisfaction, you can remove the construction history to reduce storage space:
-
1
-
Pick the curve network using the Pick network tool (see above).
-
2
-
Choose Del constr history from the Delete menu.
-
All information about the curve network is deleted, and
the surfaces are dissociated from the constructor curves.
Tips and Notes
- Turn auto-update off for very complex curve networks to speed up workflow. Use the Build network tool when you want to update the surfaces.
- If you click the Build network tool and the surfaces are already up to date, they will not rebuild.
See Also:
|
CrvNet Tools >
Add/subtract curves
> Add curve to
network, Remove
curve from network
|
Adding and Subtracting Curves
|
|
|
|
|
Purpose
Add curves to, or remove curves from the mesh that controls the curve network surfaces.
How To
To add a curve to the curve network:
|
|

|
-
1
-
Click the Add curve to network icon, or choose Add/subtract curves > Add curve to network from the CrvNet Tools palette menu.
-
The curves of the current network highlight. To pick a
different network, use the Pick network tool (see page 437).
-
2
-
Click the curves you want to add to the network, or drag a pick box around them. As you click each curve, it is added to the curve network.
To subtract a curve from the curve network:
|
|

|
-
1
-
Click the Remove curve from network icon, or choose Add/subtract curves > Remove curve to network from the CrvNet Tools palette menu.
-
The curves of the current network highlight. To pick a
different network, use the Pick network tool (see page 437).
-
2
-
Click the curves in the network you want to remove from the network, or drag a pick box around them. As you click each curve, it is removed from the curve network.
Tips and Notes
- If the Auto-update tool is toggled off, you will need to click the Build network tool to update the network with the changes. See page 437.
- Remember the rules for valid and invalid topology as you add or subtract curves. See page 431.
|
CrvNet Tools >
Continuity >
Positional continuity,
Tangent continuity,
Curvature continuity
|
Changing the Continuity Along Curves
|
|
|
|
|
Purpose
Change the level of continuity across curves in the network.
Overview
|
|
You can change this default
in the option window (see
page 434).
|
Tangent continuity is the default for a new network. If you need more or less smoothness between the different surfaces, use the continuity tools to change the continuity required across any given network curve.
Restrictions
|
|
|
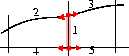
To have tangent or curvature continuity across a curve segment, the pairs of intersecting curves on each side must be at least curvature continuous (G2).
For example, in the illustration at left, in order to have tangent or curvature continuity along segment 1, segments 2 and 3 must be curvature continuous with each other, and segments 4 and 5 must be curvature continuous with each other.
This resctriction does not apply if you only require positional continuity across the curve segment.
See Aligning Curves and Surfaces on page 85 and Creating Continuity Between Curves and Other Objects on page 182 for information on creating continuity between curves.
How To
To change the continuity enforced on a curve:
-
1
-
Click one of the Continuity tool icons (Positional continuity, Tangent continuity, or Curvature continuity), or choose from the Continuity sub-menu of the CrvNet Tools palette menu.
-
2
-
Click the curve you want to change.
-
The continuity tool changes the continuity across the
curve you clicked.
-
Changing the continuity for a
curve changes the
continuity for all the segments on this curve. In other
words, the newly specified continuity is enforced between
all surface pairs that are adjacent to each other across this
curve.
Tips and Notes
- The continuity requirements you specify may not be achievable with the given curves. Use the Analyse network tool to display labels showing the level of continuity reached across each curve. See page 452.
- If the Auto-update tool is toggled off, you will need to click the Build network tool to update the network with the changes. See page 437.
- Avoid many areas with different types of continuity. The more consistent the continuity requirements, the better the surfaces.
See Also
|
CrvNet Tools >
Implied tangent

|
Creating Continuity with an Implied Half
|
|
|
|
|
Purpose
Ensure that tangent continuity is maintained along a symmetry plane, allowing the model to be reflected later.
Overview
This is a powerful feature. It lets you model one half of a symmetrical surface (such as a car body), and maintain continuity at the seam. When you duplicate the surface to create the other half, the surfaces adjacent to each other along the seam will already be continuous.
How To
To keep tangency with an implied surface along a boundary curve:
-
1
-
Click the Implied tangency icon, or choose Implied tangency from the CrvNet Tools palette menu.
-
2
-
Click the boundary curve across which you want to maintain implied tangency.
- Implied tangency only works on the network's boundary curves, i.e. curves that define the outer edges of the curve network surfaces.
- The curve must be a free curve. It cannot be an isoparm, curve on surface, or trim edge.
Tips and Notes
- If the Auto-update tool is toggled off, you need to click the Build network tool to update the network with the changes.
See Also
|
CrvNet Tools >
Lock intersection

|
Editing Curves While Maintaining Intersections
|
|
|
|
|
Purpose
Edit a network curve using the normal curve editing tools, while maintaining the intersections with the other curves in the network.
Overview
Normally if you edited a curve in the network with, for example, the Curve editor tool, you run the risk of moving or reshaping the curve out of intersections with the rest of the network.
This tool lets you lock a curve into the network so that, as you edit it, it maintains its intersections.
You can only lock a free curve. Isoparms, trim edges and curves on surface cannot be locked.
>
|
Note:
|
You can only lock intersections on networks without sculpt
curves. If you want to use the Lock intersection tool, you
will have to remove any sculpt curves from the network
first.
|
How To
To edit a curve while maintaining intersections:
-
1
-
Click the Lock intersection icon, or choose Lock intersections from the CrvNet Tools palette menu.
-
2
-
Click on a free network curve you want to lock.
-
The curve network surfaces become invisible and the
curve highlights.
-
3
-
Use the normal editing tools to edit the curve.
-
4
-
Click the Lock intersection tool again.
- Click the highlighted curve to unlock it.The surfaces reappear and are updated.
- Click another curve to lock and edit that curve. This automatically unlocks the previously locked curve.
Tips and Notes
- You can only have one locked curve at a time.
- You cannot use curve network tools on the network while a curve is locked. For example, you cannot add or remove curves, or change continuity.
-
To edit the curve network, unlock the locked curve by
choosing the Lock intersection tool and clicking on the
locked curve.
- If you edit any curve other than the locked curve, the locked curve is unlocked and the curve network returns to its normal state.
- If you save the file while a curve is locked, it will be unlocked when you open the file again.
See Also
|
CrvNet Tools >
Add/delete sculpt >
Add sculpt curve,
Delete sculpt curve
CrvNet Tools >
Pin edge,
Reset sculpt curves
mapping
|
Using Sculpt Curves
|
|
|
|
|
Purpose
- Add and remove sculpt curves. Sculpt curves shape the curve network surface by pushing or pulling the surface away from the network.
- Change the amount and region of influence of sculpt curves.
- Unpin or pin curve segments that are or are not affected by sculpt curves.
- Reset the mappings of sculpt curves.
Overview
Sculpt curves let you reshape and sculpt a curve network by mapping a curve to the surface and then modifying the curve.
Making complex or subtle changes to surfaces such as adding bumps, indentations, twists, or cork-screw effects can be very difficult. Sculpt curves provide the higher level of control necessary to achieve these effects.
A sculpt curve is like a handle on the surface which lets you push or pull the surface.
Pinning and Unpinning Edges
In a curve network without sculpt curves, the surfaces are always bounded by the mesh of curves. In other words, the surfaces always interpolate the curves in the mesh, and their edges can be seen as "pinned" to the network.
When you add sculpt curves, the system "unpins" from the network the common edges (edges shared between two surfaces) that the sculpt curve crosses, allowing the surfaces along that edge to be pushed or pulled by the sculpt curve. If you want more of the surface to be influenced by the sculpt curve, you must unpin more edges.
Using the Pin edge tool, you can pin some of the surfaces to their corresponding curve network edges so that they are not influenced by sculpt curves, or unpin them so that they are influenced by sculpt curves.
How Sculpt Curves Work
-
1
-
Alias projects the sculpt curve onto the surface along the surface normals.
-
2
-
Alias links the points along the sculpt curve to the points on the projected curve.
-
3
-
When a point on the sculpt curve moves, the corresponding point on the surface moves also.
|
|
See Changing the Influence of
Sculpt Curves on page 449
for details on how to modify
the weights and region of
influence.
|
- The degree to which the point on the surface follows the point on the sculpt curve depends on the weight or weights along the sculpt curve.
- The area of the surfaces which is pulled along is the region of influence of the sculpt curve.
How To
To add a sculpt curve to the network:
|
|

|
-
1
-
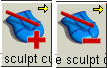
Click the Add sculpt curve icon, or choose Add/delete sculpt > Add sculpt curve from the CrvNet Tools palette menu.
-
The curves of the curve network highlight. Existing sculpt
curves highlight in red.
-
2
-
Click the free curves and/or isoparms you want to use as sculpt curves, or drag a pick box around them.
-
As you click each curve, it is added to the curve network
as a sculpt curve and highlighted in red, if it is valid.
-
If the sculpt curve does not map to any of the network
surfaces, it is rejected and remains displayed in its default
color.
-
Once mapped to the network surfaces, the sculpt curves
act as handles, interactively reshaping the surfaces as you
move or edit them.
To remove a sculpt curve from the curve network:
|
|

|
-
1
-
Click the Delete sculpt curve icon, or choose Add/delete sculpt > Delete sculpt from the CrvNet Tools palette menu.
-
The curves of the curve network highlight. Sculpt curves
highlight in red.
-
2
-
Click the sculpt curves you want to stop using, or drag a pick box around them.
-
As you click each sculpt curve, it is removed from the
curve network.
To pin or unpin edges:
|
|

|
-
1
-
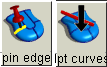
Click the Pin edge icon, or choose Pin edge from the CrvNet Tools palette menu.
-
2
-
Click the curve segments you want to pin or unpin.
-
3
-
Click Go.
-
The curve segments you clicked are toggled between
being pinned (not influenced by sculpt curves) and
unpinned (influenced by sculpt curves).
To reset the mapping, weight, and influence of sculpt curves:
|
|

|
-
1
-
Click the Reset sculpt curves mapping icon, or choose Reset sculpt curves mapping from the CrvNet Tools palette menu.
-
2
-
A dialog box asks if you really want to reset the mapping of the sculpt curves.
- Click Yes to disconnect the sculpt curves from the network, eliminating all the modifications made to the surfaces from the time the sculpt curves were first mapped, and then remap them onto the network.
>
|
Note:
|
The same effect can be obtained by deleting all the sculpt
curves, then adding them back to the network.
|
Tips and Notes
- If the Auto-update tool is toggled off, you will need to click the Build network tool to update the network with the changes. See page 437.
- To speed up rebuilds, keep the sculpt curves simple.
- Just as if you were editing the surface manually, the sculpt curve can only reshape the surface if it has enough CVs to control it.
-
For example, mapping a sculpt curve to a degree 3 surface
with one span in each direction will not allow detailed
modifications of the surface. The four interior CVs in this
example are not enough to make the sculpting effort
worthwhile.
- Ideally, you will add sculpt curves to the network only after you are satisfied with the topology and continuity of the surface.
-
Sculpt curves are generally most useful as "post-
processing" tools, especially since it can take a long time
to rebuild a curve network that has sculpt curves.
- Even when the curve network is influenced by sculpt curves, it still maintains the continuity you specify with the continuity tools (see page 440).
- Sculpt curves can be applied only to four-sided regions in a curve network. Surfaces fitted to triangular regions and regions with collapsible T-junctions remain unchanged by sculpt curves.
- You can only use free curves and isoparms as sculpt curves. You cannot use curves-on-surface or trim edges.
- Once sculpt curves are mapped onto the curve network, any changes to the topology of the network (such as adding or removing curves) requires Alias to remap the sculpt curves.
-
Because this operation can potentially take a long time, a
dialog box will ask you if you really want to make the
change.
|
CrvNet Tools >
Influence Weights >
Unit weight,
Multi weight
CrvNet Tools >
Region of influence
> Small, Medium,
Large

|
Changing the Influence of Sculpt Curves
|
|
|
|
|
Purpose
- Change the amount of influence a sculpt curve has on the network surfaces.
- Change the size of the surface region influenced by a sculpt curve.
Overview
If a sculpt curve is like a handle on the surface, you can imagine the handle being attached to the surface by a series of springs. To control how much the handle pushes and pulls on the surface, you change the stiffness of the springs. This corresponds to the weight(s) of the sculpt curve.
You can specify how much the sculpt curve influences the surface (how much it pulls or pushes) along its length:
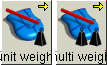
- Unit weight: the entire sculpt curve exerts the same amount of influence on the surface.
- Multi weight: you can specify different amounts of influence (weights) along the length of the curve.
You can also specify a sculpt curve's region of influence. This is how much of the surface is affected around the sculpt curve.
- A Large region of influence makes the surface act like a very flexible material: pulling the sculpt curve pulls a lot of the surface.
- A Medium region of influence make the surface seem stiffer: pulling a sculpt curve pulls less of the surface.
- A Small region of influence makes the surface seem very stiff: pulling a sculpt curve does not pull much of the surface.
How To
To make a sculpt curve have the same amount of influence along its entire length:
|
|

|
-
1
-
Click the Unit weight icon, or choose Influence weights > Unit weight from the CrvNet Tools palette menu.
-
All sculpt curves in the network highlight in red.
-
2
-
Click the sculpt curve you want to change.
-
The Unit weight tool displays the current weight profile of
the sculpt curve.
-
3
-
Drag the mouse left or right to change the weight of the curve, or type an exact value.
-
4
-
Click Go.
-
The Unit weight tool changes the weight of the curve.
To set different amounts of influence at different points along a sculpt curve:
|
|

|
-
1
-
Click the Multi weight icon, or choose Influence weights > Multi weight from the CrvNet Tools palette menu.
-
All sculpt curves in the network highlight in red.
-
2
-
Click the sculpt curve you want to change.
-
The Multi weight tool displays the current weight profile of
the sculpt curve.
-
3
-
Edit the weight profile by manipulating the "needle" handles which extend above the weight profile comb:
- Click the profile comb, then click again to insert a new needle for editing.
- Click one of the labeled needles, then drag with the left mouse button to change the weight at that point in the profile.
- Click one of the labeled needles, then drag with the middle mouse button to move the needle in the profile.
- Click one of the labeled needles, then click with the right mouse button to remove the needle from the profile.
-
4
-
Click Go.
-
The Multi weight tool changes the weights of the curve.
To change a sculpt curve's region of influence:
|
|

|
-
1
-
Click one of the region of influence tools (Large region, Medium region, or Small region), or choose from the Region of influence sub-menu of the CrvNet Tools palette menu.
-
The sculpt curves highlight in red and are labeled with
their current regions of influence.
-
2
-
Click the sculpt curve you want to change, or drag a pick box around more than one sculpt curve.
-
The tool changes the region of influence of the curve(s).
Tips and Notes
- If the Auto-update tool is toggled off, you will need to click the Build network tool to update the network with the changes. See page 437.
See Also
|
CrvNet Tools >
Analyze network

|
Troubleshooting the Network
|
|
|
|
|
Purpose
Display information about the network, allow inspection of curve segments and sculpt curves, and recommend fixes for problems with continuity.
How To
To show network information:
-
1
-
Click the Analyze network icon, or choose Analyze network from the CrvNet Tools palette menu.
|
|
To see how to make a
network the current one, see
To pick a curve network: on
page 437.
|
-
The Analyze network tool displays information about
components of the current curve network (see the Analysis
section below for explanations of the information shown).
-
2
-
Click and hold on a curve segment or sculpt curve to show more information, including a recommendation on how to edit the network if continuity could not be achieved (see the Analysis section below for explanations of the different recommendations).
Analysis
The Analyze network tool labels the curve network with the following information:
|
Network component
|
Indicated by
|
|---|
|
Intersections
|
Red dots
|
|
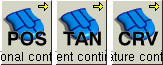
Continuity type for each curve segment
|
Label at the midpoint of the curve segment (Pos, Tan, Curv).
|
|
Curve segments with at least one adjacent surface
|
White lines
|
|
Curve segments with no adjacent surfaces
|
Green lines
|
|
Sculpt curves
|
Red lines
|
|
Pinned curve segments
|
Pin icon
|
>
|
Note:
|
If the tool fails to build a surface in a valid closed region of
the network, the edges are displayed in red. When this
happens, query the edge (see below) to obtain more
information about the probable cause of the failure.
|
The Analyze network tool also lets you click on curve segments and sculpt curves to get specific information:
|
Information
|
Description
|
|---|
|
Curve Type
|
Network or Sculpt.
|
|
Region of Influence
(for sculpt curves)
|
Large, Medium, or Small.
See Changing the Influence of Sculpt Curves on page 449).
|
|
Nature
|
Pinned or Free.
Whether or not the surface is pinned to the curve segment. (See how to use the Pin edge tool on page 447).
|
|
Edge Type
|
- Interior: the curve segment is inside the network (the surfaces are on both sides of the segment).
- Boundary: the curve segment is on the edge of the network (the surfaces are only on one side of the segment).
- Orphan: the curve segment is not connected to any surface at all.
|
|
Continuity
|
Achieved or Not achieved.
If continuity was not achieved, the Analyze network tool will give a recommended action.
|
|
Recommended Action
(for curve segments where continuity was not achieved)
|
A recommendation for how to modify the network so that the curve network can achieve the requested continuity.
|
If the curve network could not achieve the requested continuity at a particular curve segment, the Analyze network tool will recommend a course of action to fix the problem and achieve the requested level of continuity:
>
|
Note:
|
The Recommended Action is only an educated guess. In
many cases it is impossible to pinpoint the exact reason why
continuity could not be achieved.
|
|
|
|
"Recommended Action"
|
Possible Cause
|
Suggestions
|
|---|
|
End point(s) belong to degenerate surface(s)
|
One or more of the surfaces meeting at one of the intersections that define the curve segment is a degenerate surface.
|
- The intersection causing the problem is indicated with an arrow.
- Try to redefine the network with curves that do not require degenerate surfaces.
|
|
Check network topology at end point(s)
|
One of the intersections that defines the curve segment may be part of a region with more than four sides.
|
- The intersection causing the problem is indicated with an arrow.
- Try to redefine the network with curves that do not require non-rectangular surfaces.
|
|
Conflicting surfaces incident at endpoint(s)
|
There may be a conflict between the normals or curvatures of the surfaces (outside the network) which meet at this intersection.
|
- The intersection causing the problem is indicated with an arrow.
- Check the alignment of the surfaces at the endpoint of the curve segment, and reshape to provide rquired continuity.
|
|
Problem curve at endpoint(s)
|
One or both of the curves intersecting this curve segment do not have sufficient curvature quality.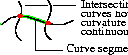
|
- The intersection causing the problem is indicated with an arrow.
- Use the Curve curvature measurement tool to check the curvature of the intersecting curves (see page 376).
|
|
Align curves at edge end(s)
|
The curves intersecting this curve segment are badly misaligned.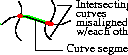
|
- Check the alignment of both pairs of curve segments.
|
|
Smooth curve incident at ends
|
One or both of the curves intersecting this curve segment have some kind of quality problem.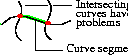
|
- Turn on display of edit points and look for bunched up edit points on the intersecting curves.
- Use the Curve curvature measurement tool to check the curvature of the intersecting curves (see page 376).
- Use the Smooth tool to smooth the intersecting curves (see page 112)..
|
|
Check edge curve for problems
|
The curves that this curve segment belongs to has some kind of quality problem.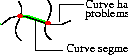
|
- Turn on display of edit points and look for bunched up edit points.
- Use the Curve curvature measurement tool to check the curve's curvature (see page 376).
- Use the Smooth tool to smooth the curve (see page 112).
|
|
Check knot spacing on edge curve
|
The curve that this curve segment belongs to may have "bunched up" edit points or multi-knots.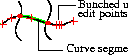
|
- Edit or rebuild the curve to spread out the edit points.
|
|
Simplify triangle curves
|
The curves defining a triangular region are too complex.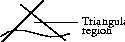
|
- Use the Rebuild curve tool to reduce the number of edit points in the curves (see page 190).
- Use the smooth tool to remove sharp bends in the curves (see page 112).
|
|
See Also
- Introduction to Curve Networks on page 430
|


