|
|
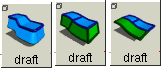
Surfaces > Draft
|
Using Draft, Flange and Collar
|
|
|
|
|
Purpose
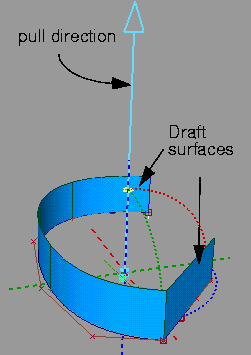
Create ruled surfaces (surfaces that are flat in some direction at every point) by pulling a surface from a curve or surface curve in a given direction, or by pulling a surface curve at an angle to the surface normal.
Overview
The Draft tool has three distinct uses and effects based on the Mode setting:
|
|

|
- Draft surfaces start from a set of curves and extend away from the curves at an angle to a pull direction.
-
Use Draft when you want to make sure a surface can be
extracted from an injection mold.
|
|

|
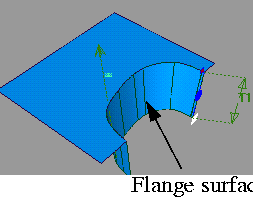
- Flange surfaces start from a set of isoparms, surface edges or curves on surface, and extend away at an angle to the original surface.
-
For example, you can use Flange mode to build a "skirt"
surface around the edge of another surface.
|
|

|
- Collar surfaces are very similar to Flange surfaces. They also start from a set of isoparms, surface edges or curves on surface, and extend away at an angle to the original surface.
-
The difference is that the surface curves used to create
Collar surfaces must be tangent continuous, and the result
is a single surface (the Flange mode takes disconnected
surface curves and creates multiple surfaces).
How To
To set the mode of the Draft tool:
-
1
-
Double click the Draft icon, or choose Draft from the Surfaces palette menu.
-
2
-
Set the Mode to Draft, Flange, or Collar
-
3
-
Click Go.
To create Draft surfaces:
|
|
|
-
1
-
Set the Mode to Draft (see above).
-
2
-
Click all the free curves, isoparms, surface edges, and/or curves on surface you want to build from.
-
Click a curve again to deselect it.
|
|
|
-
3
-
Click Go.
-
The Draft tool builds the new surface, and attaches the
angle/distance and pull direction manipulators.
-
4
-
Use the manipulators to adjust the parameters of the draft surface (see page 304).
-
5
-
When you are finished with the surface, Click Draft again to start a new surface, or choose another tool.
- If the pull direction is too close to a curve's tangent, the draft surface will not build correctly. The Draft tool indicates this condition by drawing dotted red lines at the problem curves.
- At corners (where the original curves share endpoints), the Draft tool will create tangent-continuous fillets, or trim (as required) to create clean corners.
To create Flange surfaces:
|
|
|
-
1
-
Set the Mode to Flange (see above).
-
2
-
Click all the isoparms, surface edges, and/or curves on surface you want to build from.
-
Click a curve again to deselect it.
|
|
|
-
3
-
Click Go.
-
The Draft tool builds the new surface, and attaches the
angle/distance manipulator. (Flange surfaces do not have a
pull direction. The angle is relative to the original surface's
normal).
-
4
-
Use the angle/distance manipulator to adjust the parameters of the draft surface (see page 304).
-
5
-
When you are finished with the surface, Click Draft again to start a new surface, or choose another tool.
To create Collar surfaces:
-
1
-
Set the Mode to Collar (see page 302).
-
2
-
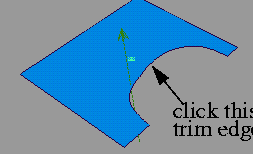
Click all the isoparms, surface edges, trim edges and/or curves on surface you want to build from.
- Click the curves in order, from one end of the common edge to the other. The curves must be tangent continuous with each other.
- As each curve is added, red lines appear on the surface curve indicating the tangent plane direction.
- Click a surface edge, isoparm, curve on surface, or trim edge to add it to the common edge.
- Click the previous curve again to deselect it.
- If the end of the curve is close to the beginning of the first curve, the common edge closes up.
-
3
-
Click Go.
-
The Draft tool builds the new surface and attaches the
angle/distance manipulator. (Collar surfaces do not have
a pull direction. The angle is relative to the original
surfaces normal).
-
4
-
Use the angle/distance manipulator to adjust the parameters of the draft surface (see page 304).
-
5
-
When you are finished with the surface, Click Draft again to start a new surface, or choose another tool.
To use the angle/distance manipulator:
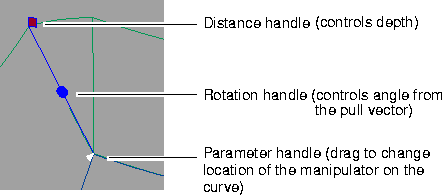
- Click one of the handles, then drag left or right to change the parameter, or type a number to set the value exactly.
To use the pull direction manipulator:
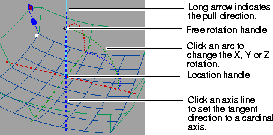
- Click an axis line to set the pull direction.
- Type "x", "y", or "z" to set the pull direction to an axis. Type "w" to set the pull direction to the current window's view axis.
- Click one of the arcs, then drag the mouse left and right to change the pull direction.
- Click the free rotation handle to rotate freely in all directions.
- Type three numbers (X, Y, and Z rotation) to set the rotation values exactly.
- Click the location handle, then drag to move the manipulator in space.
Tips and Notes
|
|
|
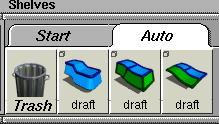
- If you use the different modes of the Draft tool regularly, you may want to drag a copy of the tool in each mode to a shelf. Each mode of the Draft tool has a distinct icon.
- Double click the Draft icon, or choose Draft from the Surfaces palette menu.
- With the middle mouse button, drag the icon from the option window to the shelf.
- Repeat for the other Mode options.
Options
Common Options
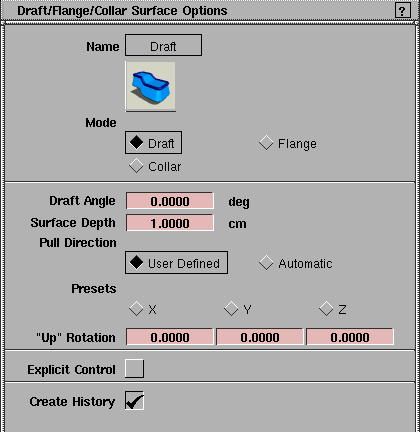
Mode
-
- Set the type of surface created by the tool. See the Overview above for descriptions of the different modes.
Draft Angle
-
- The initial angle of the surface from the pull direction/normal. You can change this value using the angle/distance manipulator when you use the tool.
Surface Depth
-
- The initial depth of the surface from the original curves. You can change this value using the angle/distance manipulator when you use the tool.
|
|
This option does not appear
if Mode is Collar. It may not
be available for your Alias
product.
|
Explicit Control
-
- Turn this option on if you want to specify the exact degree and number of spans of the Draft or Flange surface.
|
|
The Degree and Spans
options only appear if
Explicit Control is turned on.
|
Degree
-
- Degree of the draft or flange surface in the U direction. (The surface is always of degree 1 in the V direction.)
|
|

|
Spans
-
- Number of spans of the draft or flange surface in the U direction. (The surface always has a single span in the V direction.)
Create History
-
- Save the Draft history for later editing. If you turn on Create History, you can edit the original curves and the draft/flange/collar surface will automatically update.
|
|
These options appear when
Mode is Draft.
|
Draft Options
Pull Direction
-
- User Defined-you will explicitly set the initial pull direction.
-
- Automatic-the Draft tool will automatically figure out the best initial pull direction each time you use the tool.
|
|
This option appears when
Pull Direction is User
Defined.
|
Presets
-
- Click X, Y, or Z to set the "Up" Rotation option to one of the cardinal axes.
|
|
This option appears when
Pull Direction is User
Defined.
|
"Up" Rotation
-
- Enter three values (X, Y, and Z rotation) to define the initial pull direction. You can change this value using the pull direction manipulator when you use the tool.
|
|
These options appear when
Mode is Collar.
|
Collar Options
|
|
|
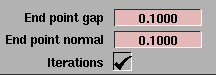
End point gap
-
- This determines the maximum distance allowed between the end points of adjacent selected curves on surfaces.
End point normal
-
- This determines the maximum angle allowed between the surface normals at the end points of adjacent selected curves on surfaces.
Iterations
-
- This controls the accuracy of the tool. If turned on (default), the tool iterates to achieve the specified Surface Depth and Draft Angle. The resulting surface will be more accurate but the iterations may produce a variable number of spans, depending on the chosen depth and angle. If turned off, the resulting surface will be more approximate, but will always contain a constant number of spans.
See also:
|
Surfaces >
Combine surfaces

|
Combining Several Surfaces into One
|
|
|
|
|
Purpose
Create a single new surface from several separate surfaces.
Overview
Often it is easier to model a complex shape with several surfaces, rather than one large surface.
However, these kinds of composite surfaces cannot be used in some circumstances. You may want to use a tool that only works on single surfaces, or your manufacturing system may require a single surface.
The Combine surfaces tool allows you to combine several surfaces into one surface. It has the following limitations:
- The combined outer boundary of all the surfaces must have exactly four sides.
How To
To combine several surfaces into one new surface:
-
1
-
Click the Combine surfaces icon, or choose Combine surfaces from the Surfaces palette.
-
2
-
Pick the surfaces you want to combine.
- As you add surfaces, the surface boundaries change color. Green means the current group of surfaces has a four-sided boundary and can be combined. Yellow means they cannot be combined.
- When the surfaces can be combined, an arrow appears showing the normal of the new surface. Click the arrow to reverse the normal of the new surface.
-
3
-
When you have picked all the surfaces you want to combine and the boundary is green, click Go.
-
4
-
The system prompts you to click the edges that must be continuous with adjacent surfaces.
- Click a green boundary line to mark it for tangency with adjacent surfaces. A label appears on the boundary.
- Click the label to change the continuity type. Each click cycles through positional (pos), tangent (tan), and curvature (cur).
-
5
-
Click Go.
How the Function Works
-
1
-
Combine surfaces fits four curves to each of the four outer boundaries of the set of surfaces you selected.
-
2
-
Then, it places a simple surface, of the degree you selected in the option box, within those four curves.
-
3
-
The function samples the interior of all the selected surfaces and modifies the surface to match those samples.
-
4
-
If the surface doesn't match well enough, Combine surfaces inserts knot isoparms into the simple surface to allow for finer adjustments to the shape.
-
5
-
If you selected continuity with boundary surfaces, Combine surfaces samples those surfaces as well, and increases the samples along the outer boundaries of the original surfaces.
Tips and Notes
- Combine surfaces uses tolerances from Preferences > Construction options (in the Tolerances section):
- Curve Fit Distance (under Fitting) controls the fit of the combined surface to the original surfaces.
- Continuity Angle (under Continuity) controls the fit of the surface normals at sample points.
- Using very tight tolerances does not guarantee that the resulting surface will match the original surfaces with higher accuracy.
-
Combine surfaces tries to achieve tighter tolerances by:
- inserting more knot isoparms for finer control.
-
The result is often a surface with more complexity than
you need.
- This tool can often achieve good fits with relatively loose tolerances. If you relax the tolerances, it also reduces the time it takes to create the new surface.
-
Try using loose tolerances to begin with, and increase
them if you are not achieving the accuracy you need.
Options
|
|
See Understanding Surfaces
on page 18.
|
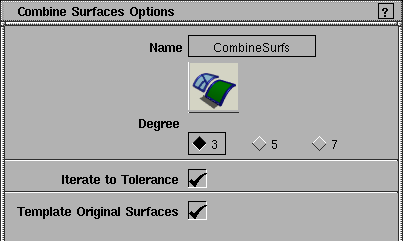
Degree
-
- Choose the degree of the resulting surface: 3 (cubic), 5, or 7.
Iterate to Tolerance
-
- Increase samples and insert more isoparms until the tolerances are reached.
|
|
These sliders only appear
when Iterate to Tolerance is
off.
|
Max Spans U / Max Spans V
-
- Do not create a combined surface with more than the given number of spans in the U and V direction, even if the tolerances are not reached.
Template Original Surfaces
-
- On-once the new surface is finished, the Combine surfaces tool makes the original surfaces templates.
-
- Off-the Combine surfaces tool leaves the original surfaces untouched.
|


