|
Animation > Param control |
Setting Keyframes for Isolated Animatable Properties | ||||
|
| |||||
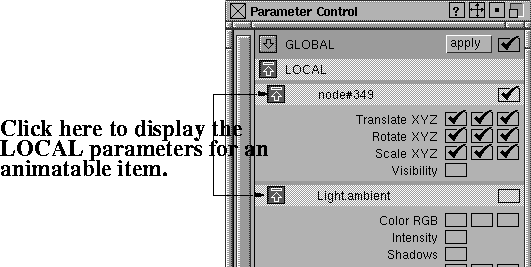
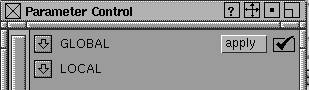
There are two groups of isolated animatable properties: GLOBAL and LOCAL. Each controls different animation parameters. LOCAL animation parameters are per object, where as GLOBAL are for all objects of that sort. How to UseSelect Animation > Param control to display the Parameter Control window.
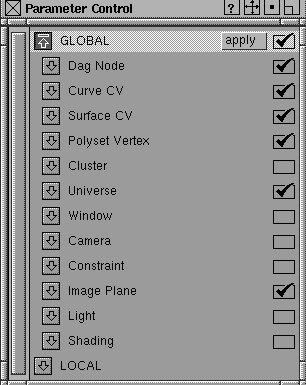
In the Parameter Control window, you can see all the animation parameters (attributes) for every type of item that can be animated. For example, X Translate is an animation parameter of a DAG node, Angle of View is an animation parameter of a camera, and Reflectivity is an animation parameter of a shader. GLOBAL ParametersIf you click the arrow beside GLOBAL, a list of all items that can be animated is displayed. This includes DAG nodes, curve CVs, surface CVs, cameras, lights, and shaders. If you click the arrow beside an animatable item, a list of all the attributes that can be animated for that type of item is displayed. Global Parameter Window
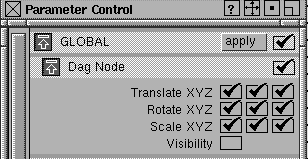
When you expand the DAG node Global parameter settings, this is what you find. Any box with a check represents an animatable parameter. Visibility doesn't have a check; therefore, this parameter cannot be animated with set keyframe at this time.
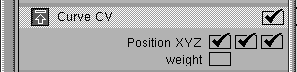
When you expand the Curve CV Global parameter settings, you will see that Position XYZ can be animated and Weight, for the moment, cannot.
Shading Parameters Global Settings | |||||
|
|
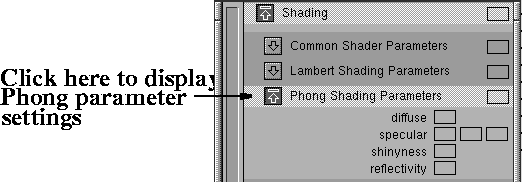
When you click the arrow beside the Shading parameters, sub-headings for shader and texture parameters are displayed. Clicking an arrow beside a sub-heading displays the parameter settings for that shader or texture.
| ||||
|
For details on shader and texture parameters, see the Multi-lister in Rendering in Alias. |
>
LOCAL ParametersIf you click the arrow beside LOCAL, you can see a list of all animatable items that are currently active. If you pick or unpick objects in the modeling windows, or select a new shader, texture, or light in the Multi-lister window, the items under LOCAL change to reflect this new set of active items. >
If you click the arrow beside an animatable item, you see all the attributes that can be animated for that type of item. Usually this list is the same as in the GLOBAL parameters for that type of item. However, in some cases, the LOCAL animation parameters are a subset of the GLOBAL animation parameters. For example, all lights have color, intensity, and shadow attributes. However, only ambient lights have the Ambient shade attribute. Local Parameter Window
The LOCAL parameter window lists all items that are active.
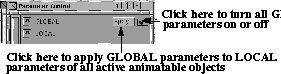
Each animation parameter (GLOBAL or LOCAL) has a box next to it, which contains a check mark (4) if the parameter is turned ON. To toggle it OFF, click in the box. Parameter Names For IK HandlesAlthough IK handles are DAG nodes, some types will display parameter names which are different from Translate, Rotate, and Scale, which are the standard for DAG nodes. The following diagram illustrates the difference between spline handles and a single-chain IK handle. (See Introduction to Inverse Kinematics for details on Rotation Order and Roll and Twist).
Parameters | ||||
|
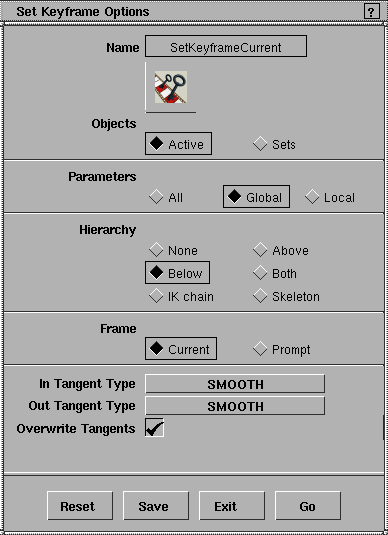
For example, Animation >
Set keyframe, Edit >
Duplicate channels - |
Any animation functions that have Params in their option box operate based on the on or off condition of their animation parameter. If the Parameters option in these functions is set to Global, then the function is only applied to the animation parameters that have a check mark next to them in the GLOBAL parameters section of the window. If the Parameters option in these functions is set to Local, then the function is only applied to the animation parameters that have a check mark next to them in the LOCAL parameters section of the window. The difference between GLOBAL and LOCAL is that there is only one set of GLOBAL parameters that apply to all objects. LOCAL parameters, on the other hand, apply to each animatable item. Therefore, when you set the LOCAL parameters of each item individually and then invoke some animation functions with Parameters set to Local, different animation parameters of different items will be affected. The state of each GLOBAL parameter is set to its default each time you start up Alias. However, LOCAL parameters for an item are saved when you store a file. So when you retrieve a model, its latest LOCAL parameter settings are also retrieved. The check mark box next to each item's animatable parameter gives a visual cue about that item's parameter. In particular, if the item is animated in a LOCAL parameter (that is, a channel exists for the animation parameter of that item), then the box next to that parameter stands out by being slanted (just like the slanted boxes in the SBD window for animated items) and white. To turn all the animation parameters for an item on or off click the check box beside that item's name (under both the GLOBAL and LOCAL parameter headings). Using the Apply ButtonSometimes you may want to change the LOCAL parameter settings for many items of the same type all at once. For example, if you are animating the CVs of a curve or surface in the XY plane, you may want to turn off the LOCAL animation parameter for the Z position of all CVs. Since an object could have hundreds of CVs, it would be very cumbersome to pick all the CVs, and turn off the Z position LOCAL animation parameter for each CV. Instead, you can pick all the CVs, click the Z Position GLOBAL parameter box off in the Curve CV or Surface CV parameter window (depending on whether the CVs are on a curve or a surface), and then click the apply button in the GLOBAL parameters section of the window. This applies the GLOBAL parameter settings for each type of item to the LOCAL parameter control of each item in the LOCAL parameters window. Now if you open one of the CVs in the LOCAL parameters window, you see that its Z Position parameter has been turned off. Next to the apply button there is a check box. If you click in this box, you can turn all the GLOBAL parameters on or off for every type of animatable item at once (4 indicates that they are on).
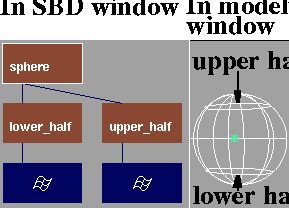
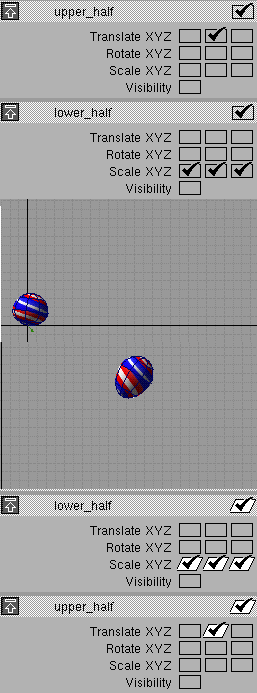
Example: Animating a BallThis example shows you how to animate a bouncing ball. The ball squashes and stretches when it hits the ground and bounces off again. | ||||
|
|
| ||||
|
|
Animating a ShaderThis example shows how to animate a shader.
Animating a LightTo animate a light's attributes (such as color or intensity), select the light in the Multi-lister and animate the light as you would animate a shader. To animate the position of a light, select the DAG nodes above the light in the SBD window, and animate the DAG nodes. For more details on how to animate other kinds of objects, such as cluster percentages or joint constraints, see Animation > Set keyframe on page 52. Where you can use Parameter ControlThe following animation functions have an option to use parameter controls (your package may not have all of these functions):
|
| Copyright © 1998, Alias|Wavefront, a division of Silicon Graphics Limited. All rights reserved. | Please send questions or comments regarding the documentation to: [email protected] |


 ) to act on ACTIVE objects. All items that are listed under
the LOCAL heading are considered ACTIVE for the purposes
of these animation functions.
) to act on ACTIVE objects. All items that are listed under
the LOCAL heading are considered ACTIVE for the purposes
of these animation functions.