Multi-lister |
|
||
2 |
Multi-lister |
The Multi-lister is the primary interface you use to create, edit, manage and display shaders, textures, lights, and the environment. You also use the Multi-lister to access the Control Window and the Color Editor. In This Section:
|
|
|
Windows > Multi- lister |
Multi-lister Overview | ||
|
| |||
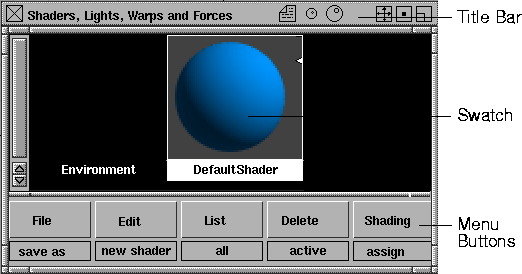
The Multi-lister consists of a title bar, five menu buttons, and a swatch display area. The swatches represent the environment, shaders, textures, and lights contained in your scene. The title bar contains tools to control the display of swatches in the Multi-lister. The menu buttons contain tools to create, edit, manage, and display shaders, textures, lights, and the environment.
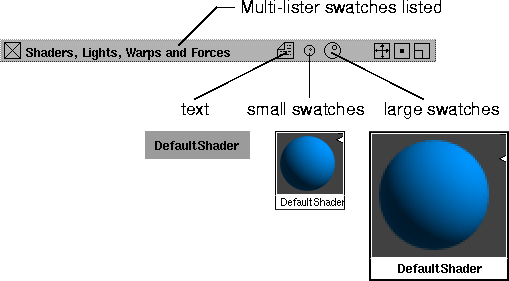
Title BarThe title bar indicates the type of swatches listed in the Multi-lister. It also lets you control the display of swatches in the Multi-lister (text, small swatches, large swatches), and lets you close, track, and minimize/maximize the Multi-lister window.
Swatches | |||
|
On the left side of the swatch display area is a scroll bar, which you can use to scroll through the list of swatches if they cannot all be displayed in the Multi-lister at the same time. |
There are four different types of swatches used in the Multi-lister: environment, shader, texture, and light.
These four types of swatches are used to represent:
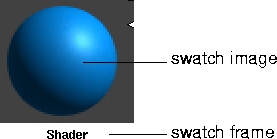
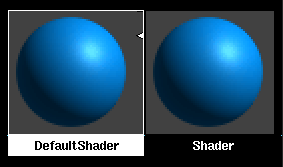
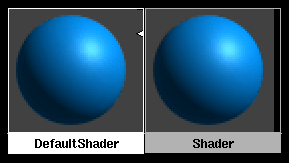
Swatches are listed in the following order: the environment, shaders, lights. Shaders and lights are listed alphabetically by name. Textures are listed next to the environment, shader, or light they are mapped to. All swatches consist of an image, which represents the appearance of the environment, shader, texture, or light, and a frame, which contains the swatch name and any icons.
The type of swatch image, and the way you use the swatch, is different for different swatch types. All swatches, however, share the following features.
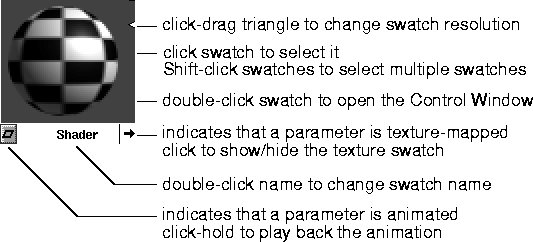
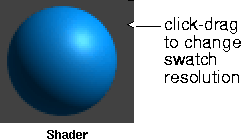
You can select a swatch by clicking on it. You can select several swatches by Shift-clicking on them. By double-clicking a swatch, you open the Control Window. You can then edit any parameter for that particular environment, shader, texture, or light. See Control Window on page 33. You can edit the swatch name by double-clicking on the name and typing a new name. You can change the resolution of the swatch's image by click-dragging the white triangle on the right side of the swatch either up (higher resolution) or down (lower resolution). If an environment, shader, texture, or light has a texture mapped to one of its parameters, the swatch will have an arrow in its bottom right corner. By clicking on this arrow, you can toggle the display of the texture in the Multi-lister. If you have animated a parameter of an environment, shader, texture, or light, the swatch will have a diamond in its bottom left corner. By click-holding on this diamond, you can play back the animation of the swatch. Shader Swatches | ||
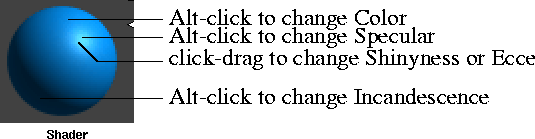
A shader swatch uses a sphere to represent the appearance of a surface. By Alt-clicking on different parts of the sphere, you can open the Color Editor and edit the shader's Color, Specular, or Incandescence settings. By click-dragging on the sphere's highlight, you can interactively edit the shader's Shinyness or Eccentricity value.
Surface Texture Swatches | |||
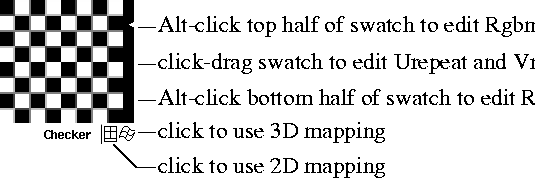
A surface texture swatch displays the two-dimensional texture. By Alt-clicking on the top half of the swatch, you can open the Color Editor and edit the texture's Rgbmult setting. By Alt-clicking on the bottom half of the swatch, you can open the Color Editor and edit the texture's Rgboffset setting. By click-dragging anywhere in the swatch, you can interactively edit the texture's Urepeat and Vrepeat values. | |||
A surface texture swatch has two texture mapping symbols in its bottom right corner. By clicking on one of these symbols you activate either 2D mapping or 3D mapping.
The File and Stencil textures appear black in the Multi-lister until you specify an image file for them. Environment Texture and Solid Texture Swatches | |||
|
See Environment Textures on page 105 and Solid Textures on page 183. |
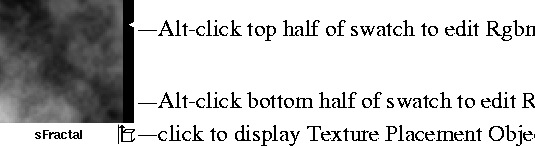
An environment or solid texture swatch uses a two-dimensional pattern to represent the three-dimensional texture. By Alt-clicking on the top half of the swatch, you can open the Color Editor and edit the texture's Rgbmult setting. By Alt-clicking on the bottom half of the swatch, you can open the Color Editor and edit the texture's Rgboffset setting. | ||
An environment or solid texture has a texture placement symbol in its bottom right corner. By clicking on this symbol you can display the texture's Texture Placement Object in the modeling windows.
The Ball, Cube, Sphere, Projection, and Volume textures appear black in the Multi-lister until you specify an image file or series of image files for them. The sCloud texture always appears black in the Multi-lister; the shader it is mapped to displays the actual texture. Light Swatches | |||
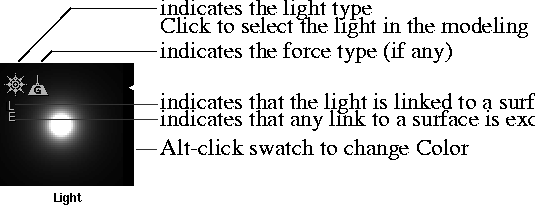
A light swatch represents a light as viewed from 10 units away with a 20 degree field of view. By Alt-clicking the swatch you can open the Color Editor and edit the light's Color parameter. A light swatch has a light type symbol in its top left corner. If the light has a force component, the light swatch will also have a force type symbol. If the light is linked to a surface, the light swatch will also have an L symbol. If a light's link to a surface is exclusive, the light swatch will also have an E symbol.
Menus | |||
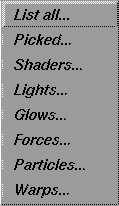
The Multi-lister menus contain tools to create, edit, manage, and display shaders, textures, lights, and the environment. To display a menu, click and hold the mouse on a menu button at the bottom of the Multi-Lister window. The default active menu item is displayed below each button.
Opening the Multi-lister | |||
|
| |||
You must open the Multi-lister to create, edit, manage, and display shaders, textures, lights, and the environment. To open the Multi-lister: | |||
|
|
| ||
Changing the Multi-lister Display | |||
|
| |||
You can change the type, size, or style of swatches listed in the Multi-lister. For example, if you have many shaders, texture, and lights, you may want to only display lights, or to display small swatches, or low resolution swatches, to speed up the Multi-lister display. To change the type of swatches listed in the Multi-lister: | |||
To change the size or style of swatches in the Multi-lister:
To change the resolution of a swatch in the Multi-lister:
| |||
|
|
Selecting an Environment, Shader, Texture, or Light | ||
|
| |||
You must select an environment, shader, texture, or light in order to use the Control Window to edit its parameters, or to use many of the Multi-lister menu tools. You can select one or many shaders, texture, lights, and/or the environment. To select a shader, light, texture, or the environment:
To select several shaders, lights, textures, and/or the environment:
Creating a Shader or Light | |||
|
| |||
When you start a new scene, there is only the environment and one shader (the DefaultShader) defined (and assigned to all objects). You can create a new shader (based on the DefaultShader) or light, or copy a shader or light that you have customized. | |||
|
Shader#1 and Light#1 are not used explicitly as names; the first shader or light with a given name is implicitly numbered 1. |
By default, shaders and lights are named sequentially as you create them: DefaultShader, Shader, Shader#2, and so on, and Light, Light#2, and so on. To avoid confusion, however, you should name all your shaders and lights as you create them. If you let the system assign default names and later combine two or more files, all shaders and lights will be renumbered to avoid duplicate names. It may then become difficult to distinguish shaders and lights by name. To create a new shader: | ||
| |||
To create a new light using the Multi-lister: | |||
To copy a shader or light:
| |||
Editing an Environment,
| |||
|
| |||
To edit a shader, texture, light, or the environment: | |||
To change the name of an environment, shader, texture, or light:
To delete a shader, texture, or light:
| |||
Saving and Loading an Environment, Shader,
| |||
|
| |||
You can save a shader, texture, light, or environment to a file that is independent from your scene's wire file to create a library. You can then load a saved shader, texture, light, or environment into any other scene. To save an environment, shader, texture, or light:
| |||
To load an environment, shader, texture, or light: | |||
| |||
| Copyright © 1998, Alias|Wavefront, a division of Silicon Graphics Limited. All rights reserved. | Please send questions or comments regarding the documentation to: [email protected] |