Chores
Inspecting, Washing, Combing and/or Carding of Wool
The verr of the holding will provide most if not all of the wool needed for garments for the holdings occupants to wear. They will be shorn as the wool grows long enough to be usable. Once the wool is shorn, it is time to card it.
Clean fleece is a must! Lanolin left in the fleece will cause excess pills in the finished product.
Begin the process of picking through the wool. Your fingers will untangle it as they pull through looking for any blades of straw or grass that impurifies it. Any foreign particles are quickly discarded from the fluffy wool and the cleansed wool put back into the basket. In doing so if split fibers are seen, they should be removed also. Divide fleece into 1/2 a stone sections. (2 Urthen pounds)
Fill two large basins with hot water. (no more than 130 degrees)
Place 1/4 of the fleece in water for 4 ehns, squeeze and set aside or in the soapy water.This step is to rinse the heavy stuff out and get ready to wash. using the same water do this with all sections of the fleece. This is called suint water and actually is beginning a saponification process You will see the water bubble like there is soap in it.
Take fleece and wash in tub of hot water, with 2 tefs (handfuls) of soap flakes. Do not make bubbles- just swish the soap to mix with the water. You want the water to feel slippery. and if greasy (lots of lanolin) add a spoon of soda ash or washing soda.
Let the fleece sit for 15 ehns. Do not let the fleece cool too much or the lanolin will recongeal on the fleece. Lanolin begins to congeal at 110 degrees. You will defeat Your purpose of washing if You allow this to happen.
Remove and rinse in hot water. Do not worry about soap left in the fleece. When carding most of the dirt will fall out.
Lay the fleece on the wire catches by the loom and spinning wheel to dry.
Carding: Remember something to help You...You are what you eat and that goes for carding too!
The better the beginning product the better the end result will be.
Combing may be done, but carding will better preserve the characteristics of the wool.
Take a spinning wheel, a fleece and a hand carder and you have the perfect set for turning fleece into yarn.
Good fleeces only need to have the tips freed for spinning. There is often no need to fully card quality staples.
The wool may then be dyed to various colors for use, with various plant and blood dyes.
Roving is the final step in the carding process. It divides the web into small strips called pencil rovings. These are collected on large spools on the end of the card. These spools of pencil roving will be placed on the spinning frame to make yarn.
NOTE:Blend colours - natural blacks with dyed red. Blend different fibres - wool and silk - experiment! Fleeces with a break and short edge pieces from a fleece card well together to make a batt for felting or a sliver for worsted spinning.
More information on Weaving cloth designs
Spinning and weaving were the year-round tasks of Viking women, both to clothe their families and to produce cloth for other essential purposes, such as the sails for Viking ships. Special combs with long iron teeth were used to card the roughly cleaned wool. It was then attached to a distaff- a wooden stick held in the left hand or the crook of the arm - and fibres teased from it were fastened to a spindle, weighted at the bottom with a spindle-whorl of clay or stone. The spindle was set turning and, as it dropped to the ground, drew out the wool into a thread. This was then wound into a ball, or a skein if it was intended for dyeing. Skeins were made with the aid of a reel - a handle with a curved bar at either end, on to which the wool was wound crosswise from corner to corner. The finished wool was woven on a warpweighted loom - an upright loom leant against the wall of the house. A weaver's other tools consisted of a sword-like weaving-batten of wood, whalebone or iron, and small pointed pin-beaters of wood or bone, used to make detailed adjustments to the threads.
No Viking Age warp-weighted loom survives, but it may be reconstructed on the basis of those still used in primitive communities. In such looms the warp (vertical threads) is held taut by weights and divided into two layers by a beam near the bottom. The upper warp threads hang in front of the beam at the same angle as the loom, while the lower threads hang vertically. Working from the top down, the weaver passes the weft (horizontal threads) through the gap in the warp, then beats it upwards with a weaving-batten. The lower warp threads are tied to a heddle-bar, supported on two rests. By pulling this out to the end of its rests, the weaver draws the lower threads through the upper thus changing their position before the weft is passed back in the opposite direction.
Plain (or tabby) weave and twill were the main weaves used in Viking Age Scandinavia. Plain weave is the simpler: single weft threads are passed alternately over and under the warp threads. In twill, above, the weft threads pass over one warp thread, then under two or more others, producing a diagonal effect. Shaggy woollen cloaks were a major export from Iceland. The tufted cloth was produced by inserting short lengths of wool into the warp during weaving.
Spinning: Theory and Preparation
Introduction
Knowledge of wool spinning existed 9,000 years ago and there is evidence to show that twisted cordage made from plant fibres was being used 20,000 years ago but as it isn't known for certain how the latter was produced care has to be taken in saying that the craft of spinning fibre into yarn is as old as that. From 9,000 years ago, however, there are examples of woollen thread in weaving and the spindles used to spin it.
Spinning has been practised by cultures all over the world with only slight differences in spindle styles and technique governed primarily by local materials and the fibre being spun. The use of hand spindles has never died out and is still practised today as a living tradition in many parts of the world besides the growing number of people in our own culture who are taking it up as a relaxing and creative pastime.
You are reading this article on a web site devoted to viking and dark age re-enactment so be advised that there are some anachronisms in this piece but I think they are obvious enough not to be misleading. Due to the ubiquitousness of spinning I have found no value in trying to sift out any elements that may be peculiar to Viking culture alone, if any exist. Authentic, though, to 10th century North Western Europe is the style of spinning described here; 'draft spinning' on low whorl spindles of different sizes to produce woollen yarn.
Basic Principles
Draft Spinning relies on the fibres being paid out, or 'drafted' as it is called in the terminology of spinning, from the prepared bunch of fibres, whether this is held in the hand or supported in some other way, straight into the path of the on-coming twist of the developing yarn from the spindle. The individual fibres must be able to slide past one another into the twist where they are trapped firmly into place their ends overlapping along the entire length of the yarn.
Fibre Preparation
In order for this to take place smoothly some initial preparation of the fibres is required prior to spinning, even if this is nothing more than opening up the matted fibres by hand and removing any vegetable matter that may be clinging to it. Some modern spinners prefer to spin fleece just as it is straight from the sheep without prior washing, described as spinning 'in the grease', and with the minimum amount of straightening and teazing in order to retain the character of the wool. This applies especially to the long curly type of fleece like Wensleydale. Preparation, if any at all, is entirely a matter of personal preference.
Assuming you are going to do some preparation, dirty fleece can be soaked for a few hours in plain cold water to lift any loose dirt but leave the natural oils intact. Really hot water and a degreasing agent like a squirt of washing-up-liquid, washing soda, soapwort solution or a specialist scouring agent will strip everything out of the fleece and may leave it uncomfortably dry to handle in which case it may be necessary to add some clean oil. Olive or almond oil rubbed in by hand or an olive oil spray emulsion is available from specialist suppliers.
Next, after washing and drying the fibre it is usual to carry out one of the combing operations to separate the individual fibres and arrange them in parallel alignment ready for spinning. These days there are a variety of different tools to do this job ranging from the rotary drum-carder for bulk production down to small dog-grooming combs that work well for tidying individual locks (called 'staples') of the longwool fleece. Large and small, hand - held and block mounted wool combs are available and these are authentic to the Viking period. Pairs of hand-carders are not authentic as they did not come into use until a little after our period, about the 12th century, but they are very efficient and comfortable to use. A single miniature carder (or wire toothed dog grooming brush) can be used for 'flick carding' longwool staples.
Selecting a Spindle
Now you will need to choose a drop-spindle. For our type of spinning a spindle with the whorl (weight) at the bottom of the shaft and a notch at the top the whole thing weighing between 2-4oz will be most suitable to start. There is a theory of whorls that goes something like this:-
A small light spindle weighing 1oz or less is for fine fibres like cotton, silk and some animal hairs and is sometimes used supported in a little bowl or held in the hand so as not to break the thread. This is another technique and not one we will be looking at here.
A 2oz spindle with a 2 inch diameter whorl works for fine to medium thickness wool. Same weight smaller diameter whorl gives a faster spin and tighter twist. Same weight larger diameter whorl gives slower spin and looser twist.
A 4oz spindle with a 4inch diameter whorl is the sort of thing you would use for thick bulky yarn or for plying, that is twisting together, two or more finer strands of yarn. With a larger diameter whorl spinning is slow and lazy giving a very high bulk open yarn for rug weaving. It is also useful for learning spindle control.
If you are plying on the same spindle you used to spin the single yarns it helps a great deal to make it heavier by slipping a supplementary whorl over the shaft before beginning to ply.
Direction of Spin
One final consideration to make before taking fibre and spindle in hand and starting to spin is the direction you are going to spin in; clockwise or anticlockwise.
A characteristic of a single strand of spun yarn is the way , once removed from the shaft of the spindle, it twists around itself. There are two ways of dealing with this problem; wet it and hang it under tension to dry or ply it, that is put two (or more) together and allow them to twist around each other. Either way the yarn then becomes stable. The twisting that occurs when two strands are placed side by side is in the opposite direction from the direction in which it was spun so when spinning with the intention of plying it is vital to be consistent in the direction of spin.
Twisting the spindle in a clockwise direction, natural for the right-handed, gives a 'Z' twist to the yarn and anticlockwise spinning gives an 'S' twist. These designations come from the slant of the diagonal line of twist as it spirals along the yarn.
So two 'Z' twist singles will be plyed anticlockwise giving an 'S' twist to the finished yarn. If two of these 'S' twisted doubles are to be plyed it would be in a clockwise direction returning to the original 'Z' twist.
Weaving yarn does not need to be plyed as a rule because it is held under tension on the shuttle and then packed down into the growing weaving and rendered stable when the cloth is finally removed from the loom and washed. Of interest from the point of authenticity is the fact that during the Viking period and into the later middle- ages it seems to have been customary for warp thread to be 'Z' twist and weft to be 'S' twist which would in itself have a stabilizing effect on the single threads.
Weaving Cloth on the Warp Weighted Loom
The warp-weighted loom is constructed of two upright beams connected at the top by a bar called the cloth bar. The upright beams are between 4.9 and 7.2 feet tall, and the cloth bar between 5.9 and 7.9 feet long. From the cloth bar of a warp-weighted loom are hung the warp threads. These are the threads which run vertically. The number of warp threads on the loom depends on the desired width of the fabric to be woven. The warp threads are divided into two groups for a simple weave. They alternate, even and odd threads. A beam parallel to the cloth beam is called the shed rod and helps to keep the evens and odds apart. It is positioned one third of the height of the uprights from the ground. The even numbered warp threads will hang perpendicular to the ground, behind the shed rod. The odd numbered warp threads are placed in front of the shed rod, and are parallel to the uprights, which lean against a wall. The open space between the two sets of warp threads is called the natural shed. In the diagram below, the even threads are represented by the letter A, odd threads by B.
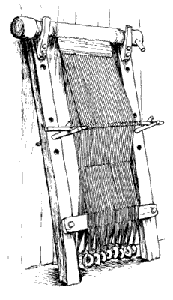
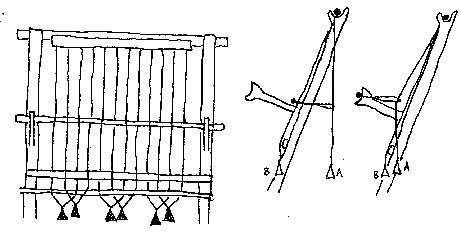
These warp threads are gathered and tied at the bottom to a cord which is strung through a warp-weight. The warp weights insure that the warp threads do not blow in the breeze or get tangled and in the wrong order. The even set of threads (in our case, thread A) is tied to another rod which is known as the heddle rod. The heddle rod is placed halfway up the height of the uprights and sits on supports, from which it can be removed. The heddle rod can be lifted forward to bring the set of threads represented by A in front of the threads represented by B. This creates a different shed than the natural shed. The thread that is being used to weave, called the weft or woof thread, can then be passed between the two sets of warp threads, through the shed. After this pass, the heddle rod is returned to its bracket and the even threads will again fall behind the odd threads. The weft thread is then passed back through the natural shed. This process of passing the weft thread through the natural shed, then lifting the heddle rod and passing the weft back the other direction is repeated countless times when weaving on a warp-weighted loom.
Loom Tools
Warp Weights: The warp-weights themselves are the most commonly found objects associated with weaving. Those that were created out of terra cotta or stone have survived conditions that destroyed the dried mud warp-weights and the wooden looms. Warp-weights are usually shaped as pyramids, or spheres, with a hole cut through the weight. This hole allows a cord to be strung through which attaches the weight to the warp threads.
Weaving Sword: The weaving sword is a flat, long tool that was put in the shed and pushed the weft up.
Shuttle: Also called a weft bobbin. The weft thread was passed through the shed using a weft bobbin. This is simply a bundle of thread with a "firm head." The "firm head" is formed by wrapping the thread around the weaver's hand and then looping it around itself to create a tightly bound, rather pointed ball of thread. A weft bobin is easier to pass through the shed than a simple ball of thread, or a loose clump would be.
Weaving Steps w/examples
- Hang and Separate the Warp Threads: The warp threads are the threads that hang down from the cloth bar across the top of the loom. For kirtles and the like, there are between 305 and 457 warp threads per foot. For cloth to sell, there are between 427 and 732 threads per foot. These are hung from the 'cloth bar'. The threads will alternate with one hanging straight down and the next laying across the 'shed rod' across the bottom of the loom. Once all of the threads are hanging, gather them at the bottom and use more string to hang the warp weights from the bottom. This keeps the warps hanging taut.
bondmaid hangs the warp threads from the cloth bar, separating them to hang every other one in front of the shed rod before gathering them at the bottom to string them to the warp weights, going through until every thread is grouped and weighted. - Attach the Heddle bar: The heddle bar is used to change the way the threads hang during the weaving. The threads hanging straight down are attached to the heddle bar and then the bar is set on the support bar until needed.
bondmaid attaches the threads in the back to the heddle bar and lays the bar on the upright as she turns to pick up the thread - Make the Shuttle/Weft Bobbin: This is easy. Just take the thread and make your hand into a 'pyramid' shape my putting all of your fingertips together. Then just take the thread and wrap it around and around your hand until you run out of thread. This will be put through the warp threads.
bondmaid picks up the thread and takes the end between her fingertips, wrapping the rest around and around her hand, not too tightly but not loose either, until she has wrapped all the thread into a kinda pointed ball - Pass the Weft Thread through the Warp Threads: The thread on the shuttle is the 'Weft'. It goes in an alternating over-under manner through the warp threads. Go in front of the threads in the back and then the threads in the front. Do this until you have made a complete pass through all of the warp threads.
bondmaid passes the shuttle through the warp threads, moving from left to right, alternating the threads to go in front of one, then the next, continuing until she makes it to the end of the warp threads. - Move the Heddle Bar to the hooks: Moving the heddle bar from against the uprights to the hook pulls the threads in the back to the front. This is necessary for the next step of the weaving.
bondmaid takes the heddle bar from against the uprights, pulling it back and setting it on the hooks, checking to make sure that the threads all came through. - Pass the Weft back through the Warp Threads: Again alternate front and back threads passing the shuttle back through the warp threads from right to left.
bondmaid passes the shuttle through the threads again, alternating each one as she makes her way from right to left through the threads. - Replace the Heddle Bar: take the heddle bar from the hooks and set it back down on the uprights, returning the warp threads to their original hanging position.
bondmaid lifts the heddle bar from the hooks and lets the threads fall back to hang straight down. - Repeat Steps: Just repeat steps 4, 5, 6, 7 over and over. There will end up being, for kirtle-cloth, between 213 and 274 'weft' threads per foot and for cloth to sell, between 335 and 366 threads per foot.
The cloth made this way is called va�m�l, or homespun cloth. In addition to being used to make the clothes around the Landfall, this cloth can be sold or traded. The cloth is measured by the ell. An ell is roughly equal to an ah-il in length, being about 18 inches square. The cloth is measured, for trade, by its equivalent amount of silver. 1 ounce of silver is equal to anywhere from 3 to 6 ells of va�m�l.