| Forepeak | Foc'sle | Head | Saloon | Galley | Rigging | Hull & Deck | New Projects | Pegasus LOG |
NEW or CONTINUING
PROJECTS
![]()
New
Water Tank
Posted
11/7/00
Rob Squire (Triton #96) showed me a water tank inspection plate he added so I decided to install a similar clean out access in the sole adding any flooring. Kind of "get all the dirty work done before" type of thing. What I saw after cutting the hole, I didn't like. Aside from 40 years of yuk on the bottom which I expected, there was also about 3 pounds of lead shot integrated with the mineral buildup.
The lead keel located in the forward section of the hull is held in place by several layers of FRP and looks just like the drawings. However at the lowest part of the water tank just behind the ballast there is another section with lead shot which I assume is the added ballast of West Coast Triton's. The only material covering the lead shot is a layer of resin which appears to be about 1 inch thick. Over the years, this small section of non reinforced resin had cracked and some of the lead shot came up while some of the water went down. In addition, a previous owner had cut an access to the keel in the head under the main beam then patched over it. What I found using the inspection hole and a mirror is that an aluminum brace between the floor and the keel had been inserted before patching over the cutout. I assume this allowed him to apply additional bracing for the mast while racing. This section of aluminum is now corroding. Sole & Bilge Tank Pictures
I felt I had 2 options; One would be to fix the existing tank by covering the lead with fiberglass reinforced resin and the second was to install a water tank in the berth similar to Triton's not having a bilge tank. To help me decide which option to take, I talked to the folks at TAP Plastics who gave me the same recommendation given to those traveling to Mexico: "enjoy yourself but don't drink the water." The bottom line was FRP is used for modern potable water tanks however, the resins are heavily covered with an FDA approved gel coat. Did AEROMARINE use an FDA approved gel coat over the resins 40 years ago? Did the FDA even know what resins were 40 years ago? Nobody knows.
I opted to install a water tank under the v-berth and cover the resin cracks with a product called COAT-IT reinforced with fiberglass A cloth. COAT-IT is a waterproof epoxy sealer that finds, fills & seals leaks and cracks.
After reviewing a number of tank sizes, shapes and manufactures (all of which seem to be in the $140 to $170 range) I located several tanks in excellent condition at Shipwreck Marine Salvage in Sacramento for $25 (what a deal ;-) They even allowed me to take a couple of different tank sizes and shapes to the boat to make sure one would fit before buying it. I selected a 21 gallon that slides under the v-berth like a glove just behind the small drawers and, I still have room for a 13 gallon holding tank in front of it (if I can handle the added weight that far forward.) Tank Installation Pictures.
![]()
V-Berth
Make Over #2
Posted
11/7/00
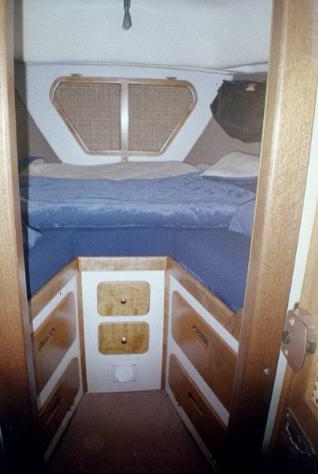 We tried using an insert over the drawers for a while and enjoyed the extra
room it provided however, we did not like crawling in and out through the
narrow entry way (especially in the middle of the night.) Also, we
did not like the loss of depth perception provided by the white bulkhead
when the insert was left in all the time. So, like everything else in a
sail boat, we compromised here and there and enlarged the bunk slightly
by moving the bulkhead (where the small drawers are installed) aft 7 inches.
This does not seem like a lot but the area covered is a trapezoid and is
greater than it appears. I then added vertical trim to enhance the
appearance of depth. The results were rewarded by a more roomy and
comfortable sleeping area without loosing the openness.
We tried using an insert over the drawers for a while and enjoyed the extra
room it provided however, we did not like crawling in and out through the
narrow entry way (especially in the middle of the night.) Also, we
did not like the loss of depth perception provided by the white bulkhead
when the insert was left in all the time. So, like everything else in a
sail boat, we compromised here and there and enlarged the bunk slightly
by moving the bulkhead (where the small drawers are installed) aft 7 inches.
This does not seem like a lot but the area covered is a trapezoid and is
greater than it appears. I then added vertical trim to enhance the
appearance of depth. The results were rewarded by a more roomy and
comfortable sleeping area without loosing the openness.
The sleeping bags were replaced with fart sack's (old Navy vernacular) made of polyester fleece for each cushions while the top sheet was made from nylon fleece. A comforter was cut to the shape of the v-berth for cover (fleece makes it very comfy and cozy ;-)
![]()
Rebuilding
The Atomic 4
Posted
5/20/02