Hull &
Deck

Some
Deck Work
New Window's
Building
Interior Window Frames
Bilge
Pump's
Building
& Installing a Propane Locker
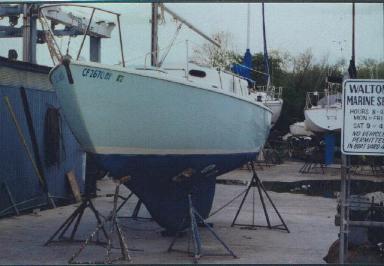
I motored Pegasus Walton's
Marine boat yard and had her hauled, power washed and set her on the racks.
Walton's is located across the slough from Owl Harbor Marina where Pegasus
is
slipped. I always marvel at the ability of a marine lift to move a sail
boat around like a toy (I know, compared to a 40 footer it is a toy) however,
it's still an awesome sight.
After the power wash, the crew
immediately went about marking a few smal blister spots while the Admiral
and I armed with comet cleanser, prepared to scrub the heavy oxidization
from the hull prior to polishing and waxing. Repair of 8 small blisters
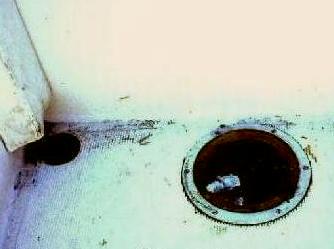
and the removal of 2 thru-hulls in the head was left to yard crew as well
as the application of new bottom paint.
Two months into the Pegasus
Project
(no work was performed in December '97 or January '98) I took time to request
an insurance quote from Boat/U.S. Because of Pegasus's age
they needed an out of the water survey. The timing could not have
been better. I contacted a local surveyor with good recommendations
and approved by Boat/U.S., who was able to squeeze me into his schedule.
My renovation to date met or
exceeded marine standards but there were some areas the surveyor identified
that required correction (see Rigging.)

Some
Deck Work
I knew when I purchased Pegasus
that she would never look 40 years younger but, with work and time her
appearance could be improved. Reconstructive surgery would include a new
inspection plate in the cockpit sole, a couple of temporary lazaret hatch's
to help stop the leaking, the removal of a tin can from the cabin top and
replacing all the plastic port lights just to mention a few.
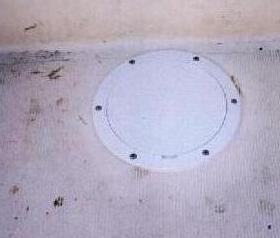
The inspection plate in the
cockpit sole was not a major problem. The current clear plate (cracked
& leaky) actually reaches the maximum dimensions possible without
cutting into the fuel tank so I installed a plate of similar size. Next
I have to figure out how to make the cockpit sole look presentable.
New Window's
Five of the 6 bronze framed port
lights and the 4 large main cabin windows are made of acrylic (1/4 inch
for port lights and 3/8 inch for the windows) and were so badly damaged
by UV that it was/is difficult to see out on a sunny day.
The Admiral and I replaced
the 5 acrylic port lights with 3/8 inch dark bronze acrylic. Cadillac Plastic
and Chemical Company in Coppell, Texas that had one sheet at their Chicago
facilities. They not only had what I was looking for, they cut it
into 4 oblong sections that met the outside diameter of my windows.
All I had to do was cut to shape, rout and finish the edges.
Building
Interior Window Frames
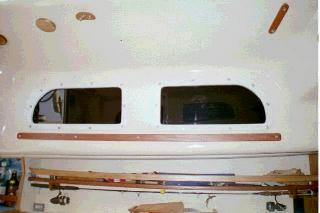 West Coast Tritons do not frame their large windows. They are bolt on's
so I decided to hide the cabin/liner joint by building wooden
frames coated with polyester resin. Then painted using the same mildew
paint used throughout the boat. I built the frames so they extended
3/8 of an inch beyond the liner; the liner sets 1/2 inch away from
the frame; I then installed a 3/8" x 1/2" white foam weather stripping
around the inside edge of the frame and attached it using the same nuts
and bolts used to secure the windows. Acorn nuts to finish off each
bolt cost $.75 a nut so I used nylon lock nuts and finished the face with
silver silicon caulking.
West Coast Tritons do not frame their large windows. They are bolt on's
so I decided to hide the cabin/liner joint by building wooden
frames coated with polyester resin. Then painted using the same mildew
paint used throughout the boat. I built the frames so they extended
3/8 of an inch beyond the liner; the liner sets 1/2 inch away from
the frame; I then installed a 3/8" x 1/2" white foam weather stripping
around the inside edge of the frame and attached it using the same nuts
and bolts used to secure the windows. Acorn nuts to finish off each
bolt cost $.75 a nut so I used nylon lock nuts and finished the face with
silver silicon caulking.
Bilge
Pumps
A couple times a year, I like
to flood the bilge with a mixture of Simple Green and water and let it
sit overnight. The process keeps the bilge smelling fresh and, allows
me to check the operation of the bilge pumps. The 12VDC pump is a
Rule Automatic, 500 GPH who's duty it is to clear the bilge of ice box
melt, stuffing box drips, etc. 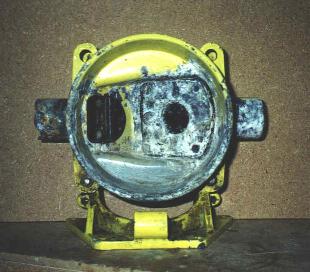 The manual pump is a Gusher 10 advertised as "A robust bilge pump with
a worldwide reputation for efficiency and reliability. Constructed
of die-cast, epoxy coated, anodized alloy, synthetic rubber and stainless
steel." Although the advertisement is filled with neat words, the
pump was always marginal and failed to operate at the last bilge cleaning.
The die-cast, epoxy coated, anodized alloy broke down and corrosion set
in leaving a heavy coat of wet, white mush plugging the valves.
The manual pump is a Gusher 10 advertised as "A robust bilge pump with
a worldwide reputation for efficiency and reliability. Constructed
of die-cast, epoxy coated, anodized alloy, synthetic rubber and stainless
steel." Although the advertisement is filled with neat words, the
pump was always marginal and failed to operate at the last bilge cleaning.
The die-cast, epoxy coated, anodized alloy broke down and corrosion set
in leaving a heavy coat of wet, white mush plugging the valves.
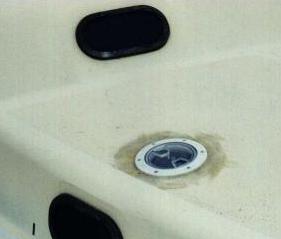
I replaced all the neat words
with a Guzzler 500 Thru-deck made of Delrin (A friend showed me the importance
of a thru-deck manual bilge pumps this year by not having one when it was
needed most ;-) Although the advertised flow rate for the Guzzler
is 15 GPM vs 22 advertised for the Gusher 10, it should prove adequate
and I have more confidence with items made of synthetic material if they
live in or near the water (and it was $200 cheaper :-)
Building
& Installing A Propane Locker
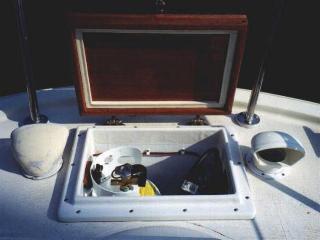
My original idea was to locate
propane locker under the fantail and have it slide out for access and service
however, the tiller would not allow it. So, I built a locker that
can be accessed from the top and hold a 5 pound tank plus a couple of 1
pound bottles for the BBQ. 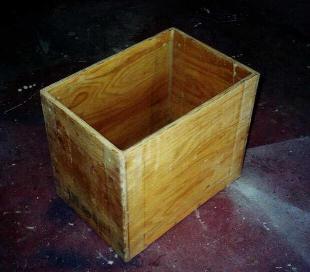 I built the basic box using 1/2" ply for the sides and 3/4" ply for the
bottom. The box was glassed inside and out plus taped on all seams
without a lot of concern about the final appearance (it will not be visible
once installed.) To support the locker when installed on top of the
fantail, I added a collar around the locker using clear fir and secured
it to the box with with #10 SS screws.
I built the basic box using 1/2" ply for the sides and 3/4" ply for the
bottom. The box was glassed inside and out plus taped on all seams
without a lot of concern about the final appearance (it will not be visible
once installed.) To support the locker when installed on top of the
fantail, I added a collar around the locker using clear fir and secured
it to the box with with #10 SS screws. 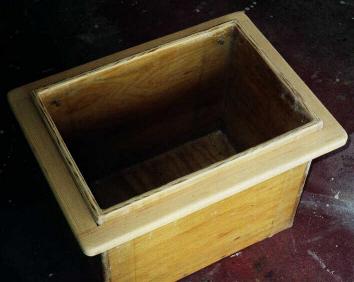 Once
the collar was secured to the locker I routed the outside corners then
beveled the inside corners using thickened epoxy. Another layer of
glass covers the entire upper portion of the locker/collar so it essentially
becomes one piece. Fourteen pre drilled, countersunk and epoxy coated
holes were placed around the collar to accept #10 SS fasteners.
Once
the collar was secured to the locker I routed the outside corners then
beveled the inside corners using thickened epoxy. Another layer of
glass covers the entire upper portion of the locker/collar so it essentially
becomes one piece. Fourteen pre drilled, countersunk and epoxy coated
holes were placed around the collar to accept #10 SS fasteners.
The upper portion of the locker
and inside the box was primed with AWLGRIP two part primer. The finish
coat was applied to just the collar area using Interlux two part paint
left over from the mast project. My plan was to paint the inside
with Zolotone however, that would cost more than the entire box ;-) 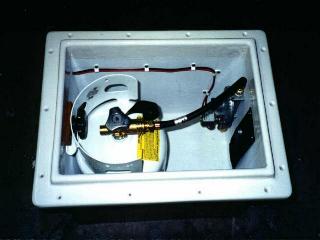
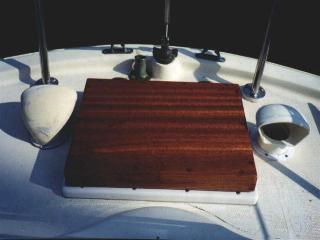
The hatch lid was made from
mahogany using simple butt joint that was glued and screwed with #8 SS
screws, recessed, plugged, sanded and varnished (8 coats.) For emergency
venting, a 1/2 inch hose is connected to the bottom of the locker to a
1/2 bronze through hull. High pressure propane travels through a
POL pigtail to the regulator where it is reduced to .5 psi and is prevented
from going any further by a low pressure solenoid valve wired to the control
panel in the cabin. I also installed a red light on the bulkhead
over the stove to indicate if the gas is on or off. I used the locker
lid the first night after installation to set my portable stove on while
I cooked dinner (it was too hot to cook in the cabin :-) The lid was later
covered with Sunbrella.
The finished product