| Forepeak | Foc'sle | Head | Saloon | Galley | Rigging | Hull & Deck | New Projects | Pegasus LOG |
Galley
By April
1998, we reached the point on Pegasus's renovation where we could work
a day
and sail a day. By June we could work a day, fish a day and
cruise a week
resulting
in several trips to San Francisco Bay. Its all about priorities.
Work
not accomplished in favor of sailing, is time well spent!
![]()
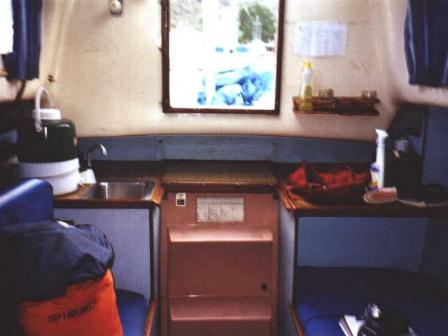 Like most pocket cruisers the galley of a Triton competes for cabin space.
Pegasus's
galley was original when purchased and consisted of a sink with a hand
pump, icebox and a portable alcohol stove. Functional but hardly
what you would consider a well found galley.
Like most pocket cruisers the galley of a Triton competes for cabin space.
Pegasus's
galley was original when purchased and consisted of a sink with a hand
pump, icebox and a portable alcohol stove. Functional but hardly
what you would consider a well found galley.
So, as many did before us, we added, subtracted, altered and mutilated Carl's little ship wherever necessary to give Pegasus a galley that incorporates the amenities and aesthetics that we find warm, comfortable and functional. I guess that's what personalizing a boat is all about and I'm sure Carl would support any change that encouraged the owners to spend more time sailing.
![]()
Building a Galley
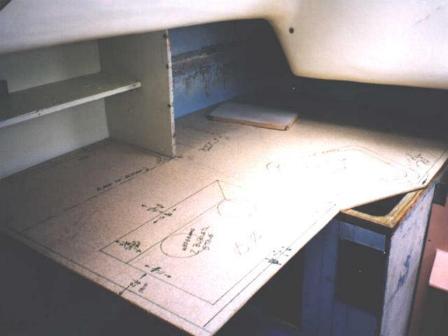 I shortened the starboard settee (remember, this is a 2 person boat) to
increase counter space and make room for a permanent stove and easy access
food stowage. I used particle board templets and built mockups of
the changes to better visualize the room needed and determine if the space
remaining would be adequate and comfortable. I then took the templets
home to build the fixture. Final trimming and fitting was done at
the boat. The shortened starboard settee would also have to provide
for a "convertible" fourth berth in the event I decided in
the future to certify
Pegasus
for racing. TODSF by-laws
I shortened the starboard settee (remember, this is a 2 person boat) to
increase counter space and make room for a permanent stove and easy access
food stowage. I used particle board templets and built mockups of
the changes to better visualize the room needed and determine if the space
remaining would be adequate and comfortable. I then took the templets
home to build the fixture. Final trimming and fitting was done at
the boat. The shortened starboard settee would also have to provide
for a "convertible" fourth berth in the event I decided in
the future to certify
Pegasus
for racing. TODSF by-laws
governing racing certification
requires that a Triton have four berths.
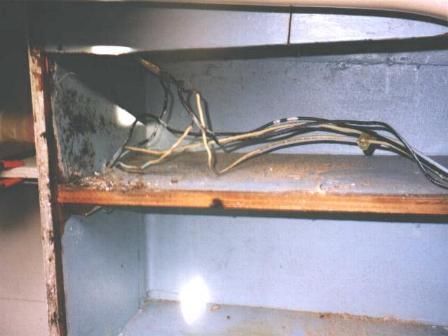 I also removed the starboard and port cupboards above the counter tops.
Original wire used in Pegasus was solid copper like that used in
houses so I rewired as I went with a multi-strand tinned wire. I
also installed a fuse panel for all DC circuits.
I also removed the starboard and port cupboards above the counter tops.
Original wire used in Pegasus was solid copper like that used in
houses so I rewired as I went with a multi-strand tinned wire. I
also installed a fuse panel for all DC circuits.
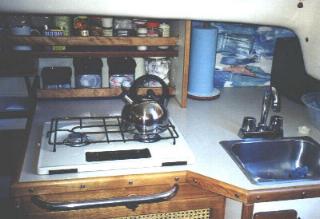 As in the foc'sle, I removed the water dam fiddles on the ceiling shelves
and replaced them with the teak fiddles originally used to trim the bunks.
With the counter top installed, a SS sink I found for $3.00 in a wreaked
motor home at an auto salvage yard was also installed along with a Bar
faucet. A pressurized water system complete with filter completed
the project. A hand pump type faucet will also be installed at some
point for emergency use.
As in the foc'sle, I removed the water dam fiddles on the ceiling shelves
and replaced them with the teak fiddles originally used to trim the bunks.
With the counter top installed, a SS sink I found for $3.00 in a wreaked
motor home at an auto salvage yard was also installed along with a Bar
faucet. A pressurized water system complete with filter completed
the project. A hand pump type faucet will also be installed at some
point for emergency use. 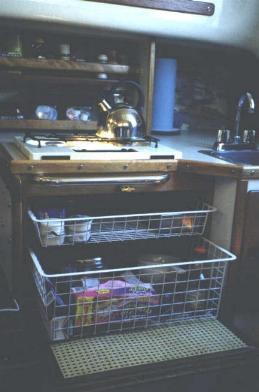 A hatch covering the added stowage area was built from birch and covered
with cane to maximize ventilation. Wire drawers were installed to
keep everything organized and well ventilated.
A hatch covering the added stowage area was built from birch and covered
with cane to maximize ventilation. Wire drawers were installed to
keep everything organized and well ventilated.
After searching through many used nautical supply houses for an old 2 burner drop-in stove top that fit our dimensions I gave up and purchased a porcelain stove from a local RV supply store. I have seen porcelain stoves on boats older than Triton's and the color (Almond) matches the rest of the interior. Because Pegasus is kept in fresh water and moderate climate, corrosion should be minimal and easy to control. I have used these stove tops in the past without problems. Why propane? Alcohol fumes give me a head ache and butane does not burn well in our cold but sailable winters. If it did I would continue to use the little one burner butane Mr. Stove I had been using. Its small, easy to stow and cooks very well in warm weather (in fact I keep it aboard for cooking outside or ashore.)
Our propane locker holds a 5 pound tank plus a couple of 1 pound bottles for the BBQ which is adequate for our cruising and cooking life style. See Deck & Hull for information on how I built and installed my propane locker.
![]()
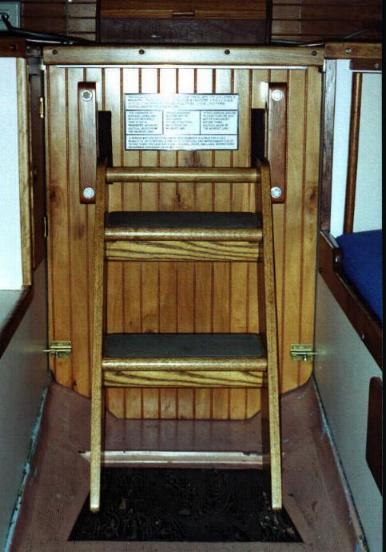 The
last object discarded was the combination FRP engine cover and ladder to
the cockpit. It was functional but not aesthetically pleasing in
pink. I built a new ladder using white ash and attached it to a new
engine cover of beaded birch laminated to 3/4 inch ply.
The
last object discarded was the combination FRP engine cover and ladder to
the cockpit. It was functional but not aesthetically pleasing in
pink. I built a new ladder using white ash and attached it to a new
engine cover of beaded birch laminated to 3/4 inch ply.
Most of my projects seem to
require 2 or 3 additional actions for each action initiated. Kind
of like 2 steps back for every 1 step forward. An example of this
occurred when I removed the counter top over the icebox to make ready for
the new one. I found that the insulation used was the 1960 hairy
type house insulation popular in attics. The only proper course of
action was to remove the box and upgrade the insulation.
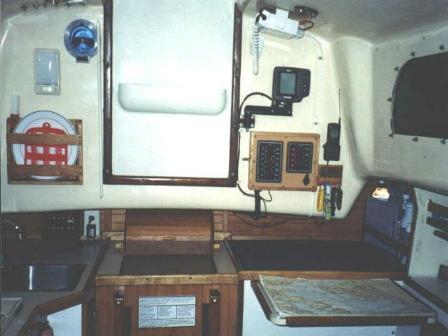 Last but not least, is a fold down extension to the port side counter top.
It adds extra counter space when needed and an excellent table when eating
alone. However, it was installed for use as a miniature chart table.
I prefer to have small copies of my charts in the cockpit where I can refer
to them while cruising and have a larger version inside for ready reference
of the big picture. The chart table was designed to hold the size
Chart Book's that I most often use while sailing. A plastic 2 inch
pony clamp secures the chart Book to the table while underway.
Last but not least, is a fold down extension to the port side counter top.
It adds extra counter space when needed and an excellent table when eating
alone. However, it was installed for use as a miniature chart table.
I prefer to have small copies of my charts in the cockpit where I can refer
to them while cruising and have a larger version inside for ready reference
of the big picture. The chart table was designed to hold the size
Chart Book's that I most often use while sailing. A plastic 2 inch
pony clamp secures the chart Book to the table while underway.
![]()
AC Power Panel
 Pegasus's minimal AC requirements could be handled with one 15 amp, DPST
circuit breaker however, like most things I design, my power panel got
a little over built ;-) Actually, I got a super deal on some miniature
panel mount circuit breakers so I installed a 20 amp DPST for the Main
breaker which disconnects both the hot and neutral leads coming into the
panel from the shore source. Both lines are kept isolated in the
event the supply was wired incorrectly (also keeps keeps ABYC happy).
For the individual circuit breakers, I used one 15 amp SPST for the hot
water heater, one 15 amp SPST for 3 AC electrical outlets, one 2.5 amp
SPST for a battery charger and one 10 amp SPST (not connected to anything)
as a spare.
Pegasus's minimal AC requirements could be handled with one 15 amp, DPST
circuit breaker however, like most things I design, my power panel got
a little over built ;-) Actually, I got a super deal on some miniature
panel mount circuit breakers so I installed a 20 amp DPST for the Main
breaker which disconnects both the hot and neutral leads coming into the
panel from the shore source. Both lines are kept isolated in the
event the supply was wired incorrectly (also keeps keeps ABYC happy).
For the individual circuit breakers, I used one 15 amp SPST for the hot
water heater, one 15 amp SPST for 3 AC electrical outlets, one 2.5 amp
SPST for a battery charger and one 10 amp SPST (not connected to anything)
as a spare.  Not wanting the power panel connected to anything else, I built it in its
own steel container (4"d x 5"h x 7"w) and bolted it to the bulkhead under
the bridge deck on the starboard side of the engine box. Its handy,
easy to switch on and off and out of the way. All AC wiring was done
with #12 AWG Ancor from the shore source to the individual breakers and
#14 AWG from the circuit breakers to the 3 circuits currently being used.
A wire bundle exiting the back of the panel was led through the bulkhead
to a moisture proof junction box in the starboard lazerate where all connections
are made to the various circuits. The entire panel was built,
wired and checked out at home before installation on the boat.
Not wanting the power panel connected to anything else, I built it in its
own steel container (4"d x 5"h x 7"w) and bolted it to the bulkhead under
the bridge deck on the starboard side of the engine box. Its handy,
easy to switch on and off and out of the way. All AC wiring was done
with #12 AWG Ancor from the shore source to the individual breakers and
#14 AWG from the circuit breakers to the 3 circuits currently being used.
A wire bundle exiting the back of the panel was led through the bulkhead
to a moisture proof junction box in the starboard lazerate where all connections
are made to the various circuits. The entire panel was built,
wired and checked out at home before installation on the boat.